Dive PlanesA frustrating situation causes delays whilst I figure out ways around the dilemma.
I know how to achieve what I want with these control surface fittings, and even served a five year apprenticeship as a toolmaker, but not having access to a lathe, milling machine, or decent bench pillar drill negates everything I knew. I am constrained to improvise a solution using basic hand tools.
Two inch long 5/16 dia solid brass bars with grub screws would be far too heavy.
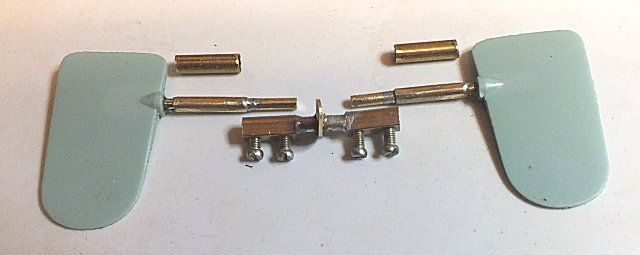
So donning the Bagpuss Thinking Cap I eventually formed a solution I could produce with the tools I have. For the present I am utilising the resin cast planes with 3/32 brass rods. The rods on them are too short for my purpose, so I extended them with K&S 3/32 rod and a 1/8 O/D sleeve, both soldered. A short section of the next size up K&S tube forms the hull bearing.
Now the natty bit. Cutting up a small terminal block I have a brass block with two screws to clamp the extended rod. The other end of the block was drilled 2 mm deep to suit 5/32 tube, and soldered to the tube.
Hurrah for Carrs 188 solder paint, less heating and solder only goes where you paint it.
Finally, a brass actuator arm soldered to the central tube. Total weight including planes 11 gm, and dismountable for servicing by just undoing the screws
The above was assembled into the hull, securing the bearings with epoxy.
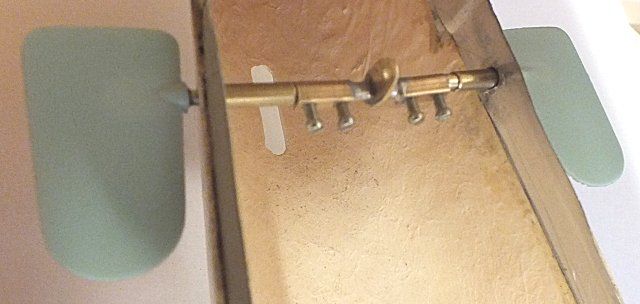
Very restricted space, so the soldering had to be accurate.
Next is the pair of aft dive planes, in an even narrower section of hull. I had to adapt the above method so the rods meet in the middle with half circle flats, using a single larger terminal block to clamp both rods together. Brass actuator arm solder to end of terminal block.
Pictures of that later, plus the relatively more simple rudder mounting and arm.


 Author
Topic: Resurrecting the K Class (Read 28560 times)
Author
Topic: Resurrecting the K Class (Read 28560 times)