|
Hydrafibe - PREDATOR |
|
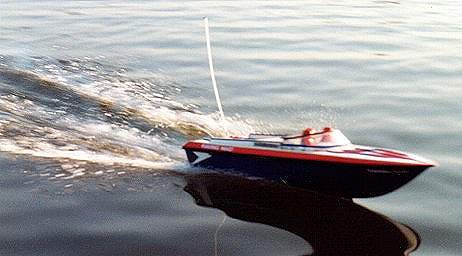
Hydrafibe PREDATOR - www.mayflower-models.co.uk/ Running Name ...RAVING MAD! Semi-scale deep Vee offshore racing power boat for 6.5cc engine. Also required!.... (Engine, optional better running gear, radio box, fuel tank) + radio. |
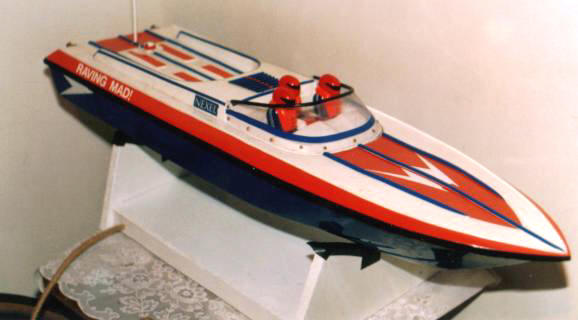 AIMS At the time of building this boat I was still sulking from my limited of success with my LASER and SHADOW boats and I became very determined to build a successful a fast semi-scale IC sports boat, preferably of the offshore variety. I set about looking for a new kit and came across a very old advert in Model Boats which read "Are you fed up with running Multi-Hulls that look as attractive as a plank of wood, just so that you can compete in your clubs competitions?" Very shortly I was examining a brand new Hydrafibe PREDATOR on my work bench. The first thing I had decided on was a change of name form PREDATOR (very aggressive) to RAVING MAD (silly and friendly), the name came from a fictitious character on Steve Wright's BBC radio show. |
|
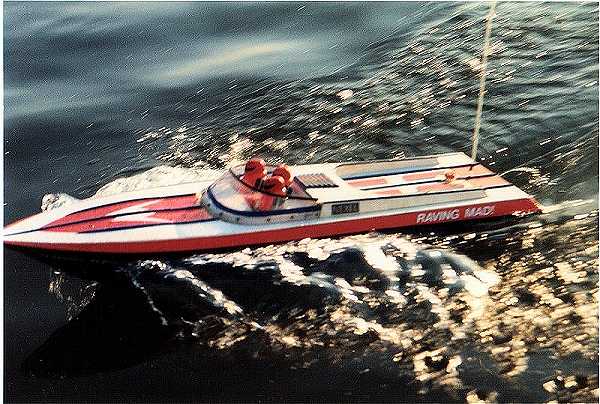
STYLING This is a great looking boat with a classic long deep Vee hull, sharp bow and three crew figures concentrating on race tactics. The style of boat is taken from boats still raced offshore all around the world. The model is simple, well designed and can win races straight from the box if you install a good engine and running gear PLUS it looks far better than any multi boat I've ever seen! |
|
THE MODEL My hull was royal blue with a white deck, ( the deck didn't have a particularly great finish ). It measures 845 x 265mm. First job on opening the kit box is to check the hull for flatness along the keel, my hull was as flat as the ruler and all the way up the sides, well done Hydrafibe. The hull, deck and crew figures are GRP but the instruction say the hatch is made from ABS, if it is, it's not anything like the ABS that I've ever seen, I'm sure it's GRP but what do I know? The boat size best suits a 6.5cc engine but the manufactures say anything between 3.5 - 6.5cc can be fitted. I reckon it could handle a very hot 6.5cc engine and tuned pipe setup but if you wanted to fit a gearbox it would be a tight squeeze. The boat can be built with electric motors such as one of the big Graupner motors e.g. 800BB etc. but I doubt weather it would be a half as good as with an IC engine. |
|
The instructions are not all that brilliant and assume you know about building model boats already, but if you are a keen first time modeller you should be able to put the kit together. Construction should only take a couple weeks of spare time. A full size plan is always a help but you don't get one, just a few out-of-scale drawings and a page of written instructions. Glues recommended are Isopon and 'Easybuild' for bedding things down such as the engine mount and GRP resin to join things together. Easybuild is good stuff for use in building fibreglass models is available from multi boat manufactures. It consists of resin with glass fibre strands in it, it's used like putty and sets into a lump of solid fibre glass. Can you still get Easybuild? ( Easybuild was a polyester resin with very fine strands of glass fibre in it and the consistency of toothpaste. ) |
|
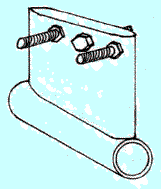
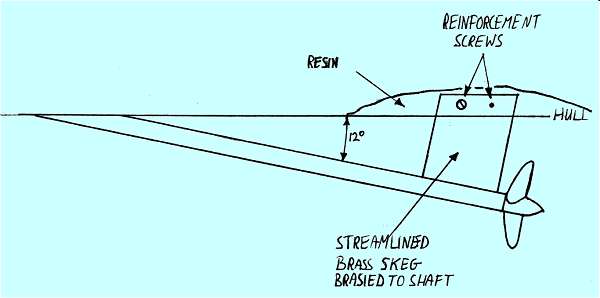
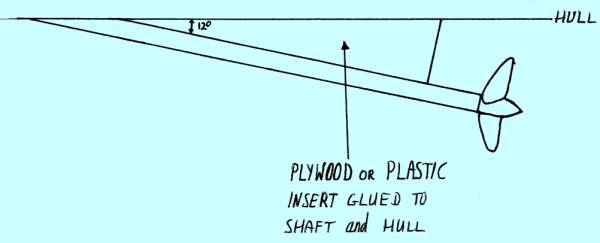
KIT BITS I must say here that I bought my kit in the early Nineties so it may be different now. The hull ( not so much so, the deck) are of a high standard but I felt that the other parts included badly let the kit down. The shaft that came with my kit has plastic bearings?!?! Plastic bearing wear tend to wear metal shafts quickly, so throw it away and buy one with brass or bronze bearings, or make bearings up for the kits shaft if you have the means. The boat will require a good strong shaft so use a 2 BA shaft of stainless steel and install a skeg. The kit doesn't come with a skeg so you'll need to make or buy, I found a good stainless-steel one that fitted over the shaft tube perfectly, sorry I don't know the make. A skeg can be made by brazing on a shaped piece of brass to the stern end of the tube or using a home made plastic or ply insert but the former is stronger . I used screws in the top of the skeg to give something extra for the fibre glass resin to hold on to. The rudder also needs replacing as it is a soft soldered brass one and is not man enough for the job. Make or buy one from EMC, Prestwich, SHG, Racing Models etc, all of which are made in stainless steel and brazed together. |
|
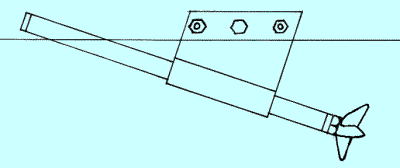
SKEG holds the shaft in places and stops vibration. |
|
|
|
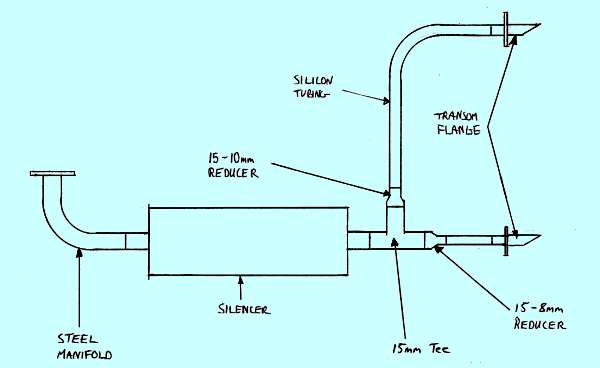
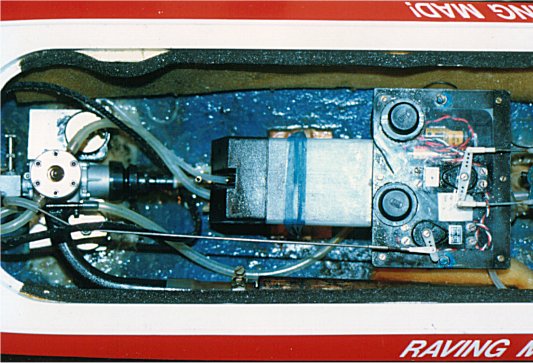
For motive power, I would be using another OS 40FSR, same as I used in the SHG LASER. As I wasn't planning to race the boat I would use a in-line silencer instead of a tuned pipe. The silencer was made by 'SoMoSo' of Southampton. This is a good silencer and runs very quietly without much loss of engine power. ( I did have a different silencer fitted for the first run but was thrown of the lake for causing noise pollution. It was an unlabeled brand so I can't tell you the make but I've seen them in different model shops so be careful, some silencers are not that good! An effective silencer should not let any light through when you look through the ends.) The manifold would be a commercial steel one with water cooling. I planned a twin exhaust outlet which required a little extra plumbing. More below. |
|
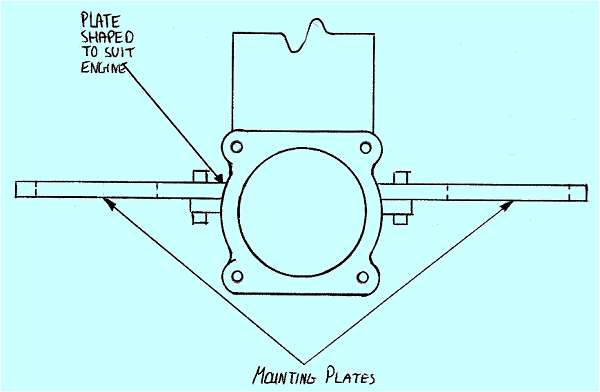
ENGINE MOUNT For the engine mounts, I used SHG rubber engine mounts on two previous boats no problems, 'if it an't broke, don't fix it!'. I like these mounts because the whole engine can be quickly removed with the release of just two nuts. I slightly modified the way it was used in order to reduce the drive line angle, fixing the plates over the engine lugs instead of under. |
|
|
|
|
|
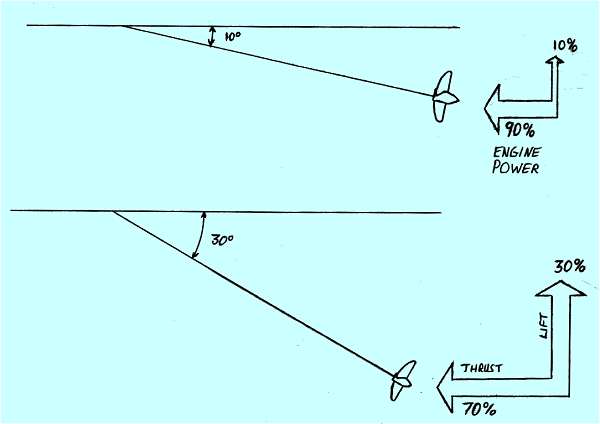
The engine was installed and aligned up the shaft. As with all model boats, spend lots and lots of time setting up the engine / shaft alignment. Keep the engine mounted as low as practical ( remember to leave room for the starting belt under the flywheel.) The more horizontal the prop shaft is the more forward thrust it will produce as opposed to lift, see below.) Don't attempt install the running gear piece by piece, assemble the engine, mount, coupling and shaft together and work with it as a unit so that when you glue it in it will set aligned. Cut out a piece of card to an angle of 12°. At this shaft angle my boat runs at a perfect attitude without extra ballast or trim tabs. The shaft angle is the most important measurement in the boat. The balance point on my boat was 300mm from the transom. |
|
One of the best types of engine / shaft couplings are made with a central rubber section fitted with short studding, to these are screwed short of hexagon section steel. Different size threads in the steel bushes cater for different engine and shaft threads. This type of coupling can cope with a limited amount shaft movement, reduce noise and save wear on engine bearings, I bought one from Red Baron Models nor Hobbystores Enfield. ( for more on engines, mounts & couplings see Technical. ) |
|
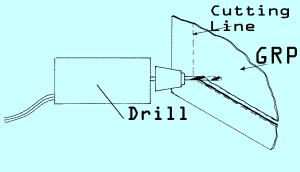
AND SO TO WORK Quite a bit of cutting out and trimming is required to the hull and deck - this will cover everything in the house with dust so wait until the Lady of the house has just done the vacuuming for the best effect! I used a small drill and bit again to cut the large sections of GRP, to take the dust out, a 540 motor was fitted with a propeller sat on the window ledge to pull the dusty air out. Fix the motor down some how else it'll fall off the ledge and try to bite you when you've got your back is turned ( I've now bought a clip on oscillating fan... bit once too often!) Once you've finished cutting and filling, go and have a bath and dream of owning or driving a real offshore power boat and all the sycophant clad scantily chicks that love to hang around as they used to in Miami Vice and Baywatch! |
|
|
|
|
| Twin exhaust outlets required the fabrication of a 'Y' splitter made from brass tubing you buy from model shops, K & S. This lasted for almost a full minute before blowing apart! I then used a copper 15mm Tee junction available in DIY shops. I fitted a reducer to the closest outlet equal the pressures somewhat between the two (fig d), as it turns out this was a pretty good guess. The fittings are piped with Silicon tubing and the joints are held with Aradite or silicon sealant. The silencer is held in place by 'Terry' clips |
|
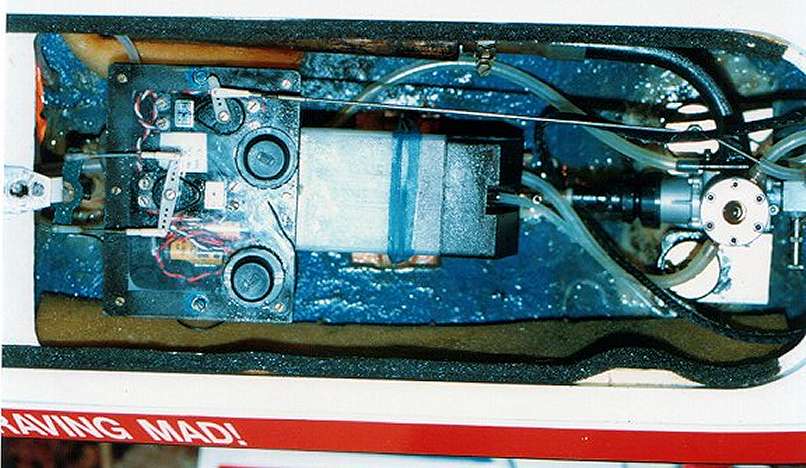
A large black 'SLEC' tank was fitted in front of the radio box on a small ply platform and held down with rubber strapping. The water feed and auto-bailer tubes run in the gap under the ply. The positions of the water pick-up and shaft etc. are marked on the plans but make sure your layout will not foul anything or each other. The water comes in from the pick-up to the manifold then to the cylinder head and overboard at the transom. Use heavy grade silicon tubing as it doesn't kink and is harder to squash flat causing blockages. I also fitted an auto-bailer behind the rudder to pull out any bilge water. ( See SHG Laser for more details ) |
|
|
|
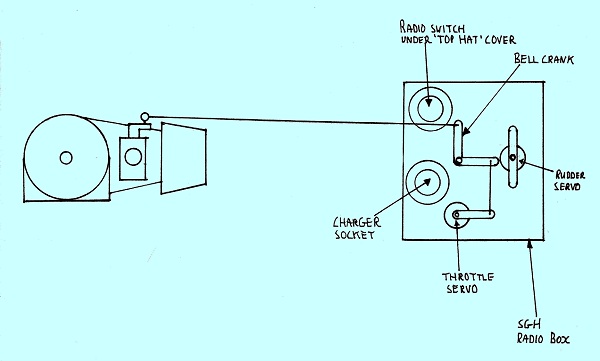
A SHG watertight radio box was then fitted. The box is designed to fully enclose the servos but mine protrude over the top cover to make for easy adjustment to linkages and box removal. The servos are held in place against the top cover with 6BA bolts, nuts and spacers similar to my previous SHG SHADOW and LASER. I striped down the servos and applied extra Silicon grease in the gearboxes and sealed to the radio box with silicon sealant. Two other holes are required for the radio switch and charge socket, these are made watertight with the 'top hat' covers supplied with the radio box kit. A ply base was cut and put centrally in the hull just in front of the water pick up. The two mounts for the radio box are fitted up through the ply with screws and then the ply is fitted down to the hull with Isopon. Waterproof the ply first. The radio box has not leaked any water and I recommended them. Double tiller arms are used to reduce the strain on the rudder servo, pull-pull links. With about 1hp going pass the rudder it's as well to keep this power under full control, with two links you'll have a better chance even if one link fails. My first attempt at the throttle link was a bit 'iffy' using a plastic snake, this was soon replaced with a very heavy gauge piano wire direct link. Heat the wire to red hot and allow to air cool before bending the wire. A note on radio switches before we go on. When fitting a radio switch make them obvious which way is ON so it's easy to check just before you throw the boat in the drink! I always orientate the switch so that the radio is on when flicked or slid aft, it looks as if it has been swept back as the boat is moving forward, like the aerial.... |
|
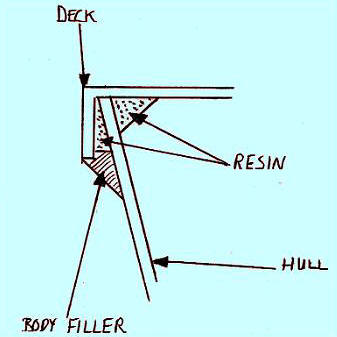
DECK JOINT The deck and hatch produced the usual amount of hard work as all GRP boats do. First job is to get the deck flat to a depth of 8mm, this will take ages to right. Check the height on a good flat surface, the diner table is good especially if it's highly polished! Get a good finish because this edge will show forever. Finish the hull of to a flat finish also. Ensure all the internal fittings are all OK, shape the front bulkhead to a good fit with the deck in place. Now you're ready to fit the deck, have fun! Once you have run several small amounts of resin around the inside of the hull / deck joint, very carefully run resin around the outside gap and finish off to a showroom finish with a nice smooth fillet using Isopon (fig e). A side point here, when fitting the front bulkhead with fibreglass and matting be careful not to make a loose fit else when the resin set it shrinks pulling everything together. If a gap exists between the bulkhead hull the hull will pull on the sides to take up the slack. I filled the front compartment with plumber foam for buoyancy, as also used my SHG SHADOW, I didn't leave enough time for the foam to stop expanding and ended up with a slightly bulging deck... again! |
|
|
|
THE HATCH The deck opening is nice and big, no working on the engine with tweezers here. I didn't fix the supplied hatch fastener to the rear deck as indicated on the plans as it would have interfered with the rudder post, so the catch was transferred to the hatch. The rear deck also needs to be strengthen to prevent it cracking around the catch, a piece of ply should do. Cut to size, drill the holes, waterproof it, use resin or Isopon to stick it and hold in place with clothes pegs. The hatch was reinforced to support the catch. The hatch itself is an interesting feature. The kit comes with a piece of heave ply that was the shape of the hatch but too big to fit inside and too small to fit the deck hole. I think it's meant to fit inside the hatch with cut-outs made for the vents and fastener but I didn't fancy shaving down that much wood and so didn't use it, I applied some plumbers foam to the underside and cut it off level. The crew figures are a tricky cutting job. To get the body shoulder to reasonable proportions means having long heads! Correct size helmets means anorexic bodies, so a compromise has to be reached. As you can see I settled for the optional long Alien heads. Fix down the figures well because they are going to be bashed around. I riveted the men down to the deck with pop riveted sandwiched over rubber servo seats. The rubber allows slight movement in case the do men receive any knocks. Paint the men before fitting. A foam strip was fitted was fitted around the opening to stop the hatch rattling but after a lot of use this gets all oily and disgusting and was subsequently removed as the hatch didn't rattle anyway. |
|
|
|
I nicked a rear louver type shade off a Porsche radio control car of some kid in the street that wasn't looking. "This will make a great intake vent!" I said while running off back home and so it does. A suitable hole was cut behind the cockpit and the louver fixed down with Stabilit express. This is the only vent I made but another vent would be advisable for cooling but not vital as my engine and manifold are well cooled via the water system. For real racing it would be better to fit intake vents based on real boats that separate air from the water. One type are NACA air-entrance ducts which force the air to bend faster than the water can so that the water flies over the duct entrance. You can see these duct on anything from the space shuttle to formula one racing cars. |
|
|
|
FINISHING OFF With the offer of dinner with good wine, Brian, my friendly silk screen printer and stencil cutter came round for the evening and did the 'striping' job on the "RAVING MAD". There are various trim materials available on the market these days, especially durable is anything made for real cars. Brian had a machine at work that cuts out different style and sizes of lettering on which he all the lettering was produced. RAVING MAD took about 48 hours work to complete and ready her for the water. |
|
ALMOST SAILING Last jobs were, fit a 50mm plastic propeller, recheck the radio, polish the boat and seal up tank vents to prevent spillage. She ( "She" because once a boat is finished she now has a personality - sad creatures us men! ), was ready for a trip down to the lake for her maiden voyage. Jason (my friend that's 9ft tall), was asked (at gun point) if he wanted to come down the lake for the launch of 'RAVING MAD'. This was the first run of this engine and so it would need a tank or two of fuel to run it in. After a few seconds pulling on the starter the engine burst into life. The engine ran for about 20 seconds, revved up to scream and stopped dead. "??!!??" Try again, same thing. "Is the fuel line OK?"- Yes. "Filter OK!" - Clear. "Exhaust?" - Clear. "Start her up with the needle open one turn more." She revved into life spluttered, coughed and died. It did the same no matter what we did. "OK lets refill the tank with fuel from a different container." I took off the small loop if silicon I had put across the two top inlet feeds to the tank and that's when it hit me!. When the engine sucked out as much fuel as it could, a vacuum formed in the tank and sucked the fuel back up the feed line with the effect of leaning the engine right out ( the scream ) and then not supplying any fuel ( engine stops! ) I left the vents open this time and soon had the engine purring like a cat, well a very loud cat.
Once the engine was bedded in it was time for
the first run. The boat and I got into the water and she was faced into my shins and
the carburettor needle adjusted for a steady acceleration from tick over to 3/4 throttle and
then opened the needle up an extra quarter turn, the extra turn will
make the engine run rich thus allowing lots of oil to splash around all
parts of the engine. Later under normal running conditions, the
engine should be tuned to quicker throttle response. A few
slow runs up an down the lake and everything seemed fine, she was
ploughing through the wash but the engine was working OK and the boat
ran in a dead straight line on an even keel without any adjustments. I
was very proud like all new fathers are and the twin exhaust really do
look the great.
|
|
|
|
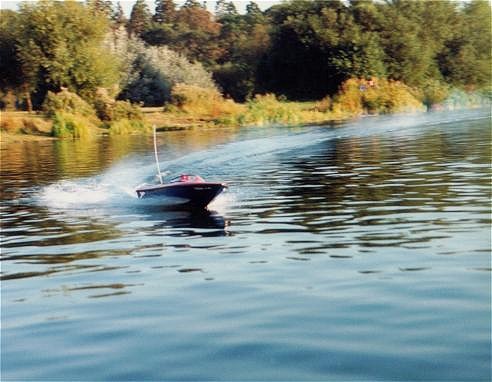
She ran with the stern part of the hull parallel with the surface, so the deck rides at a nose up attitude as it should do. It ran very well and I was soon adjusting the needle and changing the prop to attain maximum speed. Maximum speed was good and comparable to a slower 'multi' boat of the same class. I really liked this boat. It did what it was told and I found no handling vices at all. It could turn very tight turns at high speeds and the transition from low to fast speed was most impressive. It raises itself upwards out of the water and hurls forwards when coming onto the plane and settles down back into the water, like it's relaxing, when throttled back. After two hours running, we went home and I was well pleased. The next day I was back down the lake with more fuel and with the batteries recharged over night. I was soon thrown off the lake because my boat sounded too loud. I said "But it looks so good and run really well!" I protested. Nothing doing. I went out and got a "SoMoSo" silencer and was running on the lake again by the next weekend. I soon found that the best propeller was a Graupner plastic X42.5 or X45. I've bought dozens of glass filled plastic props as the real metal props. The metal ones are too expressive to experiment with and far too costly to loose or damage so as I'm a cheap-skate, I'm prepared to sacrifice a small bit of performance for cost! [ One day after Raving Mad's second outing, we took Jason out to a meal on his stag night. Afterwards, about midnight we came home from the restaurant via the boating lake and tried to throw him in. Jason is 10ft tall and he didn't want us to throw him in for some unknown reason! We did get him out the car under false pretences and drove off at high speed. Jason had to walk home the couple of miles in the dark. It was the least I could do for all the times we ran boats together! ]
|
|
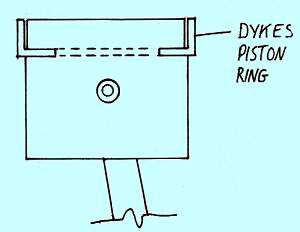
MODIFICATIONS Only two major modification were made to this boat, a change of engine and addition of a tuned pipe. As I said the OS 40FSR was the same engine as I had fitted to the SHG LASER, shortly after the first engine gave trouble it's sister also came out on strike and blew up in sympathy. One nice sunny afternoon while starting the engine it suddenly revved so high that it the con rod exploded ..... I never found out why! I found a replacement con rod, fitted it and everything was OK. Sometime afterward the engine gave up again..... This happened during a scale race (anything IC and non-multi) we used to have every year, during late summer in the Peterborough Power Boat Club. It was raining down in buckets that day but as all of us were mad, we were running the race anyway. It helps in model boat building if slightly mad or at least a little strange. Ask any model boat widow about the sanity of her husband and see what answer you get! Sorry, loosing the point again. I had completed a few laps with RAVING MAD when she started to loose power and slow down. Eventually she was off the plane and ploughing through the rain. Back on the jetty things didn't look good. It wouldn't restart and what looked worse was I could turn the engine over by hand using the propeller with the plug still in. I couldn't believe it, I had lost another engine! The 'Dykes' ring had given up and had lost nearly all compression. Again I couldn't find spares. I don't blame the engine this time but my not running the new engine long enough before giving it full throttle. The first half hour or so of a ringed engine should be run in with a rich mixture at tick-over accelerating to two thirds throttle to heat the engine up to full working temperature and wear everything in. I'm sure someone will say that's all wrong but the manufactures instructions will give any additional information for the particular engine you buy. |
|
|
|
Out came the OS engine and after a painful extraction of pictures of the Queen on small bits of paper, in went a brand new Irvine engine. By this stage I had already completed my next boat a Graupner ARROW which as fitted with an Irvine sport 25 and was experiencing great success with, I would use another Irvine in RAVING MAD a 40 ABC. Irvine engines are great engines for a fast sports boat and can't speak highly enough of it, it starts first time EVERY time unless you do something wrong and seem very reliable, ( would you like to sponsor me a free one Irvine?!). Fortunately the original engine mount needed very little modification as did the manifold which fitted both engines almost exactly. A new throttle link was made up on top of the radio box, a bit convoluted but solid. The bell crank transfers the servo movement to the starboard side of the boat to link up with the carburettor input arm. The link now passes through the starting belt, not ideal but it works and I didn't have to rebuild the radio box. ( Looking back, I could have rotated the carb 180° and reversed the servo on the transmitter... but that's the benefit of hindsight!) The rubber coupling did have to be removed due to lack of room and I had to use the original ball and socket from the OS engine which was the same size thread. Because this type of couplings is very precise, have no give in them what-so-ever and alignment is critical, it took me over a week to get it right. |
|
|
|
VERSION 2 Back on the water the boat was running faster and even better than before. A good engine deserves a good exhaust system and the engine is designed to work with a tuned pipe so Red Baron Models relieved me of even more 'dosh' and in went a Racing Models water cooled and silenced tuned pipe. I had to remove the twin exhausts outlets much to my regret, but now I have a very fast scale offshore racing boat. RAVING MAD was a boat I could always rely on to run well or give to any one that I want to have a go and knows nothing about IC model boats. I often used it to pacify my nerves after a bad days experiences with some of my more temperamental boats. |
|
CONCLUSION What can I say, she runs well, handles well and always works. I also found it a good boat to allow friends to have-a-go as she very predicable and has no hidden vices. She been run up the bank more times than I can remember, destroyed two rudders and lost no end of props but she very strong, easily repaired and keeps coming back for more. I've got a few shots of this boat on video and it looks most realistic in it's manor and could be mistaken for the real thing.... unless you know Swans are really 80 ft tall! |
|
Irvine .40 ABC motor & coupling |
|
Racing tuned motor |
|
PERSONAL RATINGS (out of 10)
Value ........................... 7 (Good basic kit) |
|
The Davis boat room was full and the order
books were almost closed. But once I had finished initial construction of the RAVING MAD
a new keel for the next boat was laid down. How about an even more modern
looking offshore racer, Graupner makes one called the
ARROW. It's an ABS
plastic hulled kit for electric power but I wanted to use an IC engine, I
wonder if it's possible to fit one? "Well all of this is just my opinion, but what do I know!" |
|
|