Model Boat Mayhem

Please login or register.

Login with username, password and session length.
Pages: 1 2 [3]   Go Down

Author Topic: Fitting out a 47: A Rivet Counter's Guide  (Read 27792 times)

Norseman

  • Full Mayhemer
  • *****
  • Offline Offline
  • Posts: 3,466
  • Location: Huyton, Liverpool
Re: Fitting out a 47: A Rivet Counter's Guide
« Reply #50 on: January 20, 2013, 06:05:51 pm »

Hi Andy
I am enjoying your thread and all the info provided. I really like your choice of colour scheme  O0
Dave
Logged

Rottweiler

  • Full Mayhemer
  • *****
  • Offline Offline
  • Posts: 2,160
  • Location: Carharrack Cornwall
Re: Fitting out a 47: Painting
« Reply #51 on: January 20, 2013, 06:48:52 pm »

After all the permanent fixtures of the boat were fitted, then it was painted.
 
 
Hi  Andy, A nice combined effort,of you and your Dad's, is this photo of the new stretched version then? :embarrassed: :embarrassed: :embarrassed: %%
Mick F


The colours used were, (All spray paint, Halfords except where mentioned):


Superstructure and above deck fittings: Ford Polar Grey, matched to photographs and RNLB Susan Ashley.
Inside of bulwarks: Humbrol German Grey (It could be any grey, as long as it's darker than the deck)
Hull Blue: Ford Balliol Blue (A trade name for Oxford Blue)
Belting Red: Ford Sunburst Red over red primer
Hull White: Appliance Gloss White
Brass and bronze: Plastikote Brass Spray


Andrew
Logged

heritorasphodel

  • Inactive
  • Full Mayhemer
  • *****
  • Offline Offline
  • Posts: 282
  • Location: Near Canterbury
Re: Fitting out a 47: A Rivet Counter's Guide
« Reply #52 on: January 20, 2013, 08:13:41 pm »

My photography and computer skills have not improved sadly...  :D


Andrew
Logged

heritorasphodel

  • Inactive
  • Full Mayhemer
  • *****
  • Offline Offline
  • Posts: 282
  • Location: Near Canterbury
Re: Fitting out a 47: Cockpit Doors
« Reply #53 on: January 21, 2013, 11:06:48 am »

When the midships steering Watsons were first built, as sort of a legacy of the old aft-cockpit boats there remained a well aft of the superstructure. On the 46ft9in Watson and the early 52ft Barnett this was an actual steering position, (If the boat had an internal rudder then the steering gear was directly below the aft cockpit, and had a backup steering postion). On the 47ft Watson the secondary steering gear was omitted due to the external rudder.


The aft cockpit was used to access the aft survivors cabin, and to allow stretcher access there were a pair of sliding doors. Unfortunately these are impossible to see on the boats now as they were replaced by a watertight hatch.


The sliding doors on Helen Wycherly. As my model didn't have a full cabin, I made the doors closed from three pieces of plasticard with details added. The tracks were from brass channel, the handles from brass rod.


Also in the aft cockpit, there is a step either side with anti slip matting on it.


Unfortunately I didn't get the chance to fit out the rest of the details in the cockpit, such as the rope trays, tool mounts, gratings and mizen mast.
The semi-finished article:


Andrew
Logged

heritorasphodel

  • Inactive
  • Full Mayhemer
  • *****
  • Offline Offline
  • Posts: 282
  • Location: Near Canterbury
Re: Fitting out a 47: The Aft Cabin Lights
« Reply #54 on: January 21, 2013, 11:14:53 am »

The four lights in the sides of the aft cabin, unlike the two bar fixed lights in the roof, were four bar grill lights. If I remember rightly, the aft two were opening, while the fore two were fixed.


At the time I didn't think my soldering skills would be up to producing the grill, so I made mine from overlapping styrene rod:


Both of these were fixed into the superstructure from the inside. They were only friction fitted, as they were fairly solid in there and I intended to replace them with better units later.


Andrew
Logged

heritorasphodel

  • Inactive
  • Full Mayhemer
  • *****
  • Offline Offline
  • Posts: 282
  • Location: Near Canterbury
Re: Fitting out a 47: The Wheelhouse Screen
« Reply #55 on: January 21, 2013, 11:23:38 am »

One thing I see in a lot of models of the 47 is a fixed window in the rear of the wheelhouse. The boats did not in fact have a fully enclosed wheelhouse when they were built, as it was open to the rear. In order to provide basic security and to protect against spray, they were fitted with a grille over the hole, which was sometimes covered in a plasticy material called Velbex. The open grille on Frederick Edward Crick:


The velbex covered grille on Helen Wycherly:


I soldered the grille out of various thicknesses of brass rod, and it was going to be set in two halves of brass tube fitted to either side of the wheelhouse, as the original folded upwards. The plan was to lower the grille into the two bits of tube and then seal the hole with the roof, thus preventing the grille from being removed.


And in place on the model:


Andrew


Logged

heritorasphodel

  • Inactive
  • Full Mayhemer
  • *****
  • Offline Offline
  • Posts: 282
  • Location: Near Canterbury
Re: Fitting out a 47: Wheelhouse Windows
« Reply #56 on: January 21, 2013, 11:44:09 am »

The aft two windows (aft of the doors) in the wheelhouse are simple flush fitted units, but the windows round the front are folding windows. You undo a pair of wingnuts at the top of the frame and the entire unit folds out of the frame. The windows on the Jeannie:


And the same unit on the 52ft Barnett St Cybi open:


Mine weren't designed to open, they were just going to be fixed onto the frame. (They're masked up for painting)


And on the boat:


Now, these are the bits I'm most worried about at the moment. They're all wonky because in the photo they're only held on with blu-tack. This was because they are both too thick and too small, and were going to be replaced. What annoys me at the moment is that the git who has her now has probably just glued them on, and if I get her back it'll cause a mess taking them off.  >>:-(


While on the subject of windows, the class had different methods of cleaning them. Some boats, like the Jeannie and Frederick Edward Crick had lateral wipers, with the unit fixed to the front of the casing (As in one of the photos above) while other boats like Pentland and Solomon Browne had Kent-Clear rotary wipers.


Andrew


Logged

Rottweiler

  • Full Mayhemer
  • *****
  • Offline Offline
  • Posts: 2,160
  • Location: Carharrack Cornwall
Re: Fitting out a 47: A Rivet Counter's Guide
« Reply #57 on: January 21, 2013, 12:06:10 pm »

Andrew, a small apology to you! When I asked yesterday,if this was the "stretched" version,it was because viewing it on my laptop,the photograph I looked at appeared elongated.Viewing it again on my desktop pooter,the photo appears perfectly normal.Keep em coming!
Mick F
Logged

heritorasphodel

  • Inactive
  • Full Mayhemer
  • *****
  • Offline Offline
  • Posts: 282
  • Location: Near Canterbury
Re: Fitting out a 47: The Roof
« Reply #58 on: January 21, 2013, 02:18:13 pm »

The roof was made from a piece of ply with a pair of supports fixed under it cut to the correct curvature. One of the main features of the roof are the four large windows. When I made these I thought they were flush fitting, but since then I've worked out that they should be this type of window:


Those are on the 52ft Barnett St Cybi. On the rear edge of the roof are a pair of small handles and a folding handrail:


This is the large handrail. I built it as per the real thing, with the connection between the support and the rail able to come apart so the rail could fold. This did not get fixed onto the model.


On this version of the 47 there are also two small rings on the front of the roof to hold the ends of the lifelines. The last thing I put on the roof was the DF loop. On the real boat this folded forward when the boat was in the boathouse. I couldn't work out how it was done, so for the time being I built a fixed version that just rested through the roof into a socket below. The semi-finished article:


There are other features on the roof that didn't make it onto this model, such as the lightboxes and the door rails. These were in progress when the boat went.


Andrew

Logged

heritorasphodel

  • Inactive
  • Full Mayhemer
  • *****
  • Offline Offline
  • Posts: 282
  • Location: Near Canterbury
Re: Fitting out a 47: The Engine Casing
« Reply #59 on: January 21, 2013, 02:32:20 pm »

The engine casing is the superstructure forward of the wheelhouse, and this has various details such as vents, the mast crutch, searchlight sockets, window supports, mast stay rings, cowl vents, handrails, you name it it's got it. The only parts I managed to finish were the flat vents, the mast stay rings and the mast crutch. The flat vents were made from lithoplate with styrene parts to add thickness.


The handrails were made of styrene rod for the rail, and brass tube, rod and a styrene disc for the brackets. The way I made them was to cut the brass tube into sections the correct length, superglue them onto the rail, and drill though it. The brass rod was inserted into the hole, then the plastic disc threaded onto the rod. When superglue is dripped onto the exposed bit of rod between the disc and the tube, it fills the gap and makes it seem far more substantial.


The mast crutch was made from a carved piece of styrene for the base, and various brass bits for the mast support.


Andrew
Logged

heritorasphodel

  • Inactive
  • Full Mayhemer
  • *****
  • Offline Offline
  • Posts: 282
  • Location: Near Canterbury
Re: Fitting out a 47: The Mast Tabernacle
« Reply #60 on: January 21, 2013, 03:17:29 pm »

The mast tabernacle on any late Watson or Barnett class lifeboat is a fairly complicated piece of kit, considering that the exhaust is funnelled up the mast. This means the mast must be firmly fixed in the upright position.


Mine was made from a sheet of lithoplate wrapped around a balsa template. Once the lithoplate had been folded the internal reinforcements were added in styrene at the base, a U shaped former half way up and two separate panels at the top of the mast. Because it wasn't particularly strong, I fixed plastic reinforcement pieces in both the rear corners and behind the hinge. Areas were cut out and details added as per photographs.


At this stage I didn't fit any of the mast restraints. The angle tube in the bottom was extrapolated from plans.


Andrew
Logged

heritorasphodel

  • Inactive
  • Full Mayhemer
  • *****
  • Offline Offline
  • Posts: 282
  • Location: Near Canterbury
Re: Fitting out a 47: The Mast
« Reply #61 on: January 21, 2013, 03:33:32 pm »

The mast on any of the late Watsons and Barnetts is designed as the exhaust as well as needing to fold to fit into the boathouse. It also carries the radio wires and various lights. It is made up of two diameters of tube with various collars and platforms fitted to it. Starting from the bottom these are:


The plate that makes a seal between the mast and the rest of the exhaust system;
The locating cheeks;
Screw seal (holds the mast tightly back, and is a vaguely U shaped bar with a large screw in the centre)
Emergency pin tube (holds the mast in the general position, while it is fixed with the screw seal)
Hinge Collar clip (essentially a large jubilee clip that holds the hinge collar on)
Hinge collar and hinge
Hinge collar clip
Wiring loom collar
Decklight collar
Wiring loom collar
Horn platform
Forward mast light platform
Radio wire yard
Masthead light platform and exhaust outlet.


This was mainly worked out from the plans, I hope a photograph of the model explains a bit more.


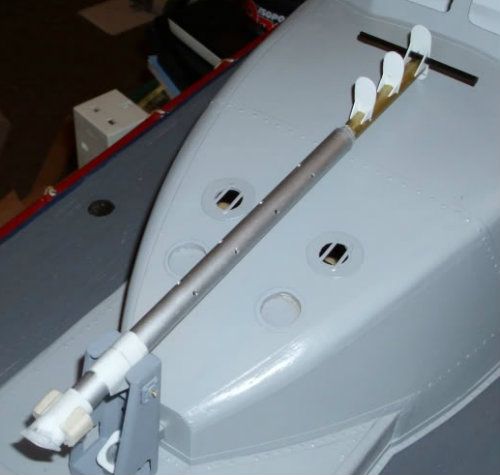
The bottom of the mast is missing the fastening points and the hinge collar clips, and the wiring loom collars and decklight collars are also missing. The large cheeks at the bottom of the mast were from balsa, these were used to keep the mast a tight fit in the tabernacle to stop lateral movement. The lower section of mast is thick aluminium tube, while the upper section is brass tube (They were the right diameter) The collars and platforms were all plastic, while the yard was carbon fibre. (It was handy).
Logged

heritorasphodel

  • Inactive
  • Full Mayhemer
  • *****
  • Offline Offline
  • Posts: 282
  • Location: Near Canterbury
Re: Fitting out a 47: The Mast
« Reply #62 on: January 21, 2013, 03:45:23 pm »

Continuing with the mast, here is an almost-finished photo:


At this point all the collars are fitted save the hinge collar clips, and the two fastenings are not fitted. The horn and the light were modified commercial fittings, while the decklight is, you'll never guess, the headlight off a 1:24 Rolls Royce Phantom II!


And a word of warning - If you make a fairly hefty mast, like I did, then try and put it up in windy weather without fastening the tabernacle down, then this happens:


Visible at the bottom of the topmast are the stay rings. The wire trunking was difficult, as I found that if it lies where the plans and photographs suggest, i.e. directly up the back of the mast, then it hits one of the casing vents and stops the mast folding properly. Mine is on at a slight twist to avoid this problem.


Andrew
Logged

heritorasphodel

  • Inactive
  • Full Mayhemer
  • *****
  • Offline Offline
  • Posts: 282
  • Location: Near Canterbury
Re: Fitting out a 47: The Tabernacle Details
« Reply #63 on: January 21, 2013, 03:51:44 pm »

A feature of the 47s and late 52 Barnetts is an odd cage around the top of the tabernacle, guarding the mast. It can't have been an absolute necessity, as the 46ft9ins weren't retrofitted with it. While building it I nicknamed it the 'Castle' fitting, for God knows what reason. I made up a separate set of drawings for this because I couldn't for the life of me work out how it was supposed to go. It's the bit I'm most proud of on the boat. But here it is:


The castle remains fixed to the top of the tabernacle. There are two rail supports each side of the tabernacle, made from brass wire and plasticard. The curved brass fitting in front of the tabernacle is supposed to hold the mast pin, to hold the mast back.


Andrew
Logged

heritorasphodel

  • Inactive
  • Full Mayhemer
  • *****
  • Offline Offline
  • Posts: 282
  • Location: Near Canterbury
Re: Fitting out a 47: The Engine Room Hatch
« Reply #64 on: January 21, 2013, 04:04:23 pm »

For this bit I put on my rivetcounter hat. This hatch was copied directly from the Frederick Edward Crick, bolts and all.


And in place on the boat:


The hatch itself is from various pieces of plasticard, while the stanchion, handles, retaining ring and hinge were from brass. The springs on the hinge are made from thin solder wrapped round a tube. The handles were made by folding a bit of brass rod, suspending it in a vice with the end of the handle facing down, and applying superglue to it. The superglue runs down to the end and gathers, forming a bulb. This is left to cure, and very accurately represents the bulbed handles on lifeboat hatches.


This was never fixed on, and I still have it. I intend for it to go on another boat.


Andrew
Logged

heritorasphodel

  • Inactive
  • Full Mayhemer
  • *****
  • Offline Offline
  • Posts: 282
  • Location: Near Canterbury
Re: Fitting out a 47: The Fender Bins
« Reply #65 on: January 28, 2013, 08:23:28 am »

The fender bins are generally known as the rope trays, and sit either side of the superstructure. They are made from mahogany with brass reinforcements. I intended to make them as a solid unit that would be permanently fitted to the superstructure and would lift off with it.
First you fit the brackets that hold it on:


Then the bin itself I made from mahogany, pinned together for strength. Here it is without the forward panel and roller:


and the final incarnation, but without brass panels, floor or tie-downs:


Since Neil has put up photos of TGB, I've discovered that the front panel is wrong, and should be corrected.


Andrew


Logged

heritorasphodel

  • Inactive
  • Full Mayhemer
  • *****
  • Offline Offline
  • Posts: 282
  • Location: Near Canterbury
Re: Fitting out a 47: The Missing Bits
« Reply #66 on: January 28, 2013, 08:34:23 am »

These are photographs of the bits I didn't get to put on to my boat:


Engine room vents:


Life ring hooks:


Cowl Vents. There were 7 of these, three small, two medium and two large:


Logged

heritorasphodel

  • Inactive
  • Full Mayhemer
  • *****
  • Offline Offline
  • Posts: 282
  • Location: Near Canterbury
Re: Fitting out a 47: The Missing Bits
« Reply #67 on: January 28, 2013, 08:43:48 am »

The Mizen mast:


Folding steps (to the roof). These were built but not fitted:


The Kent Clear windscreen wipers (Viewed from inside on RNLB North Foreland):


The Capstan:


All these plus various other pieces such as toeboards, stanchions, and the anchor handling gear. There was no wheelhouse interior fittings made as I had intended to get the boat working before fitting out the interior.


Andrew
Logged

heritorasphodel

  • Inactive
  • Full Mayhemer
  • *****
  • Offline Offline
  • Posts: 282
  • Location: Near Canterbury
Re: Fitting out a 47: The Semi-Finished Article
« Reply #68 on: January 28, 2013, 08:58:16 am »

This is the state of things when I last did any work to her:


Here's the only bits I have left:


Interestingly I was told a couple of days ago that someone had seen her under a bush a couple of weeks ago. Alas, a new search was fruitless. But I've still got hope of getting her back.


Thanks for reading.


Andrew
Logged
Pages: 1 2 [3]   Go Up
 

Page created in 0.035 seconds with 21 queries.