Model Boat Mayhem

Please login or register.

Login with username, password and session length.
Pages: 1 [2] 3   Go Down

Author Topic: Getting to grips with “Lady Daphne”  (Read 19524 times)

Watchleader

  • Guest
Re: Getting to grips with “Lady Daphne”
« Reply #25 on: December 13, 2010, 07:14:51 pm »

Thanks OLD DODES.
All info is good info.
Can you tell me when "Lady Daphne" was last staysail rigged? :-))
John
Logged

farrow

  • Guest
Re: Getting to grips with “Lady Daphne”
« Reply #26 on: December 21, 2010, 12:14:21 am »

Hi mate, afraid I cannot answer you accurately, but she is listed as an aux sailing barge in the lists published in F.S Coopers a "Hand Book of Sailing" isbn 0 229642322. A book which is very good for rigging out a full size barge and written by one of the last trading barge masters with John Chancellor. I remember her in the sixties as a big motor barge that is for a wooden one, most of Pauls where bowsprit at one time or another exceptions being the small Anglia and Marjorie. Do not forget to fit the rope stopper on the forestayfall, all barges had them.
Logged

Popeye

  • Full Mayhemer
  • *****
  • Offline Offline
  • Posts: 302
  • I see no ships!
  • Location: Upminster, Essex, England
Re: Getting to grips with “Lady Daphne”
« Reply #27 on: December 21, 2010, 11:06:19 am »

Ahoy Watchleader,
www.lady-daphne.co.uk/history.htm details the entire history of 'Lady Daphne' and/or Email Elizabeth Mainelli, (charters managing agent), Nymph Ltd., at emainelle@lady-daphne.co.uk for any information not contained in 'Daphne's' website.

Compliments of the Season.

Logged
Confucius he say, 'if all else fails.......reach for the  Red Top-Stop'.

farrow

  • Guest
Re: Getting to grips with “Lady Daphne”
« Reply #28 on: December 21, 2010, 09:48:05 pm »

Hi Watchleader,
I do not know an awful lot about the Daphne and Jean as I was a forty thieves man, aka London & Rochester Trading Co/Crescent shipping and in my time those two beast's where Ipswich boats. But all the Auxilliary's in Rochester I believed lost thier Mizzern masts and if they had a bowsprit that went as well, especially those with a spritty mizzern as that made way for a wheel house. The mule rigged boats already had a wheel house come shelter aft when under sail. The two barges where not built for Pauls and as they are Rochester registered with Lady prefix's they could have built for Watson's of Rochester. An old skipper I knew was well versed about them, well known in the trade as stuttering Bob, but I expect he is now passed on, you have to be careful in researching these crafts as there are so many enthusiastic experts who never sailed on them in trade or really knew the people who worked them!!! But as my old skipper said once it took a more skilled man to work a slow plodder than a fast handy one. Plus do not forget they may sail fairly close to the wind, but christ did they go sideways, after all they where like sailing planks.
Logged

farrow

  • Guest
Re: Getting to grips with “Lady Daphne”
« Reply #29 on: December 23, 2010, 07:30:51 pm »

I found this pic of the Aux Thyra of Rochester, it was taken not long after she was bought out of trade. She is a similiar deck layout etc to the Dauphne, but her chicken hut aft has been removed for ascetic purposes. Any way I thought you may be interested in the pic, it is from "The Thames Sailing Barge-Her Gear and Rigging" ISBN  0  87742  001  7. The Auther is Dennis F. Davis and published by David & Charles of Newton Abbot, the book has several good close up photo,s of working barges rig and fittings.
Logged

farrow

  • Guest
Re: Getting to grips with “Lady Daphne”
« Reply #30 on: December 26, 2010, 10:54:17 pm »

Found two interesting articles about the Daphnie in my book, the master concerned gave a very vivid and superb tale of her sail down channel on the BBC when I was a young lad.
Logged

Watchleader

  • Guest
Re: Getting to grips with “Lady Daphne”
« Reply #31 on: June 06, 2011, 07:26:39 pm »

I know I haven't posted updates to the build on here recently, but I did not model during the colder months and other commitments kept me from updating the build. :((
This post is to bring this forum into sync with the other forum the build is on.
 :embarrassed: :embarrassed: :embarrassed:
After this I shall run the two closer together. Then post until complete  :} :} :}

Shackles

I decided that this was a good time to get on and set up a way of making these in reasonable numbers, this is what developed.
1.2mm brass rod was the obvious material to use but how to make the shackle ends easily drillable.
I realised that flattening the end was the right thing to do, but this was so small that using a hammer and anvil free hand was not going to make it.
Looking at all the tools I had there was an obvious choice. I had a 6” box hinge pliers that had a small area that comes together when the pliers were closed and this area was reasonably close to the fulcrum to produce some significant pressure, and they would probably be strong enough to do the job.
They did the job quite well, if the first squeeze wasn’t quite enough, then a “tap” with a med hammer on the pliers jaws did the job.


With a little trial and error I determined the total length of the brass rod for each one and after flattening the first end I used a makeshift depth stop (bit of wood in vice) to cut the piece off the brass rod to length and then make the next one. (A mini production line!!!) Doing the other end of the short length was just a repeat of the first, making sure that the two flattened end were in line
Sorry a little blurred here but I hope you get the idea.


After this it was a case of finding a way to drill each end with a 1mm dia drill. It was fortunate that the parallel part between the flattened ends was exactly the same as the width of my small tool clamps. I held the clamp in a drill vice and effectively used the tool clamp as a mini vice. So setting up the drill to drill one end and then turning the piece in the tool clamp, I was able to drill both end the same.


I tried several ways of bending these pieces.
Using round nosed pliers sort of worked, but was not very consistent and I broke a couple.
I could see that the best way was going to be – make a jig!
I again, looked in my box of old tools and I found a cheap glass cutter with a breaking anvil fitted. By just removing the cutting disc and making a little form tool I was able to (with a bit of trial and error on the form width) produce pretty consistent, and realistic miniature shackle bodies. No damage to the glass cutting tool and replacing the cutter put it back where it started
(yes, they are small!)


I use 9mm long x 1mm dia miniature brass pins for shackle pins and when assembling them will clinch the excess end off the pin.
That should fix it firmly in place. If not, then a spot of superglue or quick dab of solder.


Made about eighty so far, so a few more to go, but I’m happy with that.


Logged

dreadnought72

  • Full Mayhemer
  • *****
  • Offline Offline
  • Posts: 1,892
  • Wood butcher with ten thumbs
  • Location: Airdrie, Scotland
Re: Getting to grips with “Lady Daphne”
« Reply #32 on: June 06, 2011, 09:30:16 pm »

Brilliant!  :-))

That's really inventive. Shackles are a long way off for me and Racundra, but I shall bookmark this and return in the future.

Andy
Logged
Enjoying every minute sailing W9465 Mertensia

Watchleader

  • Guest
Re: Getting to grips with “Lady Daphne”
« Reply #33 on: June 13, 2011, 01:08:41 pm »

There is quite a lot of rigging on this vessel.
If I tried and do all of the rigging as the original I will have a real game. So deciding what should, and shouldn’t be on, is the first task.
Obviously pretty well all the standing rigging has to be in place so that’s where I started.
The shrouds were the first thing to tackle.  :-))
After trying to copy the original shroud fitting over the hounds, not very successfully, I decided that a compromise was needed.   :embarrassed:
I made the shrouds/ratlines as a separate item and would later make up a dummy fixing around the hounds; it was a lot easier to make these on a jig setup, for both port and starboard, quite a simple jig:
Using GP rigging cord, fixing the deadeyes in the lower end and looping onto a fixing ring at the top, remembering to slide on 2 pieces of 2.00mm black shrink sleeve, setting a decent tension and then adding ratlines at scale 15” - (1.25”) separation, with three clove hitches on each and a spot of superglue, job done!
The fixed ends of the main shrouds were then tidied using the shrink sleeve.


The remaining standing rigging was all done using coated fishing trace wire. This is available in varying strengths and colours.
As there will be quite a bit of force on this rigging I used a variety of strengths and thickness’s, from 20lb light pike trace through 40lb pike trace and the three main forestays were 60lb clear nylon coated sea fishing trace wire.
All these have suitable sized crimps available.
I can’t recommend strongly enough to anyone thinking of following this method is to get a set of proper crimp pliers to set these, as using normal pliers or even round nosed pliers, gives a very untidy and unreliable fixing. The crimps were all covered, again using suitable sized shrink sleeve. 
The following two pics, (sorry, a little blurred) give the general idea. I know the rigging doesn’t show too well even with a contrasting sheet behind.


This pic shows the below decks layout (some of it) with the motor, battery and ESC in the centre.
The rudder servo and, aft of that, the starboard leeboard continuous rotation servo.
The sail winch is under the foreward hatch and a continuous loop runs around pulleys below the deck with a spring tensioner and two fixed rings in the loop, to attach the sail controls to. Sail control cords come up through nylon tube onto deck, centrally near the horses.


This pic shows the bow section.
The fall from the stayfall tackle is fed down a tube to below deck into the prow via a tube.
Also the excess anchor chain is fed into the chain locker in the prow via a tube.


It will be sail parts (parrels and cringles and bolt rope) in the next post. O0
Logged

Watchleader

  • Guest
Re: Getting to grips with “Lady Daphne”
« Reply #34 on: June 15, 2011, 01:06:27 pm »


I am now at the stage of sail production!

This has been a slightly daunting prospect for me for a while.  {:-{ {:-{
I decided earlier that when this time came I would resist the temptation to pass the sewing over to my wife, even though she offered.  O0 O0

If a new skill is required? Then learn it! That’s my philosophy. :-)) :-))
Firstly though, to help me put off the day, there are things closer to my comfort zone that require making. :-))

Parrels and cringles.
Both the mizzen and the topsail are hanked to Parrels running on the mast.
These are simply rings of either metal or wood that are a loose fit over the relevant mast, and slide up and down.
They are a semi-permanent fitting on the mast and often spares are fitted with the originals, otherwise it’s a major task to drop the topmast to fit new ones; somewhat simpler with the Mizzen.

The rings are all the same size and therefore I felt a simple way to make these all the same, was to wind a spiral of brass wire of a suitable guage and to a suitable diameter and then just cut the required number from that spiral.
Again the lathe showed its versatility.
I remembered this technique from winding springs, during my apprenticeship. Too many years ago!!! <:( <:(

Choose a decent size bolt, just to give a guide for the helix, and then using a small clamp hold the chosen wire into the thread and use a bar and piece of ply to clamp the wire and give a constant holding back force.
Then turn the chuck BY HAND,  O0 to produce the number of turns required.
By varying the clamp force and/or the distance to the bolt slightly different diameter spirals can be made. I.e. trial and error!!  :D
If more rings are required than can be done on the bolt length, make another spiral.  :} :}


To produce rings just clip complete, or a tad over complete, circles from the spiral, twist slightly to set in line, slip on a suitable jump ring and solder. Solder both Parrel ring and jump ring at the joins, at right angles to each other, giving a Parrel with a suitably placed attachment for the shackle.


How to make cringle irons puzzled me for a while, but luckily it was the weekend of Shepton Mallet Show,  :-)) :-))
A conversation with the very helpful members on the AMBO stand left me coming away with a copy of  “Sail making for Model Barges” by Mike Taylor.  What an excellent pamphlet.
 
Therefore I take no credit in developing this method, but just a couple of pics to show the interpretation.
The basic cringles are short 3mm lengths of 4mm brass tube, heated to cherry red and quenched in water to anneal.
The jig is formed and split to allow the “tube” to bell at either end and be removed.


The punch is shaped to the bell form and tapped firmly into the tube to form the cringle. (From either side of course.)
The jig doesn’t allow it to go anywhere and can be released easily.


Bolt ropes next
Logged

bosun

  • Full Mayhemer
  • *****
  • Offline Offline
  • Posts: 372
  • Location: NEWPORT SOUTH WALES
    • bosunsmodelboats.com
Re: Getting to grips with “Lady Daphne”
« Reply #35 on: June 15, 2011, 05:53:49 pm »

Yo John
Really nice job, coming along a treat mate.
Bosun
Logged
bosunsmodelboats.com

tigertiger

  • Global Moderator
  • Full Mayhemer
  • *****
  • Offline Offline
  • Posts: 7,748
  • Location: Kunming, city of eternal springtime, SW China.
Re: Getting to grips with “Lady Daphne”
« Reply #36 on: June 17, 2011, 06:39:20 am »

yes, fantastic job  :-)) :-)) :-))
Logged
The only stupid question is the one I didn't ask

Watchleader

  • Guest
Re: Getting to grips with “Lady Daphne”
« Reply #37 on: June 17, 2011, 04:12:20 pm »

Many thanks guys. These positive responses are much appreciated. :-)) :-))

Model bolt ropes require being; in scale, looking right, and working. O0 O0

I have been looking for something suitable to use as bolt rope almost from the start of this build, without much success.  :((
Braided nylon doesn’t look right (it does on a more modern yacht) and it’s difficult to colour match, as it doesn’t take dye well.  :(( :((

I was at a boot sale a few months ago and found some bobbins of different coloured thread; terracotta, green, brown, grey, beige and yellow, - the yellow was waxed.
With the six in my arms I asked “How much?” The reply “A quid?” I’ve never taken a pound coin so quickly from my pocket and left. - Very happy!  :} :}  :police: :police:

These threads were going to be suitable for halyards, sheets and general cordage, but were not substantial enough for bolt rope.  :((

So ... How to turn good quality thread into something thicker? {:-{ {:-{

In the “full size” world, thinner cords are counter-wound into thicker ropes using a rope walk; so why not in our small scale world?  %%

And so the “Model Rope Walk” came into being.

The following pics will give a better idea than any amount of description.

This is the working end of the setup


This is the other end 7 feet away carrying the tension weight.
The correct weight is found by trial and error, and varies with the threads being wound.


This is the part that counter-rotates the threads...
Simply a central geared wheel with satellite gears running on it, each with hooks attached.
The winding head is designed to rotate in either direction, to ensure that the winding works with the twist in the thread and not against it. :((

The whole thing is driven from an old battery operated screwdriver motor.


The threads are attached to the weight via this sliding guide and onto a fishing swivel.
The guide is made to take either three or four ply rope.


It is quite simple to produce “model rope” of about a metre length with this setup.
After winding and before removing, the ends are fixed with a spot of superglue. If a shorter length is required, then a spot of superglue is where you cut, after it dries. 

A trio of the bobbins from the boot sale and the bootmakers thread and a selection of “ropes” produced.


The brown 4ply was made from boot-makers thread (also from another boot sale)


Sewing time is imminent !!!!! %%


We're on the home straight now :} :}
Logged

bosun

  • Full Mayhemer
  • *****
  • Offline Offline
  • Posts: 372
  • Location: NEWPORT SOUTH WALES
    • bosunsmodelboats.com
Re: Getting to grips with “Lady Daphne”
« Reply #38 on: June 17, 2011, 05:52:05 pm »

Now that,s what I call proper scratch building, :-)) even down to  making your own scale rope, excellent stuff.
Bosun
Logged
bosunsmodelboats.com

jenno

  • Full Mayhemer
  • *****
  • Offline Offline
  • Posts: 149
  • Location: Look at the flag and take a guess
Re: Getting to grips with “Lady Daphne”
« Reply #39 on: June 17, 2011, 07:33:14 pm »

WOW now thats what i call a excellent job , what a talent you have

well done John.

Watchleader

  • Guest
Re: Getting to grips with “Lady Daphne”
« Reply #40 on: June 20, 2011, 07:34:50 am »

Thank you both for those encouraging comments.  ;)  :-))

The time had arrived when I had to get this sewing thing sorted, so with my wife’s permission I set up her, all singing all dancing, pretty modern sewing machine.
With a little guidance I wound a bobbin and set the threads into the machine and chose the stitch pattern; a simple single, in line stitch, at about 12 stitches to the inch.
Then with a piece of material I started to sew: - Hell! the thing almost took off!!  :embarrassed:  :embarrassed:
I managed to stop and found I had stitched a row about 5” long in no more than 5 seconds.
This was not controllable! The foot control was far too sensitive for me to handle. At least I had managed to keep my fingers away from the needle area.  {-) {-)
Plan B
My mother had a treadle Singer sewing machine in a cabinet. About 50 years ago she bought a kit to convert the treadle machine into a motor driven machine, and as an apprentice engineer at the time I was the one chosen to fit it. It was quite a straight forward job, as I remember.
This machine has been in my possession since my mother passed away 10 years ago and has been acting as a hall table, as it is a nicely polished piece of furniture.
Wow! After setting it up and winding a bobbin (good, solid stainless steel thing, - not clear plastic) I threaded the machine, using the instruction manual still in its clip in the door, and started to sew another piece of material.
What a dream to use. It ran quietly and smoothly like a “sewing machine!”    O0  O0  Easily controllable from a snail’s pace to pretty fast.       {-) {-)
A little bit of confidence arrived then.  O0  O0

Let’s go back a few days.
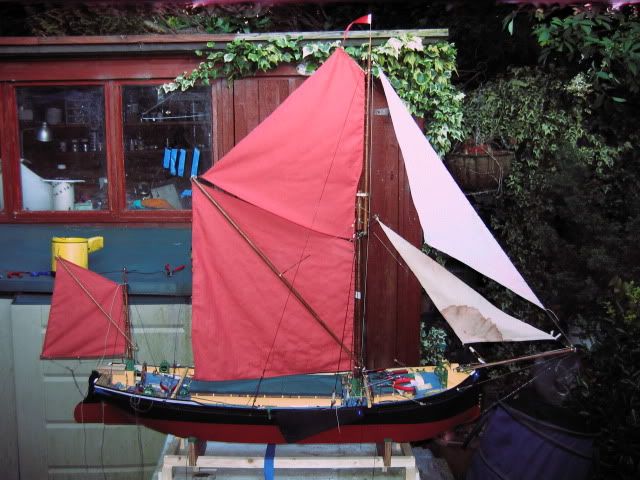
I had set the rigging up with temporary fixing, to hold all parts in the proper position and measured the sizes the sails needed to be. (Don’t use the sail plan drawing it will not be accurate enough!)
From these measurements, I cut brown paper dummy sails and tacked them in place with masking tape. After a few minor adjustments I had the boat carrying a set of brown paper sails cut as the finished size of the completed sails.
Sorry. I didn’t take a pic at this point.
Using these templates I transferred the sail outlines to the sail material, using tailors chalk.
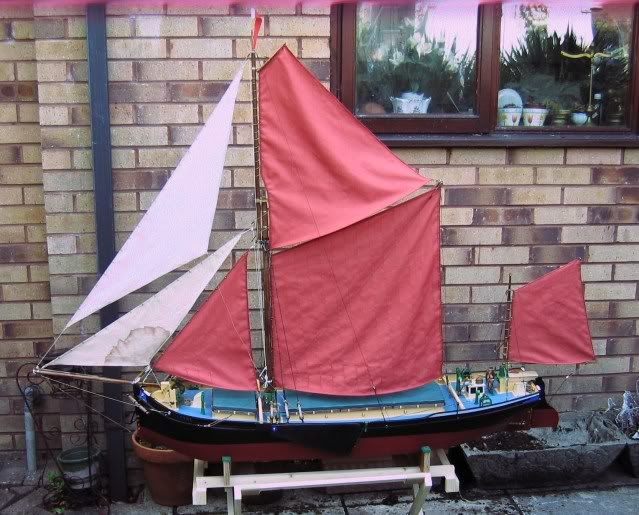
The material used for the main, mizzen, tops’l and jib, was the sail material; “brick red sailcloth” supplied by Modelling Timbers. For the inner and out stays’ls I used an old sheet (previously used as a dustsheet) dyed with tea. These are meant to look like natural canvas, as they were not treated with red ochre and not left rigged. (They were normally used only used in reasonably light winds when sea-going.)
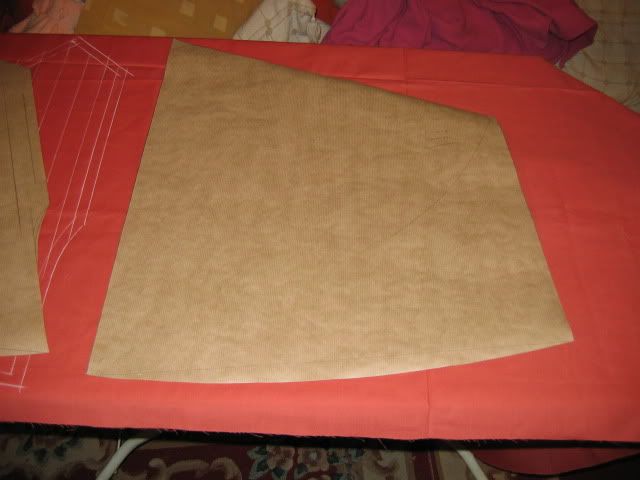


I marked on the cloth lines at the correct scale widths (32mm for mains’l tops’l and jib, and 30mm for inner and outer stays’ls and mizzen) then marked out a suitable (12mm) width all round to allow for the double hem required all round the sail edge.
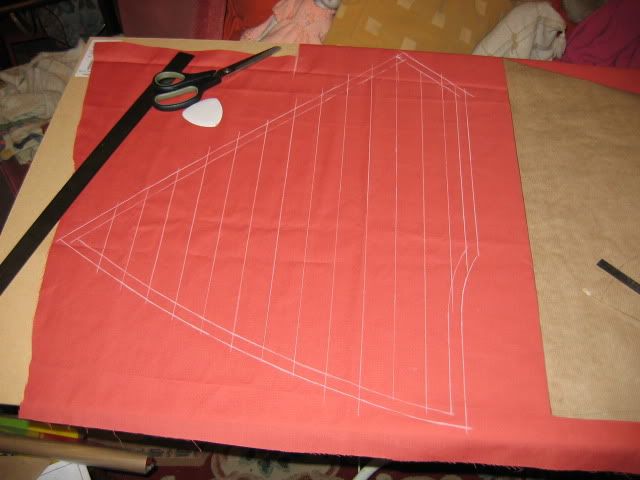


Carefully, I cut the sails out and the first thing to sew is the cloth lines. These lines were sewn, starting and ending, off the cloth. The loose ends were tied carefully and snipped off. If these cloth lines are not sewn straight and parallel and equally spaced, they will stand out like the proverbial sore thumb.
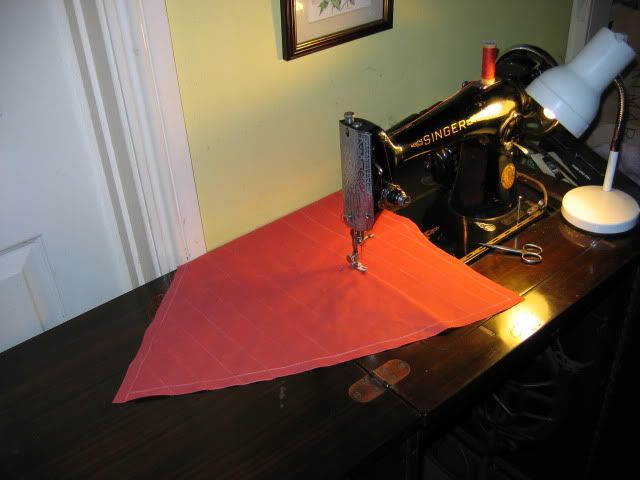


The hems, doubled, were then sewn, stitching very carefully, about 1mm from the inner hem edge. This provided pockets along all edges where I could insert any weighting needed into the sail foot and also mains’l top stiffener.
After several days I now had a set of sails, which looked good, but were missing a vital part of the sail.
Bolt rope and cringles.
Then came probably the most tedious part of this build; Hand stitching the bolt rope to the sail/s
I used a loom (normally used for bead work) to hold the sail and rope in line whilst sewing it on. I put it close to the window for maximum light.
It was straight forward to do, just remembering to lay the stitches into the lay of the ply of the bolt rope and to let the blood flow stop, (after sticking the needle numerous times into my finger), to ensure that the sail doesn’t get blood spots on it.!!!


I did manage to sew my finger to the sail at one point, but I was able to release it using a scalpel (On the skin of my finger! NOT the sail!)
The cringles were sewn in at several points on each sail, at all corners, and on the mains’l leach for braille ropes.
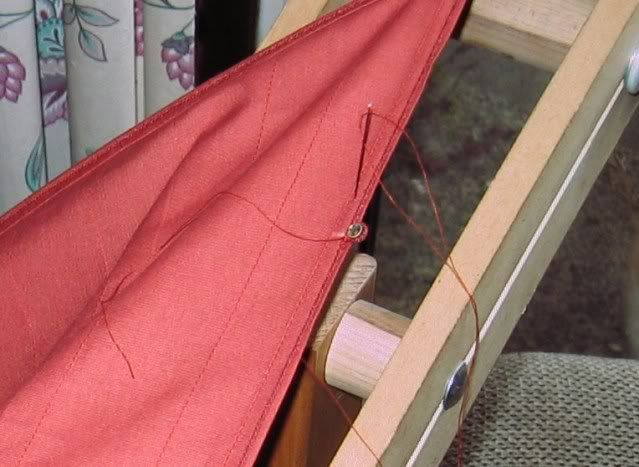


.......Sails on
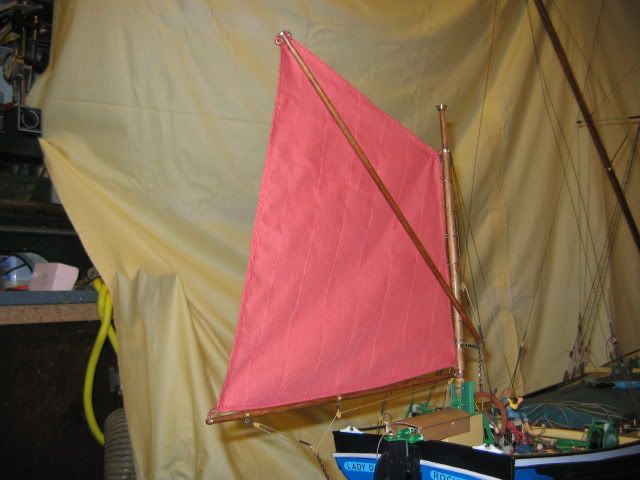


neary there just the jib to add   :o :o
The stain on the inner stays’l wasn’t intended. It appeared after staining with tea. There must have been something on the dustsheet, probably wallpaper paste, which didn’t show until after staining.
I left it on, as I looks a bit like an accident with the stays’l when in storage??? Well, to me it does.!!!  {-) {-)


DONE !!!


The eagle-eyed of you will also notice that I have added reefing lines to the main and jib.    Just a little more realism! :-)) :-))

The reason I have yet to fit the braille ropes is; until I have had a few goes at raising and lowering the full rigging, I am not sure whether they will be a hindrance or not.
She does fold down to a reasonable size which enables her to be transported in the vehicle, so I don’t have to make a trailer for her.  {:-{ {:-{
But I shall be making a storage box; 54”long x 14” wide x 24”high.
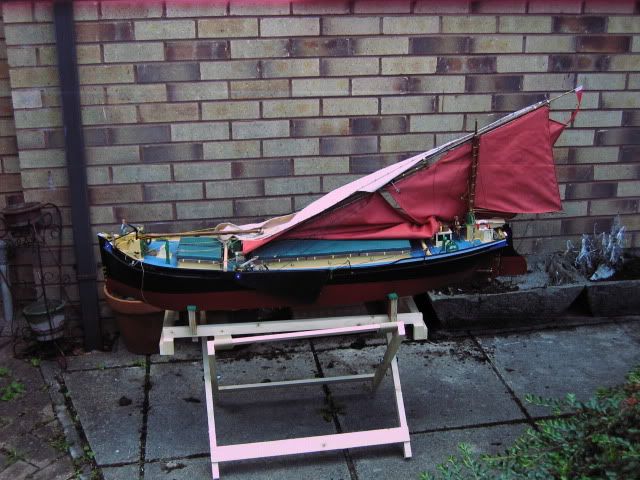


Those of you who know these vessels will have seen, if you look closely, a significant mistake I made with one of these sails.  O0 O0
I will rectify that mistake soon!!   No prizes for finding it, just the satisfaction!  :P :P

No! I haven't painted the boat stand - PINK - it's an unwanted camera effect probably a reflection from the sails.  %%

This is the next to last posting for this build.  <:( <:(
Later I hope to add a post of ‘Daphne on the water; assuming of course there are no mishaps and she does sail.  :-X :-X
Logged

pasty

  • Guest
Re: Getting to grips with “Lady Daphne”
« Reply #41 on: June 20, 2011, 10:46:24 am »

Beautiful job Watchleader, this will look a treat on the water.
The sails look really nice and great job on the sewing, what type of material is it and the thickness?
They seem to hang just right. Also the colour seems about right as well, ie not too bright.

Whats your next project?
Logged

Watchleader

  • Guest
Re: Getting to grips with “Lady Daphne”
« Reply #42 on: June 20, 2011, 12:32:20 pm »

Hi Pasty

Many thanks for your comment. It's much appreciated. O0

The material used for the main, mizzen, tops’l and jib, was the sail material; “brick red sailcloth” supplied by Modelling Timbers. :-)) :-))

The next project is a Vic puffer. Well, the hull is here waiting anyway.   :-) :-)

John
Logged

Watchleader

  • Guest
Re: Getting to grips with “Lady Daphne”
« Reply #43 on: July 04, 2011, 08:01:57 pm »


Well at long last!  O0  O0
Lady Daphne has made to the water.  :-))  :-))  :-))
I went to Barry MBC water last Thursday, but the chop was breaking up over the edge and the wind was 4-5; much too much for her maiden trip.  <:(  <:(

On Saturday I took her to Bryn Bach Water, Tredegar; home of Bryn Bach Scale and Sail.
Much calmer, a lovely day in fact.  :}  :}
When she was launched it was obvious a little ballast was needed aft, as she was sitting too high in the stern. With a couple of pounds of lead, just laid on deck, she was a lot better trimmed.
So a check of the radio equipment and she was off.
There was so little wind, particularly close to, that I used the motor to take her out to slightly better conditions.
I must thank Jenno and Bosun for taking the pics and video.      :-)) :-))    My camera had chosen that moment to fail.  :((  :((
I am pleased with the results of what was a very enjoyable build
So here are a few pics to finish this build blog.


A little wind at last


Hardly a twitch while crossing a wake


Looks good too, from this level, fairly realistic


I hope to have a video up later and will post a link to it then.

Thank you all for your helpful comments during this build and for your forbearance during some of the delays.
John
Logged

dreadnought72

  • Full Mayhemer
  • *****
  • Offline Offline
  • Posts: 1,892
  • Wood butcher with ten thumbs
  • Location: Airdrie, Scotland
Re: Getting to grips with “Lady Daphne”
« Reply #44 on: July 04, 2011, 08:58:52 pm »

Got to nominate this for a master class: it's been instructive and fascinating from post #1.

You've a great result there. Watchleader.  :-))

Andy
Logged
Enjoying every minute sailing W9465 Mertensia

bosun

  • Full Mayhemer
  • *****
  • Offline Offline
  • Posts: 372
  • Location: NEWPORT SOUTH WALES
    • bosunsmodelboats.com
Re: Getting to grips with “Lady Daphne”
« Reply #45 on: July 05, 2011, 12:28:56 pm »

Nice to see her in the water john, you have done a lovely job, with some very nice scratch building , even down to the home made rope,s :-)).
I second the fact she should be in the master class section. Proper Job. Over to you Martin.
Bosun
Logged
bosunsmodelboats.com

pugwash

  • Guest
Re: Getting to grips with “Lady Daphne”
« Reply #46 on: July 05, 2011, 01:10:48 pm »

A beautiful boat and some very inventive modelling techniques - particularly liked things like the ships wheel and
some of the brass parts you made up for the masts and sails.  You should be justifiably proud of your work.
What are her dimensions and what scale is she built to.

Geoff
Logged

Watchleader

  • Guest
Re: Getting to grips with “Lady Daphne”
« Reply #47 on: July 08, 2011, 12:15:48 am »

Many thanks guys for those endorsements.  :-)
It is very much appreciated. :-)

In answer to Andy's question: 
           Lady Daphne is built to 1/24th scale.

           Hull: length is 45", beam 11"
           O/all length, bowsprit to mizzen boom is 65"
           Bilge to Bob she is 49" high.
           Displacement is 26lbs

          John

Logged

Watchleader

  • Guest
Re: Getting to grips with “Lady Daphne”
« Reply #48 on: July 09, 2011, 11:28:54 am »


Many thanks to all of you who have shown an interest in this build. :-)) :-))
I’ve done a few little tidy-ups and now I hope for some suitable weather to explore her sailing ability, and mine. O0 O0
I am now able to close this blog with a link to the video of Lady Daphne on her maiden voyage. :} :}
Please enjoy. ok2 ok2

http://youtu.be/kp0LTzKuoG4

John
Logged

tigertiger

  • Global Moderator
  • Full Mayhemer
  • *****
  • Offline Offline
  • Posts: 7,748
  • Location: Kunming, city of eternal springtime, SW China.
Re: Getting to grips with “Lady Daphne”
« Reply #49 on: July 10, 2011, 04:22:33 am »

Wonderful job, excellent model.  :-))
It has inspired me to get started again.  :embarrassed:
Logged
The only stupid question is the one I didn't ask
Pages: 1 [2] 3   Go Up
 

Page created in 0.098 seconds with 22 queries.