Model Boat Mayhem

Please login or register.

Login with username, password and session length.
Pages: 1 2 3 4 5 6 7 8 [9] 10   Go Down

Author Topic: Oldiron's Airbrush Tutorial  (Read 202245 times)

tt1

  • Full Mayhemer
  • *****
  • Offline Offline
  • Posts: 1,752
  • If I only know a little - then I can learn a lot
  • Location: Leicestershire
Re: Oldiron's Airbrush Tutorial
« Reply #200 on: January 04, 2013, 06:22:34 pm »

Dan, the link you've given goes to email address only not the product as such.
                              Regards, Tony.
Logged

F4TCT

  • I am not completely useless.......I can always serve as a BAD example
  • Full Mayhemer
  • *****
  • Offline Offline
  • Posts: 536
  • Location: Whitby, North Yorkshire, UK
    • My Boat Builds
Re: Oldiron's Airbrush Tutorial
« Reply #201 on: January 04, 2013, 06:24:52 pm »

ah  :embarrassed:


Its an Iwata HP-C plus.


Sorry  :kiss:
Logged

sailorboy61

  • Full Mayhemer
  • *****
  • Offline Offline
  • Posts: 338
  • Location: Wirral, UK
Re: Oldiron's Airbrush Tutorial
« Reply #202 on: January 07, 2013, 04:03:59 pm »

OK, so I'm sure the usual applies, spend as much as you can, you gets what you pays for, but mini compressor with or without tank. Currently there are some offers (Ebay anyway) of with tank and what look like average side/bottom feed brushes, or without tank and a bottom and side feed but the side feed has interchangable needles and nozzles.
 
For those regular users, does the tank make a big difference on long sessions where otherwise the compressor might be running longer?
 
Thanks.
Logged

West Coast tug

  • Shipmate
  • *
  • Offline Offline
  • Posts: 14
  • Model Boat Mayhem is Great!
  • Location: New Westminster B.C. Canada
Re: Oldiron's Airbrush Tutorial
« Reply #203 on: January 07, 2013, 05:06:28 pm »

Back in the 1980's I did a lot of Airbrush poster adds / paintings a long with T shirts . I went through about 3 compressors .
The smaller oscillating compressors over heat after 45 mins of running and only put out about 20 lbs. of pressure.
They have a pulsating air flow if your going to put out the maximum power to paint an object you will not notice it ,
 But if you are painting some very small line stuff it will hamper your ability the paint tends to spit out .
Placing a tank in the system will slow this down but wont remove it .
A shop compressor designed to run a stapler will be a better choice it has a tank  ,Both of these will make a noise .
In 1986 I bought a Jun-Air model 6-M for about $500.00 Canadian, has a 3 gallon tank and runs at 100 psi. It can run about 6 Air Brushes .
With dead silence running ,My fridge makes more noise.
Jun- Air was bought out by a larger company in the late 80's , My compressor is now classed as a medical machine and cost about $3500.00 used.
A general shop compressor is your best bet you can fill your car tires with it.
Some fellows used Nitrogen bottles the larger K type.
Gary 
 
Logged

welshdragon

  • Shipmate
  • *
  • Offline Offline
  • Posts: 4
  • Model Boat Mayhem is Great!
  • Location: warboys.cambs
Re: Oldiron's Airbrush Tutorial
« Reply #204 on: February 12, 2013, 06:12:51 pm »

   Hello Oldiron. Just starting out out on this airbrushing thing.  The main question from what I can gather, is what, if any, would be the best room/shed temperature?
   taff
Logged

West Coast tug

  • Shipmate
  • *
  • Offline Offline
  • Posts: 14
  • Model Boat Mayhem is Great!
  • Location: New Westminster B.C. Canada
Re: Oldiron's Airbrush Tutorial
« Reply #205 on: February 12, 2013, 06:28:06 pm »

You will find out that if you paint something on a sunny day and then the same paint on a rainny day you may get 2 different surface tones or matt look, One way of trying to stop this is bring the item inside after painting it.
The best time to paint a car outside is the day after it has rainned , Less dust is preasent , Try and have air temp above 12c if possible .
Try and use the same type of paint , Cross painting from laqcuer and back to enamels will make the brush internals cloge, the paint will skin away from the sides and block flow. Even if you think you cleaned it last time it may still happen.
Gary
Logged

AlisterL

  • Full Mayhemer
  • *****
  • Offline Offline
  • Posts: 368
  • Location: Auckland, New Zealand
Re: Oldiron's Airbrush Tutorial
« Reply #206 on: March 17, 2013, 10:13:22 pm »

Did the question of air pressure ever get addressed? If so I missed it in this tutorial. I'd be keen to find out more about this, along the lines of:
  • What pressure for what paint type
  • Any other factors that need to be taken into account, etc.

Regards to all,


Alister.
Logged
Alister

oldiron

  • Full Mayhemer
  • *****
  • Offline Offline
  • Posts: 3,326
  • Location: Lindsay, Ontario, Canada
Re: Oldiron's Airbrush Tutorial
« Reply #207 on: March 17, 2013, 10:17:15 pm »

Did the question of air pressure ever get addressed? If so I missed it in this tutorial. I'd be keen to find out more about this, along the lines of:
  • What pressure for what paint type
  • Any other factors that need to be taken into account, etc.
Regards to all,


Alister.

  The air pressure would nominally run 25psig. This can be slightly greater for heavier paint and correspondingly lower for lighter paints.
The best way, after using this pressure as a base, is to see how the paint applies to your model. If its not atomizing correctly, the pressure is too low. Under these conditions you'll get blobs of paint coming out of the brush and , quite often, dribbles at the tip.

John
Logged

oldiron

  • Full Mayhemer
  • *****
  • Offline Offline
  • Posts: 3,326
  • Location: Lindsay, Ontario, Canada
Re: Oldiron's Airbrush Tutorial
« Reply #208 on: March 17, 2013, 10:18:37 pm »

   Hello Oldiron. Just starting out out on this airbrushing thing.  The main question from what I can gather, is what, if any, would be the best room/shed temperature?
   taff

  Sorry for the late answer. Your paint manufacturer will prescribe the best temperature for their particular paint, however, if you keep around the 70 deg F mark you should be about right.

John
Logged

AlisterL

  • Full Mayhemer
  • *****
  • Offline Offline
  • Posts: 368
  • Location: Auckland, New Zealand
Re: Oldiron's Airbrush Tutorial
« Reply #209 on: March 18, 2013, 12:44:19 am »

Thanks for your reply John.


As a matter of curiosity, what happens if you use too much pressure? I think what I've been doing with my Iwata Revolution BCR is using too much air and getting a really thin, low density coat. However I felt I needed the higher air pressure to atomise properly - maybe I wasn't thinning enough - not sure I believe that, but who knows.


I bet it's hard to diagnose this stuff over a forum :)


Regards,


Alister.
Logged
Alister

oldiron

  • Full Mayhemer
  • *****
  • Offline Offline
  • Posts: 3,326
  • Location: Lindsay, Ontario, Canada
Re: Oldiron's Airbrush Tutorial
« Reply #210 on: March 18, 2013, 12:52:01 am »

Thanks for your reply John.


As a matter of curiosity, what happens if you use too much pressure? I think what I've been doing with my Iwata Revolution BCR is using too much air and getting a really thin, low density coat. However I felt I needed the higher air pressure to atomise properly - maybe I wasn't thinning enough - not sure I believe that, but who knows.


I bet it's hard to diagnose this stuff over a forum :)


Regards,


Alister.

  Alister

  you've pretty well described what happens with too much pressure.  If you're getting a condition, with lower pressure, that causes the paint give an orange peel effect on the subject, or is hard for the brush to "pick up", I suspect you have the paint too thick.

John
Logged

West Coast tug

  • Shipmate
  • *
  • Offline Offline
  • Posts: 14
  • Model Boat Mayhem is Great!
  • Location: New Westminster B.C. Canada
Re: Oldiron's Airbrush Tutorial
« Reply #211 on: March 20, 2013, 03:45:06 pm »

In the poster art world of painting , Paint thickness and air pressure can be manipulated to one's advantage , Paint can be spat out and create a sand effect , Orange peel if too much paint is applied .
However  you are wanting a smooth finish , Some paints depending on it's granular pigment cannot be reduced to flow nice . Humbrols are a good choice for thinning provided you are using the proper thinners.Try about 25% thinners. But the satin and Matt paints may take more.
Is your paint free of clumps and dry skin parts, Passing the paint through some brand new clean pantyhose material will screen out a lot of stuff.
Coverage spray pattern from your airbrush at full spray may only cover the area of a 25 mm circle for small parts this works good but for a larger cabin / hull you may want to get a larger touch up gun.
I found out that over spray from passing over several times can leave a streaky pattern behind.
Air temp and humidity can make a gloss finish come out satin.( Rainy Day Cold)  , Paint it out side and bring it in to the warmer air right after painting  .
Diaphragm air compressors can make heat and moisture when in use for a long time , They also pulse air this can be a hindrance as well, Compressors with Tank systems are better.
I try and use about 20 psi as a base pressure for general stuff. depending on your compressors flow cubic feet per min. You might find out the air volume can drop and make the psi drop even after it shows about 20 psi on your gauge, This is just the same as not enough air pressure.


I got a paint sample from a shipyard and thinned it out and got a rubbery sticky mess, some commercial enamel  paint will not thin down or dry properly after. I try and get Automotive 2 part paints , yes these are costly but last and spray good .


Gary   
         
Logged

old shrimper

  • Full Mayhemer
  • *****
  • Offline Offline
  • Posts: 297
  • Model Boat Mayhem is Great!
  • Location: FNQ AUSTRALIA
Re: Oldiron's Airbrush Tutorial
« Reply #212 on: March 25, 2013, 08:40:26 am »

hi Oldiron
i used my air brush for the first real paint job today wasn't impressed ( its a duel action 0.3 nozzle gravity feed
i have been spraying water and turps through it to get a feel of it
so i dried it out over night and produced to try some ordinary RED enamel after straining it through some pantyhose it was  slightly thinner state  the you would use for brushing


i half filled the 7cc cup and all went well for about 3 to 4 minutes then it started to spit lumps of paint out and clog  up so i put my finger over the end and pulled the trigger and blew it back in to the bowl clearing it  this just kept happening so i thinned the paint about 50/50 was better but not perfect still kept clogging up 
i ended up with paint so thin that a 7 cc cup was gone in about 60 sec i had the pressure at max for the little desk top compressor they say 20 psi ?


what am doing wrong ??
thanks bob
Logged
50 YEARS OF TOWING NETS

West Coast tug

  • Shipmate
  • *
  • Offline Offline
  • Posts: 14
  • Model Boat Mayhem is Great!
  • Location: New Westminster B.C. Canada
Re: Oldiron's Airbrush Tutorial
« Reply #213 on: March 25, 2013, 03:46:45 pm »

Do not mix turps with water in an airbrush it will clog, The Turps will skin the inside of the air paint mixing galleries. Your Enamel then worked like paint remover inside the brush and released the turps skin . To remove the turps use some Lacquer thinner . Yes this will again make it clog but just keep forcing it through. I keep a bottle of thinners in squeeze container to force it in if required.
Have a bucket to dump stuff into and catch over spray place a rag in the bucket to absorb most of the spray.

If your paint is going to be Enamels only get a better grade thinners for paint mixing , You can use the lacquer thinners for clean up of the airbrush any time with out clogs happening in the future.
If you use Acrylics water based paints , Then try and use Enamels the same skin problem may occur inside again.
If you can afford 2 air brushes this is best no main clean ups.
What make of paint is the Red??
I have used some cheap thinners and they turned the paint in to glue and rubbery gunk.

Your air brush flat out should be able to empty the cup in about a min.
Paint build up on the needle as it comes out will make the brush spit keep this clean by rubbing it with a cloth and some thinners on the needle. This only happens if you are stopping and starting a lot.
Gary

Logged

old shrimper

  • Full Mayhemer
  • *****
  • Offline Offline
  • Posts: 297
  • Model Boat Mayhem is Great!
  • Location: FNQ AUSTRALIA
Re: Oldiron's Airbrush Tutorial
« Reply #214 on: March 25, 2013, 11:06:24 pm »

HI GARY


thanks for that info ,i have always been a brush man so spraying is new to me
the RED enamel is a turps clean up  one from the the local hardware in the small 125 mil tins ASIAN PAINTS  APCOLITE full gloss  SYNTHETIC enamel
might try a new regular brand of paint as i have added a fair bit of turps to the strained lot i have
cheers Bob
Logged
50 YEARS OF TOWING NETS

old shrimper

  • Full Mayhemer
  • *****
  • Offline Offline
  • Posts: 297
  • Model Boat Mayhem is Great!
  • Location: FNQ AUSTRALIA
Re: Oldiron's Airbrush Tutorial
« Reply #215 on: March 26, 2013, 12:17:29 am »

has any one used this product
http://www.floodaustralia.net/products/paint_additives/penetrol.php


the other paints i have ( except for the red ) are from this company FLOOD COMPANY AUSTRALIA
handy can enamel gloss and it does BRUSH very well if you warm it up with out thinning it
i might try some penetol and see how well the brush goes IF I DONT have any joy with the enamel thinner
i was reading that the red is synthetic paint from India ??? 
Logged
50 YEARS OF TOWING NETS

West Coast tug

  • Shipmate
  • *
  • Offline Offline
  • Posts: 14
  • Model Boat Mayhem is Great!
  • Location: New Westminster B.C. Canada
Re: Oldiron's Airbrush Tutorial
« Reply #216 on: March 26, 2013, 02:06:40 am »

It sounds like a cheap sign paint.
The best results are from a more quality made paint but the supply that you have to deal with may not change.
The cheaper paints have a different type of Polymer plastic construction ( Carrier) some of these chemicals don't like mixing with some thinners.
Paints depending on the density of the color pigment  can not be cut down much the pigment may not look the same color after it dries.
The Polymer in the paint may not even dry well after ( Rubbery and easy to peal ).
Humbrol's don't like my locale cheap thinners they go rubbery and don't dry , The hobby guys bring in a suitable thinner for this paint that I use.
Lacquer thinner is still what I use to clean.
Some fellows just find out that some stuff just wont flow good for spraying out a small nozzle , I have found this out myself .
Gary
Logged

old shrimper

  • Full Mayhemer
  • *****
  • Offline Offline
  • Posts: 297
  • Model Boat Mayhem is Great!
  • Location: FNQ AUSTRALIA
Re: Oldiron's Airbrush Tutorial
« Reply #217 on: March 26, 2013, 07:54:43 am »

well i went bought  a  different  brand of paint (still enamel )  and some enamel spraying thinner (  and it dident clog as much ) striped the gun and then blew 2 cups of thinner through , it  is clean
BUT
it looks like to me  like the nozzle isn't big enough .3 as you have to have the paint like water ( with no coverage ) it would take an hour to do one coat on the under water part of hull
so i did it with a brush and will rub it back then try the spray again with a .5 nozzel &%$#@#$%&* air brush

is water base any easier to spray ?

clean up would be a lot cheaper


Logged
50 YEARS OF TOWING NETS

oldiron

  • Full Mayhemer
  • *****
  • Offline Offline
  • Posts: 3,326
  • Location: Lindsay, Ontario, Canada
Re: Oldiron's Airbrush Tutorial
« Reply #218 on: March 26, 2013, 09:45:08 am »

well i went bought  a  different  brand of paint (still enamel )  and some enamel spraying thinner (  and it dident clog as much ) striped the gun and then blew 2 cups of thinner through , it  is clean
BUT
it looks like to me  like the nozzle isn't big enough .3 as you have to have the paint like water ( with no coverage ) it would take an hour to do one coat on the under water part of hull
so i did it with a brush and will rub it back then try the spray again with a .5 nozzel &%$#@#$%&* air brush

is water base any easier to spray ?

clean up would be a lot cheaper

  I've been following the responses to your problem. Sorry to hear you're having such a hard time of it. Properly sorted an air brush will do a far superior job to a bristle brush.
  That said, your "dribble" problem can be as  simple as trying to force too much paint through to small a nozzle. I've caught myself in the same situation, at times. I either get too lazy to change too a needle and tip(in my case) or I try and do too big a job for the size of the tip, but the result is the same..............a dribble. You've probably got an excellent tip for doing the small work such as figures and fittings where you're not spraying a lot at a time. However, when you open it wide for the deck, hull, superstructure, or what ever, you're trying to force too much paint through the opening.  When this happens not all the paint atomizes properly and drops out of the stream, getting caught on the rim of the tip. Get enough, and the stream blows it off the tip and gives you a blob on your work. This is usually accompanied by a distinct blueness in the air.
  Lesson, go to a larger tip for larger work and don't force the nozzle to do too much.
  good luck

John
Logged

West Coast tug

  • Shipmate
  • *
  • Offline Offline
  • Posts: 14
  • Model Boat Mayhem is Great!
  • Location: New Westminster B.C. Canada
Re: Oldiron's Airbrush Tutorial
« Reply #219 on: March 26, 2013, 03:51:34 pm »

Water based acrylics Tamiya and the other hobby stuff spray nicely . Anything with Latex base avoid it it has a gluey polymer construction and sand like particles.
You can spray latex but not from a airbrush , a smaller touch up gun can do it, Or use a Wagner air less unit.
Air brushes are not the best choice for general coverage of painting hulls / super structures , There paint coverage is to small , Get a larger unit to put out paint fast.
Its like coloring a poster board with a sharpy pen  you will see the lines between.
Double action air brushes are known for fine work , Paasche , Binks, Wren, Badger all make a single action that can cover stuff quicker but I would still get a larger gun for the main hull stuff.
Gary
Logged

old shrimper

  • Full Mayhemer
  • *****
  • Offline Offline
  • Posts: 297
  • Model Boat Mayhem is Great!
  • Location: FNQ AUSTRALIA
Re: Oldiron's Airbrush Tutorial
« Reply #220 on: March 26, 2013, 11:05:49 pm »


thanks guys for words of wisdom , yer i think because i've all ways used commercial paints for my real boat painting  refitting jobs every year for 50 years
with a brush and had good success they would be worth a try as i have a good range  of acrylic water base / 2 pack /enamel / etc
put it looks like i need some hobby paint after talking to you and reading up on it all the structure of the hobby paint seams to be a lot finer then commercial paint ,
i though it was the same only in little tins with a big price ?


also agree  im trying to do to big a job with to little tool as you have said i don't know what tamiya is worth in the UK but its about $8 for 10m jar here ,you can get it  from china
free shipping for $3.45 so im going to order a kit 25 jars of your choice of color  for $80 and some thinner
and i will look in to a bigger gun
cheers Bob
Logged
50 YEARS OF TOWING NETS

West Coast tug

  • Shipmate
  • *
  • Offline Offline
  • Posts: 14
  • Model Boat Mayhem is Great!
  • Location: New Westminster B.C. Canada
Re: Oldiron's Airbrush Tutorial
« Reply #221 on: March 26, 2013, 11:23:35 pm »

Have you tried the Auto paint supplier for 2 part urethane colors in half liter sizes, I have done this for 2 of my tugs that had a custom color . Yes it's expensive  but sprays with no problems .


One of the neat things is that I have found out is where to get a spray can of nonskid paint . It looks like sand paper when dry 40 grit. Some decks are covered with this stuff in real life .
As for the under side of the vessel I just get a can of Tremclad red oxide primer .
Gary
Logged

Captbearuk

  • Full Mayhemer
  • *****
  • Offline Offline
  • Posts: 79
  • Location: Alhaurin el Grande, Spain
Re: Oldiron's Airbrush Tutorial
« Reply #222 on: March 27, 2013, 12:02:32 am »

John,


I've been looking at Badger 200 airbrushes and I've found numbers 200-3, 200-5, 200-20. The Badger home page doesn't make it clear what these additional numbers relate to. Any idea, do they make a difference?
Thanks
Glyn
Logged

old shrimper

  • Full Mayhemer
  • *****
  • Offline Offline
  • Posts: 297
  • Model Boat Mayhem is Great!
  • Location: FNQ AUSTRALIA
Re: Oldiron's Airbrush Tutorial
« Reply #223 on: March 27, 2013, 12:23:45 am »

Hi Gary
yes the red oxide is  what i've been trying to spray ? (does have the realistic look of antifoul with out the chalking off on yer hands )
might try a tiny roller as we used them all the time on the trawlers ( 60 lt of antifoul and 2 x 18" rollers and away you go ) LOL


i was going to ask what you guys use to simulate  nonskid deck paint ( we used fine glass beads in 2 pack epoxy paint on the real stuff , sprinkle it on  with a holes in the bottom of a liter tin , like a large salt shaker


i used 2 pack under coat ( gray )  on the hull over the glass but i brushed it and then rubbed it back smooth as i don't have a big gun or a large composer


yes it is expensive $50  liter in small quantities here , 20 lt drums are a lot more economical
we used poly urethane[size=78%]  exclusively on the trawlers inside and out  , (timber and steel ) no enamel paint anywhere[/size][size=78%] ,we could get 5 years on the forward half  of hull out of it , the aft half was painted every year[/size][size=78%]do you guys use the water based one ? we [/size]don't[size=78%] have it here yet  [/size]
Logged
50 YEARS OF TOWING NETS

oldiron

  • Full Mayhemer
  • *****
  • Offline Offline
  • Posts: 3,326
  • Location: Lindsay, Ontario, Canada
Re: Oldiron's Airbrush Tutorial
« Reply #224 on: March 27, 2013, 10:58:30 am »

 Glyn
  I'm assuming you're taking about the range of 200's shown below (copied from the Badger web site). After looking at the instructions more closely it appears the biggest difference is in the spray head design. The bottom one is obviously a permanent gravity feed. Depending on the head design they will handle a certain range and type of paints. The gravity feed model is designed for very fine work as opposed to the others.
  About using these on large surfaces, I painted the hull on my Graupner Seabex with the one of these Badger 200's with no problem. Gave a very nice finish with a laquer paint designed for model work. The model designed paints have a much smaller pigment than paints designed for things int eh 12" to the foot world and are, therefore, much easier to pass through a small airbrush nozzle properly.


John


BADGER® 200®
      SINGLE ACTION, INTERNAL MIX SERIES
  Badger's 200® Series offers the ease of single action operation while providing the fine spray pattern of internal mix paint atomization for professional results. Depressing the trigger releases a pre-set amount of color which can be regulated by turning a needle adjustment screw at the back of the airbrush handle. Once the desired paint flow is set the airbrush will maintain the preset spray pattern until the user chooses to change it. 
 
  
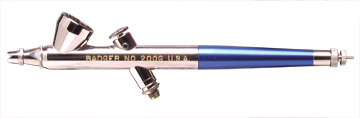
  MODEL 200 BOTTOM FEED AIRBRUSH
 Simplicity of use makes this the top choice for the advanced model painter or decorative stenciler. Also an excellent airbrush for painting posters, auto detailing and  ceramics. The Model 200 will spray inks, dyes, watercolors, gouaches, properly reduced acrylics, fabric paints, modeling paints, automotive lacquers and enamels, most ceramic stains and glazes, Air-Tex®, Air-Opaqueª and MODELflex® airbrush colors. (Available in a single head design or detail design). 
FEATURES
 •  Choice of 3/4 oz. (22ml), 2 oz. (60ml), or 3 oz. (90ml) paint jars, and 1/4 oz. (7ml) free- standing color cup  (Bottom feed only)
 •  Color cup and one-piece jar adaptor taper-fit for quick color change (Bottom feed only)
 •  Self-lubricating PTFE needle bearing enables continuous proper paint flow and prevents needle wear
 •  PTFE head seal assures efficient air flow
 •  Non-slip, one-piece trigger
 •  Fine (F) - pencil line to 2" (51mm) spray pattern
 •  Medium (M) - 1/32" (0.8mm) to 2 1/2" (63mm) spray pattern
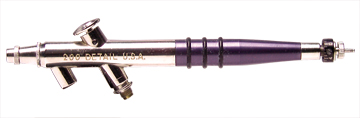
    MODEL 200 DETAIL AIRBRUSH
 The finest single action internal mix detail airbrush ever.  The Model 200-20 is designed with the PPS paint flow adjusting system, enabling recurring accuracy in spray pattern and line control.
 

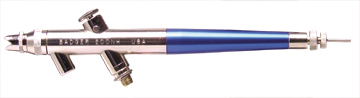
 MODEL 200 GRAVITY FEED AIRBRUSH
 Offers single action simplicity in a gravity feed airbrush. Allows for "close in"  CLICK  IMAGE TO VIEW INSTRUCTION BOOK
   spraying. Excellent for model detailing and fingernail artists utilizing mini-stencils. (Available as Fine and/or Medium). 200G height=94 
   
 
Logged
Pages: 1 2 3 4 5 6 7 8 [9] 10   Go Up
 

Page created in 0.099 seconds with 22 queries.