Model Boat Mayhem

Please login or register.

Login with username, password and session length.
Pages: 1 2 [3] 4 5   Go Down

Author Topic: Battlecruiser HMS Hood - A Hachette Project  (Read 171959 times)

Peter C

  • Guest
Re: Battlecruiser HMS Hood - A Hachette Project
« Reply #50 on: February 28, 2012, 10:05:38 pm »

Part 16 contained 1 piece of deck and 1 beam, which was for future use.

The instructions detailed the sanding required for the deck cross beams previously placed into position, these need to be fairly loose to enable the deck to be easily removed, after sanding the deck was glued and clamped onto the Cross beams making sure no glue was near the hull formers, to make sure the deck was removed after 1 hour and left to dry overnight, extra clamps were added as necessary.


Regards

Peter
Logged

Peter C

  • Guest
Re: Battlecruiser HMS Hood - A Hachette Project
« Reply #51 on: March 02, 2012, 02:09:11 pm »

Part 17 just contained 1 piece of deck, this along with the parts previously issued and not used were finally glued in place.

The first item was to glue the deck to the bearers, again making sure that the deck assembly was still removeable, the deck beam issued last week was cut in half and glued to the framework to support the aft structure previously made, this will be the final deck part fitted to this part of the removeable deck assembly.

The instructions stated that the forward structure previously made was to be glued to the deck, I have left this loose on the assumption that it more work done to it and will be covered with brass etched walls later, this may be easier if left off the deck (I can allways glue it in place later if necessary),

2 small wall pieces and shaped sub deck were positioned and glued together as shown in the instructions, again not gluing to the main deck as per the instructions.


Regards

Peter
Logged

Peter C

  • Guest
Re: Battlecruiser HMS Hood - A Hachette Project
« Reply #52 on: March 07, 2012, 01:27:51 pm »

Part 18 contained the first parts of the inner walls leading from the Admiral's cabin, after numbering, they were removed from the fret, placed into their respective slot in the deck and glued together, and corners rounded where detailed.

As with the other parts, they are not glued to the deck to allow the brass etched parts to be fixed easily.


Regards

Peter
Logged

Glyn

  • Full Mayhemer
  • *****
  • Offline Offline
  • Posts: 43
  • Model Boat Mayhem Forum is the Best!
  • Location: Centurion, Gauteng Province, South Africa
Re: Battlecruiser HMS Hood - A Hachette Project
« Reply #53 on: March 13, 2012, 04:07:32 pm »

Just an observation: has anyone noticed that the photograph - a three quarter stern shot - on the cover of the poster (first issue), isn't actually of the Hood? It appears to be a Resolution class battle cruiser. This partwork has just been released here in South Africa and although I can't afford to build it, I'll certainly be following the construction of the model featured on this blog. Best wishes to all modellers of the mighty Hood, Glyn
Logged

Eric65

  • Guest
Re: Battlecruiser HMS Hood - A Hachette Project
« Reply #54 on: March 13, 2012, 05:37:38 pm »

I think the warship leading is the Hood, photo taken from Repulse or Renown.
Logged

peter c

  • Full Mayhemer
  • *****
  • Offline Offline
  • Posts: 589
  • Location: Wolverhampton
Re: Battlecruiser HMS Hood - A Hachette Project
« Reply #55 on: March 19, 2012, 02:04:24 pm »

Hi everybody

just had to re-register to get back on the forum.

Well spotted Glyn and Eric65 (welcome Eric65 to the forum, hope you will post your builds on here) I've just checked on the Getty Images web site, somebody at Hachette didn't do their research properly. the photo is listed as  the English fleet in Pas de Calais straights in December 1939, Foreground is HMS Renown with HMS Hood in the background.

They could have chosen a better photo of HMS Hood to start the series.

Regards

Peter
Logged
Member of Chasewater Model Boat Club and Mid Wales Model Boat Club

Eric65

  • Full Mayhemer
  • *****
  • Offline Offline
  • Posts: 188
Re: Battlecruiser HMS Hood - A Hachette Project
« Reply #56 on: March 21, 2012, 04:11:49 pm »

Just reregistered too, glad to be back!

All I need now is for my latest issues to arrive!!!!
Logged

peter c

  • Full Mayhemer
  • *****
  • Offline Offline
  • Posts: 589
  • Location: Wolverhampton
Re: Battlecruiser HMS Hood - A Hachette Project
« Reply #57 on: March 31, 2012, 12:33:34 am »

Part 19 completed the inner walls to this deck, as previous walls, they can be removed for fitting the etched walls, I had to give carefull consideration on building the front section so that i could sand the curved sections without getting the return walls in the way.


There is only the stern decking to complete before we start planking.

Regards

Peter
Logged
Member of Chasewater Model Boat Club and Mid Wales Model Boat Club

peter c

  • Full Mayhemer
  • *****
  • Offline Offline
  • Posts: 589
  • Location: Wolverhampton
Re: Battlecruiser HMS Hood - A Hachette Project
« Reply #58 on: April 26, 2012, 11:50:01 pm »

Parts 20 and 21 should have been the easyist part of the build, they were the 3 stern deck sections and various strengthener pieces for the planking, these fitted to the formers without any problems but the deck was another matter.

A centreline was marked down the centre to keep everything in line and then placed into position, some of the slots didn't line up with hull formers so I opened up the slots to suit rather than alter the formers.


The second problem was part 105 didn't sit flat on the formers, I checked the deck to make sure it wasn't twisted which it wasn't, then I noticed the stern. Between gluing it up and the glue drying, it had moved and was now twisted.


After considering a few ideas, the only practical solution was to cut it off and re-glue it back square, using a fine tooth saw it didn't take long to remove it , then I glued a piece of 1.5mm plywood to the stern to allow for the saw cut.


Whilst the stern was loose, I bevelled the formers ready for planking, fitting the stern deck in place to act as a guide the stern was re-glued and checked for plumb.


Logged
Member of Chasewater Model Boat Club and Mid Wales Model Boat Club

number-1

  • Full Mayhemer
  • *****
  • Offline Offline
  • Posts: 110
  • Location: Bristol UK
Re: Battlecruiser HMS Hood - A Hachette Project
« Reply #59 on: April 28, 2012, 08:20:06 pm »

Hi Peter c, I also had to open some of the slots on my deck to get it to fit, glad you managed to fix the stern on your model. Keep up the good work, Im upto issue 27 but had to do some alterations to get the servo to fit  >:-o

regards
Les
Logged

peter c

  • Full Mayhemer
  • *****
  • Offline Offline
  • Posts: 589
  • Location: Wolverhampton
Re: Battlecruiser HMS Hood - A Hachette Project
« Reply #60 on: May 18, 2012, 12:12:19 am »

Hi Les

I'm not that far yet, its being built at work so I only have time during the lunch break, I can do about 3 planks a day so its going to take some time to finish the hull.

Part 22 is the start of the planking, 20 planks total, 10 each side of the stern. All the formers were sanded as far as possible without removing the hull from the board and checked with a loose plank to make sure they laid flat to the formers before fixing.


Part 23 continued the planking under the hull, so I've decided to complete parts 23 to 27 together by finishing as much of it before removing the hull from the board, I Will post photographs periodically to show progress.

Regards

Peter
Logged
Member of Chasewater Model Boat Club and Mid Wales Model Boat Club

Bodmin

  • Shipmate
  • *
  • Offline Offline
  • Posts: 3
Re: Battlecruiser HMS Hood - A Hachette Project
« Reply #61 on: May 23, 2012, 01:21:38 pm »

Hi there,

I have just myself started on this ship myself. I have been away for some time, so I have a backlog of over thirty issues to be getting on with. This is my first attempt at a project of this size so I am watching this post regularly to see if I can pick up any pointers. I'm currently on week 9 and aim to really take my time ( an issue per day) so as to not make any rash mistakes. I only intend to make a display model and would be happy to receive any advice at all.
Logged

peter c

  • Full Mayhemer
  • *****
  • Offline Offline
  • Posts: 589
  • Location: Wolverhampton
Re: Battlecruiser HMS Hood - A Hachette Project
« Reply #62 on: May 30, 2012, 03:50:48 pm »

Hi Bodmin

This is the largest and most complex build I am doing so far, so I am following the builds on Partworks Model Forum, they have plenty of ideas and tips to follow, personally my best ideas arrive at about 3.00 in the morning, after I have spent days trying to figure out how to do it.

I am slowly planking the hull which follows the lines of the armour plating, also there are 2 layers to do, the other part that needs carefull consideration will be fitting the brass etched details, especially the wall sections.

We just need to take our time and not rush things, I find its better to walk away from the project when things go wrong and start fresh the next day.

Don't forget to post some pictures of your build so we all can follow your progress.

Regards

Peter
Logged
Member of Chasewater Model Boat Club and Mid Wales Model Boat Club

peter c

  • Full Mayhemer
  • *****
  • Offline Offline
  • Posts: 589
  • Location: Wolverhampton
Re: Battlecruiser HMS Hood - A Hachette Project
« Reply #63 on: May 31, 2012, 03:52:01 pm »

This post should have been posted last Friday as a continuation to the progress of the planking, but I had trouble downloading the photo onto Photobucket for insertion, apparently low battery power in the camera wouldn't allow me to upload it.

Parts 23 to 26 continued the planking over the anti-torpedo bulge from bow to middle section where the lower deck starts,


The hull is starting to take shape now.

More to follow.

Regards

Peter
Logged
Member of Chasewater Model Boat Club and Mid Wales Model Boat Club

Bodmin

  • Shipmate
  • *
  • Offline Offline
  • Posts: 3
Re: Battlecruiser HMS Hood - A Hachette Project
« Reply #64 on: June 01, 2012, 07:33:20 pm »

Hi Peter,

I'm a bit behind at the moment and haven't touched it in a week. However I have been a little busy and would rather it have my full attention.

A few pics of my progress are attached as requested.


Regards

Bodmin
Logged

peter c

  • Full Mayhemer
  • *****
  • Offline Offline
  • Posts: 589
  • Location: Wolverhampton
Re: Battlecruiser HMS Hood - A Hachette Project
« Reply #65 on: June 03, 2012, 01:13:12 pm »

Hi Bodmin

Your build is looking good  :-)), its supprising how quickly the hull grows as you progress through the partworks.

Keep up the good work and keep us informed on how you are progressing by starting your own blog.

Regards

Peter
Logged
Member of Chasewater Model Boat Club and Mid Wales Model Boat Club

peter c

  • Full Mayhemer
  • *****
  • Offline Offline
  • Posts: 589
  • Location: Wolverhampton
Re: Battlecruiser HMS Hood - A Hachette Project
« Reply #66 on: June 03, 2012, 01:33:10 pm »

With the planking going as low as possible without removing from the board, I started to plank the armour belt


Regards

Peter
Logged
Member of Chasewater Model Boat Club and Mid Wales Model Boat Club

peter c

  • Full Mayhemer
  • *****
  • Offline Offline
  • Posts: 589
  • Location: Wolverhampton
Re: Battlecruiser HMS Hood - A Hachette Project
« Reply #67 on: June 06, 2012, 07:53:47 pm »

Whilst the planking slowly continues, I have decided to start the etched brasswork delivered with issue 35.


As this is the first time using etched brass, things Will be taken slowly, the first step is to clean any grease or oil off the brass, leaving all the parts attached to the fret and wearing latex gloves, I wiped it over with white spirits dampened tissue paper, the back needed to be abraded with wet and dry to aid adhesion when gluing to the plywood.

Now its time to start assembly, to remove the parts from the fret, the tags needed to be cut with a sharp knife on a hard surface such as glass or ceramic tile, using anything else may result in the etch bending before cutting, only releasing the door parts as required, otherwise they could become lost, I picked the doors up using blue tack on the end of a cocktail stick, the tip of another cocktail stick was dipped in a pool of super glue then transferred to the back f the door,this was then held in position until the glue went off, I continued until all the doors had been glued into place.


The wall was removed from the fret and glued to the plywood wall with  Araldite making sure the doors were the right way up, picture to follow when side walls are glued into position.

Regards

Peter
Logged
Member of Chasewater Model Boat Club and Mid Wales Model Boat Club

rem2007

  • Full Mayhemer
  • *****
  • Offline Offline
  • Posts: 776
  • Location: Northumberland
Re: Battlecruiser HMS Hood - A Hachette Project
« Reply #68 on: June 07, 2012, 09:51:21 pm »

...when I was doing the Bismarck build and working on the etched fret work, i use a pencil with a little ball of bluetack on the end so the piece being removed didnt ping, once it pings, your on your knees for hours, good luck.
We found the CA available at most pound shops did the trick.

Robert
Logged

essex2visuvesi

  • Full Mayhemer
  • *****
  • Offline Offline
  • Posts: 6,147
  • Location: Finland, England, Finland!
Re: Battlecruiser HMS Hood - A Hachette Project
« Reply #69 on: June 08, 2012, 08:08:28 am »

I have very good results with this stuff when sticking etched parts to plastic or wood

Logged
One By One The Penguins Steal My Sanity
Proud member of the OAM  (Order of the Armchair Modeller)
Junior member of the OGG  (Order of the Grumpy Git)

gregk9

  • Full Mayhemer
  • *****
  • Offline Offline
  • Posts: 1,266
  • Location: West Midlands
    • Chasewater Model Boat Club
Re: Battlecruiser HMS Hood - A Hachette Project
« Reply #70 on: June 15, 2012, 12:03:42 am »

Hi Pete,
Am now watching your build with interest on here. its building up great and look forward to its completion.
Logged
Best wishes.

Steve. G.
Treasurer & Membership Secretary:  Chasewater Model Boat Club
http://chasewatermbc.blogspot.com/

essex2visuvesi

  • Full Mayhemer
  • *****
  • Offline Offline
  • Posts: 6,147
  • Location: Finland, England, Finland!
Re: Battlecruiser HMS Hood - A Hachette Project
« Reply #71 on: June 15, 2012, 06:04:29 am »

I have very good results with this stuff when sticking etched parts to plastic or wood


Where did the link go?

Here it is again
http://www.gatorsmask.com/gatorglueorder.html
Logged
One By One The Penguins Steal My Sanity
Proud member of the OAM  (Order of the Armchair Modeller)
Junior member of the OGG  (Order of the Grumpy Git)

peter c

  • Full Mayhemer
  • *****
  • Offline Offline
  • Posts: 589
  • Location: Wolverhampton
Re: Battlecruiser HMS Hood - A Hachette Project
« Reply #72 on: June 22, 2012, 02:38:26 pm »

At last the upper planking has been completed, it can now be removed from the baseboard and turned over to complete the other side.


Its surprising how these planks have made the hull rigid, I shall have to try and get more of the brass etched parts fitted to the superstructure, the issues waiting to be completed are mounting up.

Regards

Peter
Logged
Member of Chasewater Model Boat Club and Mid Wales Model Boat Club

peter c

  • Full Mayhemer
  • *****
  • Offline Offline
  • Posts: 589
  • Location: Wolverhampton
Re: Battlecruiser HMS Hood - A Hachette Project
« Reply #73 on: July 18, 2012, 10:38:11 pm »

My apologies for not posting in the past few weeks, but I've been very busy both at work and at home, I haven't had as much time as I would have liked to spend on the build.

Now to catch up with the photos.

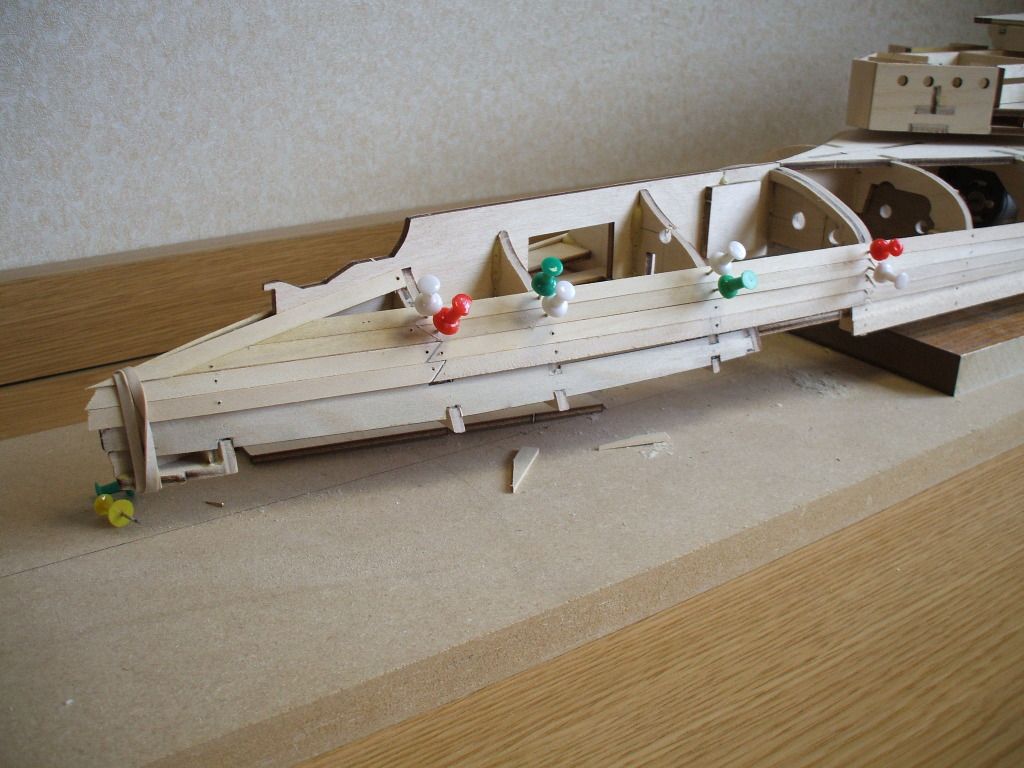
The hull has now been removed from the baseboard and completed sanding the formers for the planks, I have started at the stern as this seems the most difficult part.


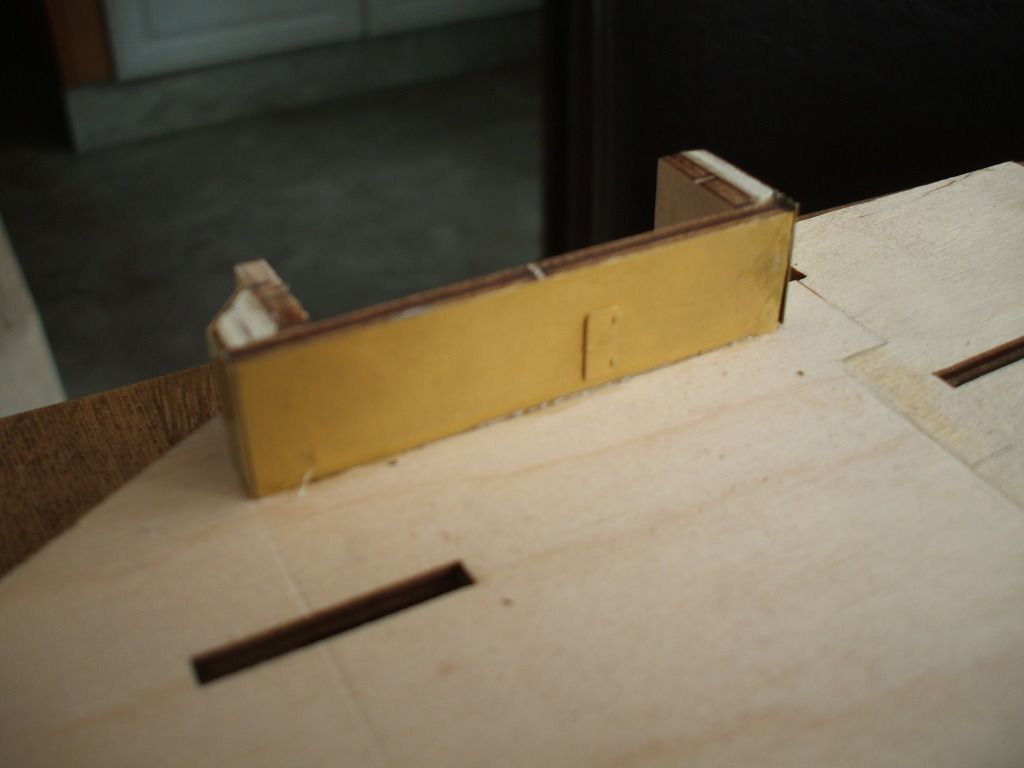
I have also managed to glue the brasswork received in Part 35 to the formers, in my excitement of working on the brass parts, I completely messed up the fitting of the return parts, these have now been removed and will be refitted at a later date when we complete the external structural parts.


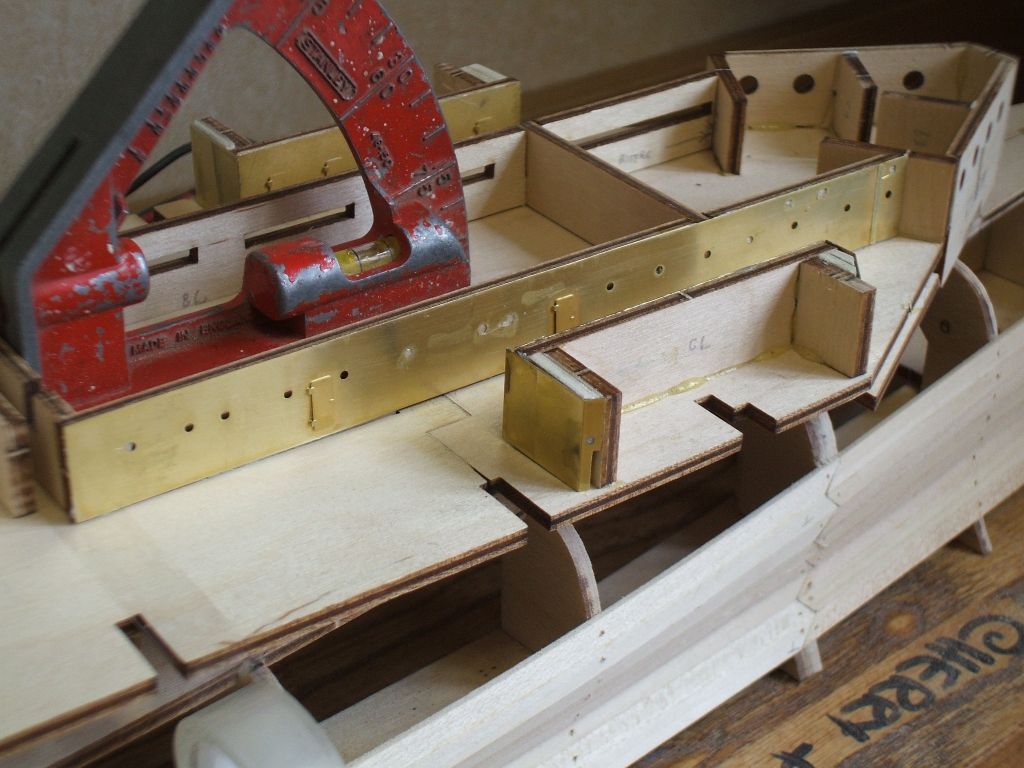
Part 37 is one of the long internal walls, this only had 2 doors to fit before fitting to the plywood wall, it also contained one of the internal corner walls, but as this will be a working ship, I want to provide as much support to the bass as possible, so the corners will be fitted once I have filled the gap with scrap plywood.


I hope my next posting will be sooner.

Regards

Peter
Logged
Member of Chasewater Model Boat Club and Mid Wales Model Boat Club

peter c

  • Full Mayhemer
  • *****
  • Offline Offline
  • Posts: 589
  • Location: Wolverhampton
Re: Battlecruiser HMS Hood - A Hachette Project
« Reply #74 on: July 25, 2012, 02:08:44 pm »


Woops made a mistake in the last posting :embarrassed: it should have been detailed as Part 36

Part 37 contained the other side of the long internal wall, this was fitted as previous only I glued the brass to the plywood before fitting the doors, and I remembered to drill timber for the portholes that was missed when the ply was lazer cut.


The first layer of planking is nearly complete at the bow, the final 2 planks will need to be reduced in width to suit the gap remaining, I hope to complete most of this before I go on holiday.


with 'er indoors now working during the evening time in the week, I am managing to do some of the etched brass at home allowing me to catch up on the build.

Regards

Peter
Logged
Member of Chasewater Model Boat Club and Mid Wales Model Boat Club
Pages: 1 2 [3] 4 5   Go Up
 

Page created in 0.087 seconds with 22 queries.