Model Boat Mayhem

Please login or register.

Login with username, password and session length.
Pages: 1 [2] 3 4 5   Go Down

Author Topic: Oh no, not another TVR1A!  (Read 38270 times)

SailorGreg

  • Full Mayhemer
  • *****
  • Offline Offline
  • Posts: 1,335
  • Money talks - it says goodbye
  • Location: Hayling Island, Hants
Re: Oh no, not another TVR1A!
« Reply #25 on: November 01, 2012, 12:39:07 pm »

Happy days!  The TVR goes together without a hitch and I now have a complete engine.  My only tiny gripe is that the hex head set doesn't include replacement screws for the connecting rods - you have to stick with the slot heads.  But then you can hardly see the screws under the engine anyway, and when it's running you can't see them at all.


Well, when I say it went without a hitch, there was a little one.  Eagle-eyed readers will notice that the inlet manifold is fitted with slot-head screws (as is the exhaust).  This is because I couldn't find a way of tightening the hex head screws because they are so close to the pipe -


You can see that the flat of the head is up against the pipe.  I couldn't get the supplied socket over the head, and although I could try needle-nose pliers the screw won't turn straight because the corners of the head won't pass the pipe without binding.  Can anyone offer me a solution?

Apart from that little wrinkle, everything went fine, and I set the engine up on my little compressor, oiled everything twice and pressed the switch.  The engine started immediately.   :} :-))   I don't know why that surprised me, but it did, and I was a very happy man.  The engine runs equally well in forward and reverse and has clocked up an hour or so of running so far. 


I've started on the boiler cladding now and will post something on that next.

Chuffed to bits so far!!   :} :}

derekwarner

  • Full Mayhemer
  • *****
  • Offline Offline
  • Posts: 9,472
  • Location: Wollongong Australia
Re: Oh no, not another TVR1A!
« Reply #26 on: November 01, 2012, 01:16:39 pm »

Contrary to the thread title.......I suggest each TVR1A build is individual & we enjoy each build read O0
Your engine build looks fine Greg......... :-)) .....
Are you going to lag the steam inlet tubes?.....
Do not attack any brass component with the proprietary "Brasso" polish as it will dullen & eat into the blue enamel
In OZ we have a product called Metal Magic....... %) it is brilliant & does not dullen or eat into the enamel.......Derek
Logged
Derek Warner

Honorary Secretary [Retired]
Illawarra Live Steamers Co-op
Australia
www.ils.org.au

essex2visuvesi

  • Full Mayhemer
  • *****
  • Offline Offline
  • Posts: 6,148
  • Location: Finland, England, Finland!
Re: Oh no, not another TVR1A!
« Reply #27 on: November 01, 2012, 01:23:31 pm »

Very nice :)
Tempted to build one just for show
Logged
One By One The Penguins Steal My Sanity
Proud member of the OAM  (Order of the Armchair Modeller)
Junior member of the OGG  (Order of the Grumpy Git)

pettyofficernick

  • Full Mayhemer
  • *****
  • Offline Offline
  • Posts: 1,255
  • Marineville will be destroyed, Muahahaha.....
  • Location: Leasowe, Wirral
Re: Oh no, not another TVR1A!
« Reply #28 on: November 01, 2012, 02:13:38 pm »

I had the same problem with the manifold bolts and reverted to the screws. Looks good all the same.....
Logged
What I do is best not discussed, for I have been many things in my time....

Jerry C

  • Full Mayhemer
  • *****
  • Offline Offline
  • Posts: 1,504
  • Location: Caernarfon, North Wales.
Re: Oh no, not another TVR1A!
« Reply #29 on: November 01, 2012, 02:56:34 pm »

We all have the same problem. Ignore it and use the screws. When you put the lagging on the manifolds, if you use my method of string, pollyfiller and masonry paint , put it all on before fixing manifolds in place keeping the screw area clear. You can then build up the area with thin layers of filler using a small paint brush and lose the screws altogether.  She really looks stunning.
Jerry.

SailorGreg

  • Full Mayhemer
  • *****
  • Offline Offline
  • Posts: 1,335
  • Money talks - it says goodbye
  • Location: Hayling Island, Hants
Re: Oh no, not another TVR1A!
« Reply #30 on: November 03, 2012, 05:59:17 pm »

Made some progress on getting the boiler ready.  I was given a piece of insulating fabric by muleears (thanks Cal) and I also got hold of some ceramic paper (that sounds like an oxymoron to me!) so I thought I would do a belt and braces job on the insulation.  Cal's contribution (left over from his own Maccsteam 3.5" boiler) was exactly the right width for the boiler and only needed a small piece trimming off to fit perfectly.  I followed the process described by logoman here http://www.modelboatmayhem.co.uk/forum/index.php?topic=31545.msg311399#msg311399 so all the holes in both the soft stuff and the wood were cut with wad punches.  I dipped the edges of the insulation in some wood dye so they wouldn't show up bright white, and fixed the first layer to the boiler with double sided tape

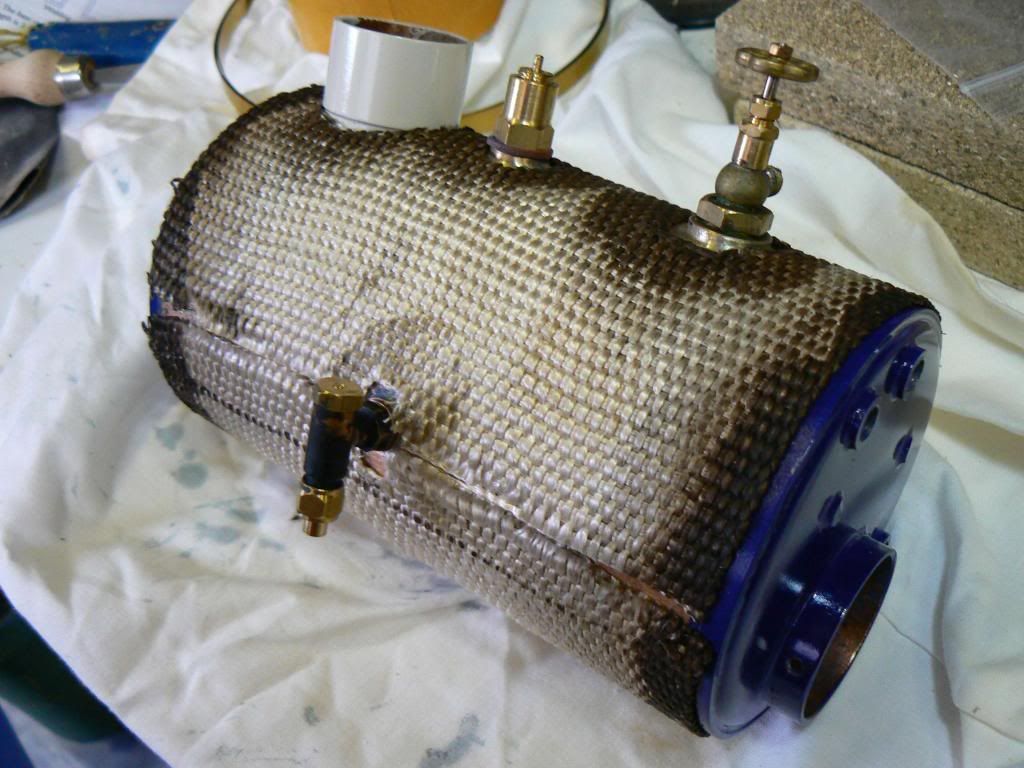
I did the same with the ceramic paper -

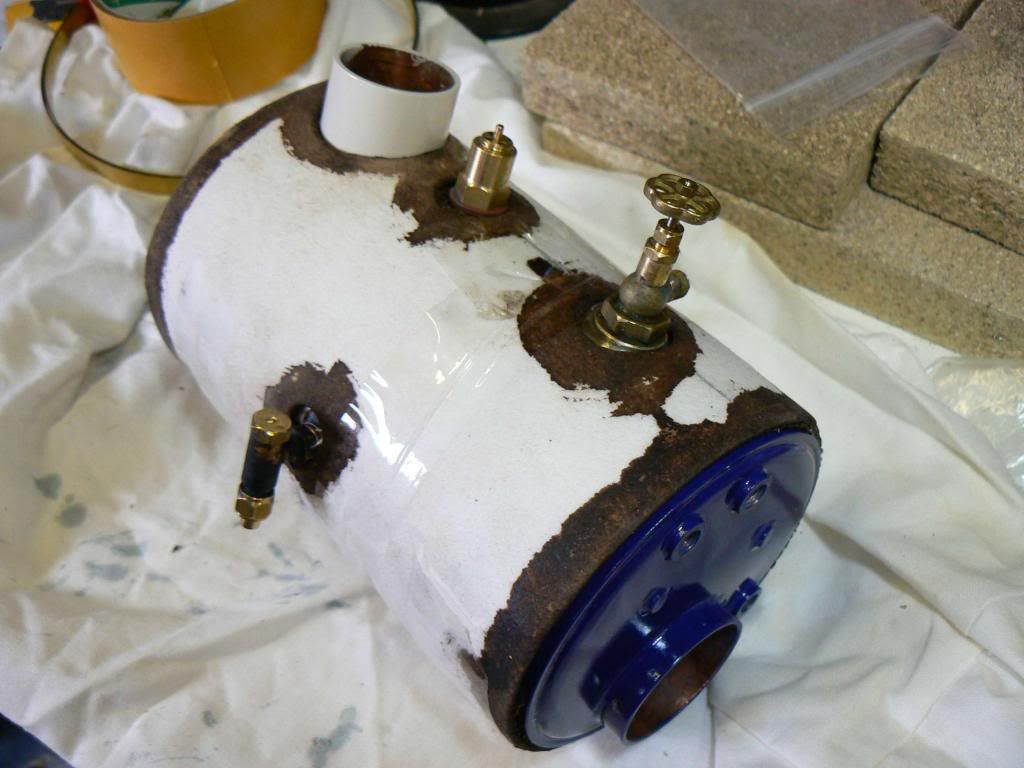
although this was held in place with ordinary tape around the outside.
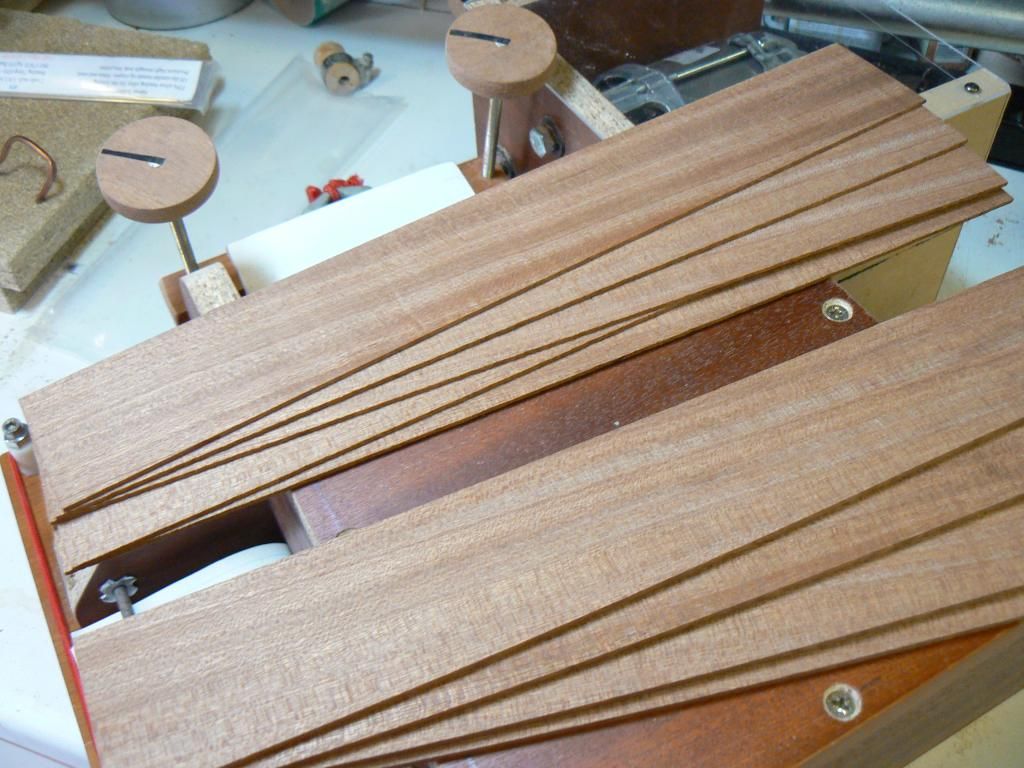
I prepared my wood strips from an offcut of sapele I have had around for ages.  I sliced it up on my bandsaw then ran it through my homemade thickness sander to get all the slices to a consistent thickness.  Here are the slices all sanded and ready for cutting up.

I cut these to width on the bandsaw then sanded the edges to make them smooth and slightly bevelled.  I did this by fixing a straight edge and a stop to a piece of kitchen worktop, then sanding the edges to give a slight bevel along the length.

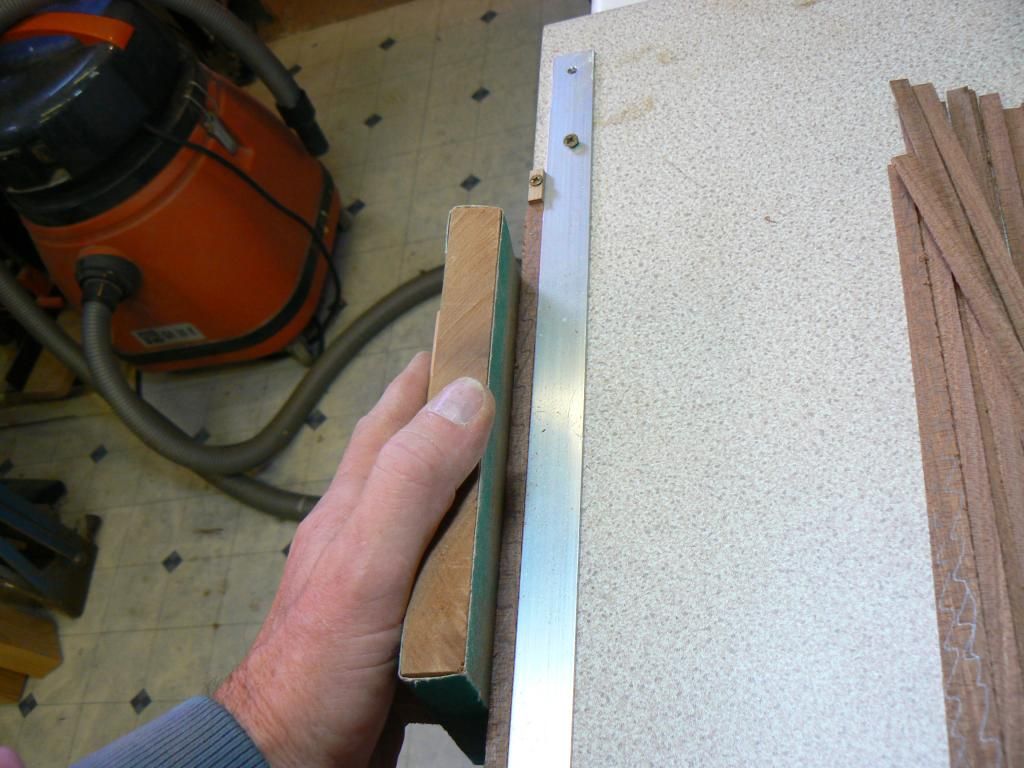
You can see I scribbled on what will be the inside face so I always knew which way the bevel had been cut.  I then cut the strips to length, and followed logoman's instructions to put the cladding together.  Here's the top section in place on the boiler (double sided tape again).

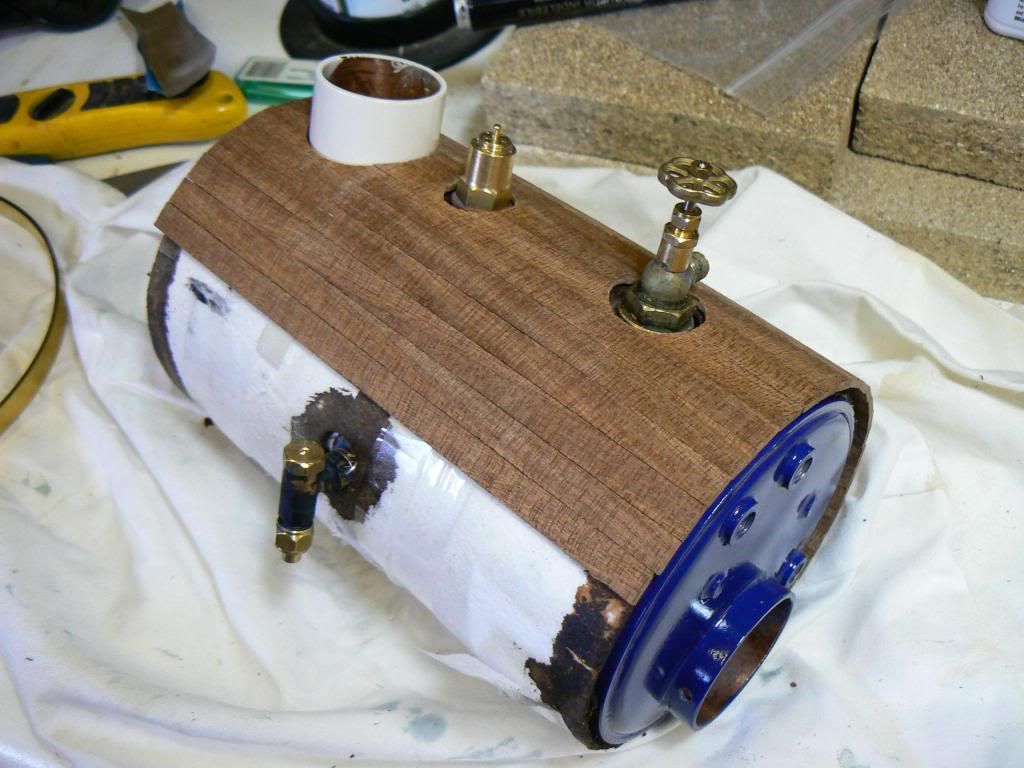
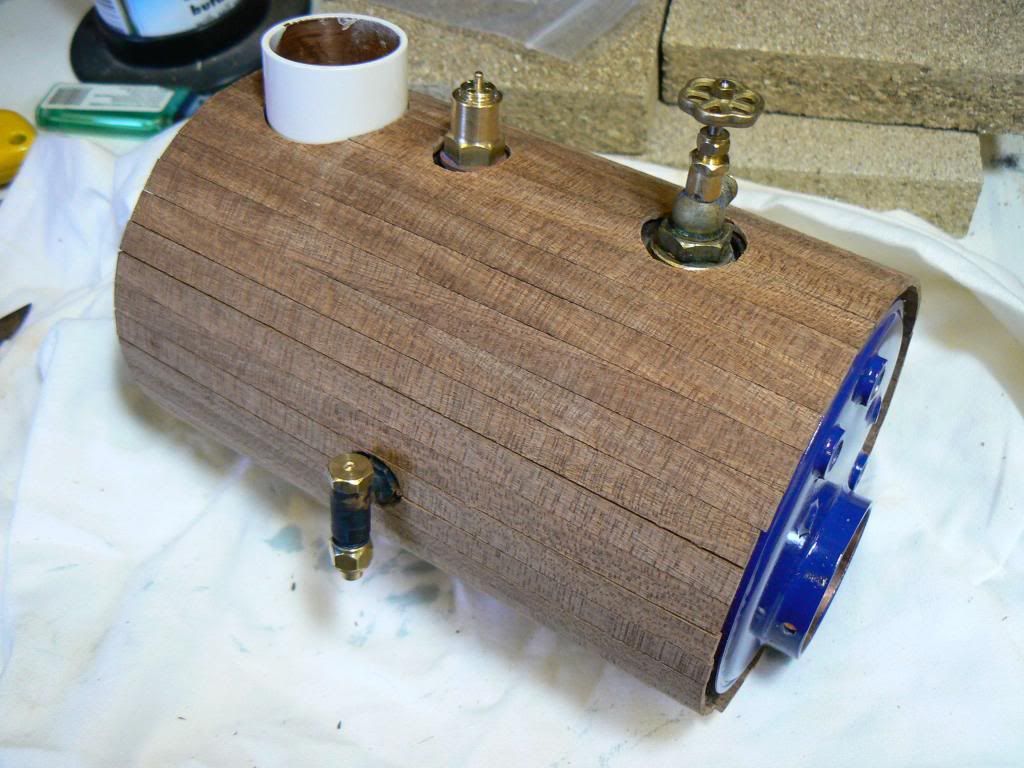
and the whole boiler clad -

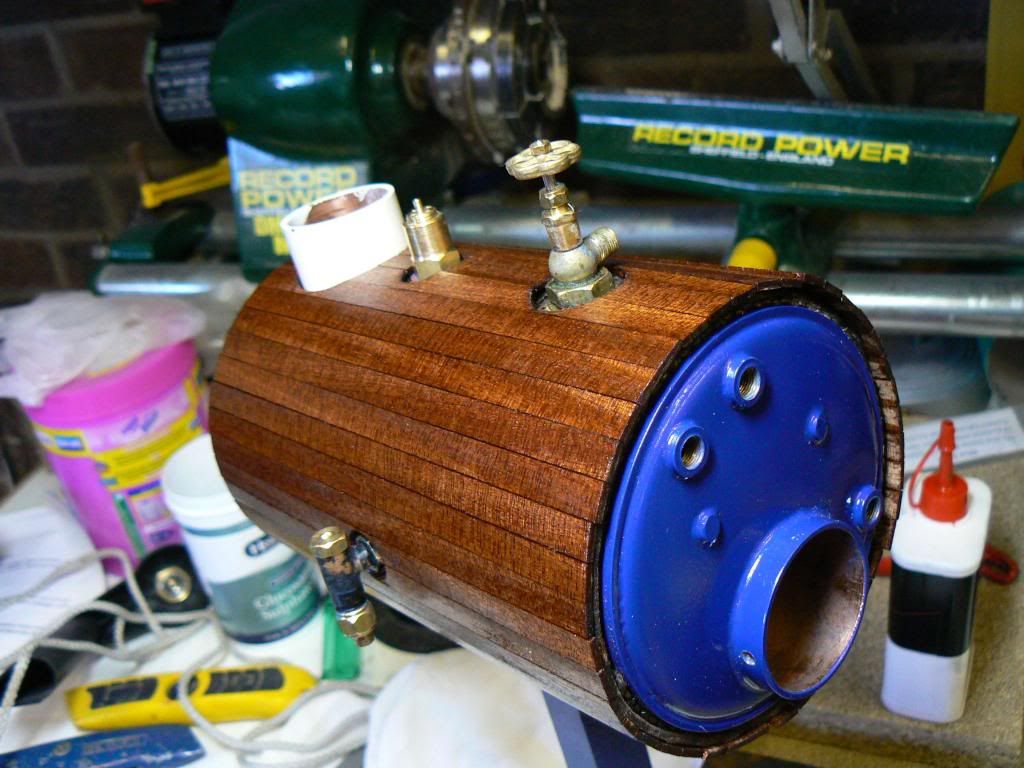
A couple of coats of thinned varnish and it's starting to look pretty good.

I need to attend to the ends - the strips are a bit long and don't all line up as I want - but I'm going to wait until I've got the bands in place before doing that.  I need to confess I made a complete hash of my first attempt at the bands - one ended up wrapped round the drill chuck (I know, fix things down before drilling  :embarrassed: ) and one got cut too short (I know, measure twice... :embarrassed: ).  I am now waiting for some more banding to turn up to finish the boiler cladding off.

Ran the engine for a while today.  It now has two hours on compressed air, so it should be ready for steam once I have something that can make it!

Really enjoying this  :-)) :-)) :-))

Greg


SailorGreg

  • Full Mayhemer
  • *****
  • Offline Offline
  • Posts: 1,335
  • Money talks - it says goodbye
  • Location: Hayling Island, Hants
Re: Oh no, not another TVR1A!
« Reply #31 on: November 03, 2012, 06:13:12 pm »

Sorry - meant to say thanks to Jerry and Nick for their reassurance over the manifold screws - nice to know it's not just me!  And I like your recipe for the pipe lagging Jerry, it certainly ends up looking neater and cleaner than some of the bare string you see around.

Anybody going to the Warwick show on the Friday?  I plan to. (Sorry, hijacking my own thread  %) )

Greg

SailorGreg

  • Full Mayhemer
  • *****
  • Offline Offline
  • Posts: 1,335
  • Money talks - it says goodbye
  • Location: Hayling Island, Hants
Re: Oh no, not another TVR1A!
« Reply #32 on: November 07, 2012, 11:51:07 am »

The new banding for the boiler arrived, and I was a lot more careful cutting and drilling this time.  Here is the result -


I also decided to take pettyofficernick's advice and ask George (ooyah2) to provide me with an engine driven pump.  It arrived this morning, and looks just the job.  Thanks George!  :-)) :-)) (and thanks Nick for the recommendation)
For those who haven't seen Nick's thread on this pump (http://www.modelboatmayhem.co.uk/forum/index.php?topic=39299.0), this is what George's pump looks like -


I am a little way away from putting it and all the other bits together into a working steam plant, but I plan to start that sometime next week (other things occupying me before then - including a trip to Leamington Spa on Friday).  Guess I'll need to do some silver soldering practice soon.  I haven't done any of that before - I've had one go at a nipple on the end of some pipe and it turned out OK but a bit messy, obviously I need to polish up my technique. O0 O0   There's lots of directions, tutorials and video guides around so I don't lack advice - just practical skill, and there's only one way to fix that!

Greg

Jerry C

  • Full Mayhemer
  • *****
  • Offline Offline
  • Posts: 1,504
  • Location: Caernarfon, North Wales.
Re: Oh no, not another TVR1A!
« Reply #33 on: November 07, 2012, 12:19:16 pm »

That boiler's giving me a load of Déjà blue.
Jerry.

logoman

  • Full Mayhemer
  • *****
  • Offline Offline
  • Posts: 33
Re: Oh no, not another TVR1A!
« Reply #34 on: November 08, 2012, 07:55:01 pm »


Hi Greg,
to fit the manifold with the brass hex screws, i filed a little off the manifold so the screws would turn without hitting the pipe, then use a very small spanner from a set I bought from Knupfer.
http://www.knupfershop.de/shop/wbc.php?sid=388c89ca2&tpl=produktdetail.html&pid=719&rid=42&recno=1


Logged

SailorGreg

  • Full Mayhemer
  • *****
  • Offline Offline
  • Posts: 1,335
  • Money talks - it says goodbye
  • Location: Hayling Island, Hants
Re: Oh no, not another TVR1A!
« Reply #35 on: November 08, 2012, 10:48:21 pm »

Ha! The obvious solution!  Thanks logoman, I'll have a go at that in a while.  I do want to use the hex heads on the manifolds, so some minor surgery is on the cards.  I'll polish up my German and get those spanners as well (I lived there for three years a long time ago, so you'd think I'd be able to remember my basic vocabulary  :embarrassed: )

Lovely engine - have you run it on steam yet - it looks so clean!  It's engines like yours that prompted me to try for more than just the basic build.  Wonderful work and attention to detail.

Greg

SailorGreg

  • Full Mayhemer
  • *****
  • Offline Offline
  • Posts: 1,335
  • Money talks - it says goodbye
  • Location: Hayling Island, Hants
Re: Oh no, not another TVR1A!
« Reply #36 on: November 16, 2012, 03:07:00 pm »

I have started on my pipework but I now need to seek help from the collected wisdom of the forum.  I bought one of RDG Tool's small displacement lubricators (see here - http://www.rdgtools.co.uk/acatalog/Models_and_Steam_Fittings.html - 5th item down) and it was only when I looked closely I realised that the thread for connecting to the steam line is 3/16 x 40.  It does say 3/16 in the text, but their other lubricators (and the image of this one on the web) have 1/4 x 40, which fooled me.  I called RDG to see if they supplied a suitable tee piece and they said no, nor did they know of any other supplier who might help.  I don't seem to be able to find anyone who supplies a fitting that will join this lubricator to a standard 5/32 tube tee piece. {:-{

How should I connect it?  Ideally I would find a tee piece to take a 5/32 tube in and out, but with a female 3/16 x 40 in the tee so I can just screw the lubricator into it.  Does such a fitting exist?  Failing that, how do I connect this lubricator into the steam line - or do I just abandon this and go for a "straight through" lubricator like the Clevedon Steam one?  Or have I just missed the blindingly obvious!?  :embarrassed:

Help!

Greg


pettyofficernick

  • Full Mayhemer
  • *****
  • Offline Offline
  • Posts: 1,255
  • Marineville will be destroyed, Muahahaha.....
  • Location: Leasowe, Wirral
Re: Oh no, not another TVR1A!
« Reply #37 on: November 16, 2012, 03:39:15 pm »

Hi Greg, try these people, I use their adapters, elbows etc, good stuff and reasonably priced. If you do not want to buy from USA, Forest Classics import their range of fittings, so could more than likely get you one, they are very helpful. you will get all you need there,  I will post a photo of my lubricator when I get home.

http://www.pmresearchinc.com/store/home.php?cat=142

http://www.forest-classics.co.uk/
Logged
What I do is best not discussed, for I have been many things in my time....

pettyofficernick

  • Full Mayhemer
  • *****
  • Offline Offline
  • Posts: 1,255
  • Marineville will be destroyed, Muahahaha.....
  • Location: Leasowe, Wirral
Re: Oh no, not another TVR1A!
« Reply #38 on: November 16, 2012, 09:27:48 pm »

Hi Greg, here's how I did mine, although I used the 1/4 x 40 version of RDG's lubricator. The Tee was from Forest Classics and the pipe unions from Steam Fittings.co.uk. You will need an adapter to reduce the size of the tee where the lubricator screws in.
Hope this helps,

Nick.
Logged
What I do is best not discussed, for I have been many things in my time....

SailorGreg

  • Full Mayhemer
  • *****
  • Offline Offline
  • Posts: 1,335
  • Money talks - it says goodbye
  • Location: Hayling Island, Hants
Re: Oh no, not another TVR1A!
« Reply #39 on: November 16, 2012, 10:57:28 pm »

Thanks Nick.  I knew there had to be a more elegant solution than trying to make up a very short length of pipe with nipples on each end!  Guess a call to Forest Classics is on the cards.  :-))

Greg

SailorGreg

  • Full Mayhemer
  • *****
  • Offline Offline
  • Posts: 1,335
  • Money talks - it says goodbye
  • Location: Hayling Island, Hants
Re: Oh no, not another TVR1A!
« Reply #40 on: November 21, 2012, 09:33:57 pm »

Well, no sooner do I find a problem than the good Mayhemers fix it for me.  As well as Nick's help and suggestions, I was e-mailed by George (he of engine-driven pump fame) offering to make me a tee piece to suit my lubricator.  A quick exchange of messages and the tee piece arrived this morning.  Here it is attached to the lubricator.  The fitting at the top of the picture solders straight on to the inlet manifold of the engine.  Beautifully made and just the job.  Thank you George, very much indeed.   :-)) :-)) :-))


Apart from that, progress on the pipework has been a little slow.  My 1:1 scale boat (see my avatar) has been trumping the steam plant for my time over the last few days.  I've made a start though, and my silver soldering so far isn't too bad (to my eye at least).  One more question though - after annealing the tubing to bend it and soldering the nipples, the copper is discoloured.  Is there a way to return it to shiny copper colour?  Or does this require some form of mild acid bath (which I have not done so far)?  Obviously I know it won't stay shiny, but it would be nice if it was all the same colour rather than the blotchy effect I now have.  Perhaps it's just my hamfisted use of the blowtorch.   {:-{

I have also taken logoman's advice and performed some minor surgery on the manifolds to allow the hex head screws to fit.  That's gone pretty well too, although I suspect my metalworking prowess (or lack thereof) would raise a few eyebrows among the real engineers.  Pics to follow when I've tidied it up a bit!

Greg

pettyofficernick

  • Full Mayhemer
  • *****
  • Offline Offline
  • Posts: 1,255
  • Marineville will be destroyed, Muahahaha.....
  • Location: Leasowe, Wirral
Re: Oh no, not another TVR1A!
« Reply #41 on: November 21, 2012, 09:53:28 pm »

Hi Greg, for cleaning up after soldering (pickling) there a number of things you could use. Vinegar, Citric Acid, (as sold in home brew shops) or my favorite, a 5% solution of Sulfuric Acid, but only if you know how to use it safely. ( it is available to buy online) once pickled and rinsed, polish by your favored method.
Logged
What I do is best not discussed, for I have been many things in my time....

steam up

  • Full Mayhemer
  • *****
  • Offline Offline
  • Posts: 441
  • Location: Gateshead UK
Re: Oh no, not another TVR1A!
« Reply #42 on: November 22, 2012, 09:28:33 am »

I use brick acid used to clean up brick work after my clumsy DIY efforts %% %%

SailorGreg

  • Full Mayhemer
  • *****
  • Offline Offline
  • Posts: 1,335
  • Money talks - it says goodbye
  • Location: Hayling Island, Hants
Re: Oh no, not another TVR1A!
« Reply #43 on: November 26, 2012, 06:53:56 pm »

Well things seem to have slowed up a bit recently but I haven't stopped completely.  I have fitted the lubricator and pump to the engine and done a few bits of pipework, but am going quite slowly as I work out where I want things.  I have been looking at andywright's thread from way back (http://www.modelboatmayhem.co.uk/forum/index.php?topic=3755.0) where he fits a plant like mine in a Solent launch (Metcalf Mouldings in those days, now built by Models by Design) - a boat I am led to believe Santa will be leaving under the tree for me.  :-) :-) :-) As he was fitting his plant, Andy turned the boiler round so that the chimney was more amidships, and I, like him, think it looks better that way.  So I am going to do the same which means my burner is now at the forward end of the boiler and right next to the gas tank - which is probably no bad thing.  Now I have decided that I can start fixing things in place on my temporary base to get all the pipe runs sorted out.

Thanks yet again for the advice guys - it's comforting to know that almost whatever the problem, someone will have an idea to fix it.  I have been using white vinegar to clean up my soldering and it works fine - 30 minutes or so in the vinegar and a quick buff up and it's all shiny again.  I guess there are more potent solutions (no pun intended!) but I only needed to walk to the kitchen to get the vinegar.  Anyway, just to prove I haven't been completely idle, here's a picture. 


I found that I can use the lubricator needle valve as a throttle when running on my compressor (just open the drain to let the air out), and I have had the engine running really slowly at what must be only 3-4 psi - the gauge on the compressor barely registers.  I still take irrational delight in just standing and watching the engine working.  Daft isn't it?   :} :} :} :}

Greg


Kerrsy

  • Full Mayhemer
  • *****
  • Offline Offline
  • Posts: 174
  • Location: Wiltshire, England
Re: Oh no, not another TVR1A!
« Reply #44 on: November 26, 2012, 07:22:11 pm »

Hi Greg
Nothing wrong with watching your engine I do it all the time and more when the grandchildren come round.
The way you are fitting up your engine will go really well in mine as I will be fitting Georges designs on mine as well
Your making a really good job of it. Keep up the good work you should have it piped in buy the time I finish my boiler !!
Alan
Logged

pettyofficernick

  • Full Mayhemer
  • *****
  • Offline Offline
  • Posts: 1,255
  • Marineville will be destroyed, Muahahaha.....
  • Location: Leasowe, Wirral
Re: Oh no, not another TVR1A!
« Reply #45 on: November 26, 2012, 07:38:13 pm »

Good evening Greg, looking good. I to watch my engine steaming away, ( and steaming up the windows to boot!). Like you, I mounted everything on a board to start with, and have now transferred it to a piece of 100mm trunking coverplate, just the job for fitting the plant into the boat ( African Queen) as a removable unit It has a 10mm lip down each edge, so only the ends need folding up once the length has been established. I scrounged my piece from some electrical contractors who were replacing the mains feeds to some flats a couple of doors away. The feed water heates is brilliant, It was even hot enough to make a cuppa, and yes, I tried it, tasted ok too.
Keep up the good work.
Nick.
Logged
What I do is best not discussed, for I have been many things in my time....

Jerry C

  • Full Mayhemer
  • *****
  • Offline Offline
  • Posts: 1,504
  • Location: Caernarfon, North Wales.
Re: Oh no, not another TVR1A!
« Reply #46 on: November 26, 2012, 08:45:15 pm »

I can watch mine running until my specs steam up. If you intend using a regulator I was advised to position the oiler upstream from the regulator so both regulator and cylinders are lubed. It's looking good. My engine also ran on a breath of air when first started and would even run on the setting position. Not so on steam and on load. It doesn't even like running in the economy position but that maybe because of the large backlash in the coupling. I did toy with operating without a regulator and just relying on the hacker gear but I'm glad I didn't because in my case it wouldn't have worked. I'm not short on radio channels though so I did choose to fit the lot.  Keep up the good work.
Jerry

SailorGreg

  • Full Mayhemer
  • *****
  • Offline Offline
  • Posts: 1,335
  • Money talks - it says goodbye
  • Location: Hayling Island, Hants
Re: Oh no, not another TVR1A!
« Reply #47 on: November 26, 2012, 09:23:28 pm »

Thanks for the encouraging comments guys.  Jerry, I am going to use a regulator, but listened to the advice that said place the lubricator as close to the engine as possible.  I can see the logic of lubricating anything that moves, although the regulator barely moves at all most of the time.  I never really thought about lubrication, and if I had I'd probably have assumed a little bit of condensation would suffice.  Oh well, I guess I'll stick with what I've got for the moment and see how it goes.

I'm phoning Santa in the morning to make sure he's got my letter - he still lives at the North Pole, right?  ;)

Greg

pettyofficernick

  • Full Mayhemer
  • *****
  • Offline Offline
  • Posts: 1,255
  • Marineville will be destroyed, Muahahaha.....
  • Location: Leasowe, Wirral
Re: Oh no, not another TVR1A!
« Reply #48 on: November 26, 2012, 09:33:32 pm »

Hi Greg, I have fitted my lubricator before the regulator, as I believe this to be the best place for it, that way, anything that moves will get a dose of oil. Last I heard, Santa was living in The Cherry Tree Centre, Wallasey, He has his own micro climate of snow, some elves and a couple of reindeer for company, oh, and hordes of children clamoring for pressies..... :-)) :-)) :-))
Logged
What I do is best not discussed, for I have been many things in my time....

Jerry C

  • Full Mayhemer
  • *****
  • Offline Offline
  • Posts: 1,504
  • Location: Caernarfon, North Wales.
Re: Oh no, not another TVR1A!
« Reply #49 on: November 26, 2012, 10:33:06 pm »

Greg, I'm sure you'll be ok doing it that way and if not well it's no big deal to change it round. One thing I did find was my regulator is a bit "all or nothing" so with that in mind as part of my refit I've just opened out the hole under the disc to 2mm from 1.5mm. And hope that will give me more control. I wanted to plug the original hole and drill a line of tiny holes to give more progression but the present disc isn't suitable for this and I can't be bothered (scared) to make a new one. I'll let you know if this mod is successful or not next year. The scars on my fingers are proof that when warmed through the regulator is too hot to have any condensate in it! Let us know how you go.
Jerry.
Pages: 1 [2] 3 4 5   Go Up
 

Page created in 0.096 seconds with 22 queries.