Model Boat Mayhem

Please login or register.

Login with username, password and session length.
Pages: 1 2 [3] 4 5   Go Down

Author Topic: Solent steam launch build log  (Read 42950 times)

southsteyne2

  • Full Mayhemer
  • *****
  • Offline Offline
  • Posts: 302
Re: Solent steam launch build log
« Reply #50 on: June 27, 2013, 12:39:25 am »

Hi Greg seems to be a case of uneven heating possibly concentrating more heat o the nipple and the pipe not hot enough, the whole joint must be a cherry red glow may need to shut the blinds a bit so you can see and you should be ok also make sure you use the correct flux for your solder
hope this helps
John
Logged

pettyofficernick

  • Full Mayhemer
  • *****
  • Offline Offline
  • Posts: 1,255
  • Marineville will be destroyed, Muahahaha.....
  • Location: Leasowe, Wirral
Re: Solent steam launch build log
« Reply #51 on: June 27, 2013, 09:10:51 am »

Hi Greg, agree with john, the whole joint must be cherry red. I use Cup Alloys silver solder paste for steam fittings, so easy to use, clean the joint, apply a little paste, push parts together and heat, gently at first, until the job go's cherry red, and you will see a nice silver ring appearing around the joint, job done. There is also the chance that you over heated the job and cooked the flux, preventing it from doing its work. Clean it all up and have another go, you will soon have it right....
Best wishes,
Nick.
Logged
What I do is best not discussed, for I have been many things in my time....

SailorGreg

  • Full Mayhemer
  • *****
  • Offline Offline
  • Posts: 1,358
  • Money talks - it says goodbye
  • Location: Hayling Island, Hants
Re: Solent steam launch build log
« Reply #52 on: June 28, 2013, 11:52:41 am »

Thanks guys for the responses.  I have had another go, with the same result.  I did a simple nipple-on-a-pipe joint at the same time to prove to myself I wasn't doing anything silly.  That one went fine.  However long I held the flame on the parts, I couldn't get it to glow red (unlike the pipe and nipple, which did).  So I conclude that my torch is too small to overcome the heat sink effect of the oil trap - and that my successful joint on the outlet pipe was a fluke!

Anyway, it's not critical to the working of the engine or boat, and I wanted to crack on with the timber cladding, so for the moment I am resorting to a piece of silicon tubing.  I might return to this some time in the future if it continues to bug me, but I am not going to hold everything else up for it.  I want to get steaming!   :-)) :-))

Thanks again for the advice.

Greg

KNO3

  • Full Mayhemer
  • *****
  • Offline Offline
  • Posts: 1,531
  • Location: Bucharest
Re: Solent steam launch build log
« Reply #53 on: June 30, 2013, 01:20:37 pm »

On parts that aren't subjected to high temperature and pressure steam, like condensers, exhausts etc, you can safely use normal solder, which is also a lot easier and less likely to distort already finished components.
Logged

SailorGreg

  • Full Mayhemer
  • *****
  • Offline Offline
  • Posts: 1,358
  • Money talks - it says goodbye
  • Location: Hayling Island, Hants
Re: Solent steam launch build log
« Reply #54 on: July 07, 2013, 10:04:07 pm »

Of course  - I should have realised that.  I have clad the oil trap with wood now, but the temperature I need for soft solder should allow me to manage a joint without too much trouble.  Thanks for the advice. 

Progress has slowed a bit recently as the better weather has tempted me off to other toys.  The coming week should give me a bit more building time and I still hope to get steaming during the good weather - assuming that lasts longer than the next few days  :-)

Greg

SailorGreg

  • Full Mayhemer
  • *****
  • Offline Offline
  • Posts: 1,358
  • Money talks - it says goodbye
  • Location: Hayling Island, Hants
Re: Solent steam launch build log
« Reply #55 on: July 20, 2013, 04:27:33 pm »

 Well, it's been a little while since the last update, but I haven't been entirely idle.  Firstly, I soft soldered the fitting to my oil trap without any damage to the wooden cladding – thanks for the nudge KNO3.


I have also fitted the coaming around the cockpit.  The steamed portion I glued in place using the mould as a clamping piece -


I added some straight pieces along the sides to complete the coaming.  Here it is being planed down to its finished height -


I am putting a thin strip of holly around the hull which will then be capped with a sapele gunwhale. The trickiest part of this is the curved stern area, and I went back to my steamer to see if I could shape the pieces before applying them.  I put a piece of holly and a piece of sapele in the steam for 20 minutes and tried to bend them.  The holly was fine, just like a piece of rubber, but the sapele snapped.  I left the holly to cool and dry, and thought about doing another piece of sapele.  In the end I decided to laminate some thin strips rather than try steaming a wood that clearly isn't very keen on it.  Here are the strips in the mould just to make sure they weren't going to break as well!


I glued the holly strip in place around the stern once it had dried out -


and then added further strips along each side.  Unfortunately I didn't have any stock long enough to do each side with a single strip, so there are some joins which I hope won't be too obvious when it's all finished.  At the foredeck I had to be a little inventive to clamp the strips in place while the glue cured.  I made up various pieces that mimicked the shape of the hull as seen here (and in the picture above of the stern) -


I also used some very small screws in a couple of places, which I will take out before I add the sapele capping.  Adding that should be a little easier as I will use wood glue rather than epoxy.  (I used epoxy for the holly because it was sticking to both the wood margin plank and the GRP of the hull.)


So progress is slow but steady.  Once the gunwhales are on, that's pretty much all the woodwork done, so it'll be on to varnishing/painting and integrating the steam plant.  That should be in the next update - unless the sun keeps shining and tempting me off to other things! As I think I've said before - too many toys!  :-)) :-)) :-))


Happy sunbathing  8)


Greg


pettyofficernick

  • Full Mayhemer
  • *****
  • Offline Offline
  • Posts: 1,255
  • Marineville will be destroyed, Muahahaha.....
  • Location: Leasowe, Wirral
Re: Solent steam launch build log
« Reply #56 on: July 20, 2013, 04:46:20 pm »

Nice woodwork! :-)) :-)) :-)) :-)) :-))
Logged
What I do is best not discussed, for I have been many things in my time....

SailorGreg

  • Full Mayhemer
  • *****
  • Offline Offline
  • Posts: 1,358
  • Money talks - it says goodbye
  • Location: Hayling Island, Hants
Re: Solent steam launch build log
« Reply #57 on: July 20, 2013, 05:32:37 pm »

Thanks Nick.  I'm looking forward to getting some finish on it!

Greg

pettyofficernick

  • Full Mayhemer
  • *****
  • Offline Offline
  • Posts: 1,255
  • Marineville will be destroyed, Muahahaha.....
  • Location: Leasowe, Wirral
Re: Solent steam launch build log
« Reply #58 on: July 20, 2013, 05:37:27 pm »

Puts mine to shame, I call it the 'lived in look' as an excuse for my rough joinery..... %) %) %)
Logged
What I do is best not discussed, for I have been many things in my time....

Jerry C

  • Full Mayhemer
  • *****
  • Offline Offline
  • Posts: 1,504
  • Location: Caernarfon, North Wales.
Re: Solent steam launch build log
« Reply #59 on: July 20, 2013, 06:20:05 pm »

It's really tricky, I know. I found I could bend  Sapele  easier than Mahogany but only just. Itching to see some varnish on her.
Jerry.

muleears

  • Full Mayhemer
  • *****
  • Offline Offline
  • Posts: 262
  • Location: Washington, NC USA
Re: Solent steam launch build log
« Reply #60 on: July 22, 2013, 02:34:25 pm »

Great looking boat Greg, looking forward to seeing her on the water!
Logged
Cal
Washington, NC USA
Proud owner of:
75% complete Krick Victoria
75% complete Billing African Queen
Krick Alexandra
Lots of building, very little steaming!

SailorGreg

  • Full Mayhemer
  • *****
  • Offline Offline
  • Posts: 1,358
  • Money talks - it says goodbye
  • Location: Hayling Island, Hants
Re: Solent steam launch build log
« Reply #61 on: July 24, 2013, 05:53:34 pm »

Another quick update because I have run into a little "challenge"  {:-{

First, the good news.  All the woodwork is done and sanded - and sanded, and sanded.....  and sanded

Then I put a coat of sanding sealer on all the wood, and the whole thing came to life.


I even had an admirer come to visit.


I am delighted with how she has turned out so far.   :} :} :} :} :} :} :}   Carried away with enthusiasm to get the first coat of varnish on, I sanded the sealer with some fine grade paper, and as it was a lovely day I did it outside.  Just as I was finishing I noticed a strange ridge on the foredeck.  That wasn't there before!    >>:-( >>:-( >>:-( >>:-(


Obviously the glue joint has let go (or rather, I suspect I didn't make a proper joint in the first place).  I glued the deck planks with superglue, and I'm not sure why this joint has failed.  That said, it's not a glue I have used much at all in the past, and I have tended to use either epoxy or Titebond wood glue everywhere else.  I don't know if superglue has a dislike of sunlight - if it does, I had better get all the deck off now, because I plan to go sailing when the sun is shining!

I walked away when I found that crack and have pondered how to fix it.  Obviously I really don't want to have to start again, and my first attempt at fixing will probably be running more superglue into the joint and pressing it back into place - unless anyone has a better idea?  I cannot get at the underside of the deck, so all mending has to be from above - ideally without messing up my planking!  {:-{ {:-{ (And don't you just hate those close-ups that show every little blemish  O0 O0 )

I'll probably have a go at fixing it tomorrow and see how that goes.  If it refuses to stick, I can't see any alternative to taking the foredeck off and doing it all again  :(( :(( :(( .

Fingers crossed!

Greg

Tug-Kenny RIP

  • Full Mayhemer
  • *****
  • Offline Offline
  • Posts: 7,625
  • Location: Newport. S Wales
Re: Solent steam launch build log
« Reply #62 on: July 24, 2013, 08:24:56 pm »


It's a shame that had to happen Greg.

I'm writing because I feel superglue might not be the best idea, as future water on to the surface may interfere with it and debond it again. I would recommend some alphatic resin wood glue if you can get it runny enough to permeate down inside.

Hope this helps

ken
Logged
Despite the high cost of living   .......... It remains popular

SailorGreg

  • Full Mayhemer
  • *****
  • Offline Offline
  • Posts: 1,358
  • Money talks - it says goodbye
  • Location: Hayling Island, Hants
Re: Solent steam launch build log
« Reply #63 on: July 24, 2013, 10:24:44 pm »

Thanks for the sympathy Ken.  I thought moisture cured superglue rather than debonding it, hence the tendency for fingers to stick before whatever it is you are gluing - or are there different sorts?  The deck's not had any moisture on it (other than the sanding sealer - perhaps there was a reaction?).

Anyway, funny old thing - I went to have another look this evening and the deck is back flat again.  Barely any sign of a broken joint.  I guess it was the heat on the wood that lifted it.  But I still have a broken joint, so I guess it's back out into the sun tomorrow to try and get it to lift again, then glue on the exposed edge and push into place. 

Ken - I am a great fan of aliphatic glues (of which Titebond is my favourite) but the join is actually very tight (it looks perfectly good when closed), and I guess the plank edges have superglue on them, which would reduce the effectiveness of a glue designed to penetrate the wood.  I'll try superglue one more time and keep fingers, toes and everything else crossed.  If that fails I will return to the forum for further advice!

Greg


vnkiwi

  • Full Mayhemer
  • *****
  • Offline Offline
  • Posts: 1,593
  • Location: SE Asia
Re: Solent steam launch build log
« Reply #64 on: July 24, 2013, 10:58:46 pm »

By leaving it out in the hot sun, you have altered the mosture content (taken moisture out) on the upper surface, and it has curled.
Overnight, when it has cooled down, the wood has picked up moisture and returned to 'normal'.
I wouldn't take it out into the sun again, but would now ease some liquid superglue into the crack, and allow it to capilary into the joint. Be generous so it can run under the strip as well. Wipe any excess off the surface and leave inside to cure for an hour or more.
This should solve the problem for you.
Then sand and apply your varnish to seal the surface. Remember sanding sealer is porous. And that moisture does cure superglue, but don't go wetting it, tomuch doesn't help. Just breath on it is enough.
Hope this helps
vnkiwi
 
Logged
If it ain't broke. Don't fix it !

Jerry C

  • Full Mayhemer
  • *****
  • Offline Offline
  • Posts: 1,504
  • Location: Caernarfon, North Wales.
Re: Solent steam launch build log
« Reply #65 on: July 24, 2013, 11:05:18 pm »

I have found that super glue only likes to work once. However I would try clamping the offending plank somehow keeping the joints clear and getatable and wick very thin cyo into the joints. My "wear is almost totally glued with thin cyo. Is your sanding sealer meths based? Do you clean the brush with meths?  That is what I used. 3 or 4 coats rubbed down with fine wire wool between coats then 3/4 coats yacht varnish thinned 10:1 with white spirit, rubbed down same as sealer. Try and get some under the deck where possible. I've run 2 seasons with no probs. best of luck mate.
Jerry.
ps. Kiwi got in before me but I agree also.

derekwarner

  • Full Mayhemer
  • *****
  • Offline Offline
  • Posts: 9,539
  • Location: Wollongong Australia
Re: Solent steam launch build log
« Reply #66 on: July 25, 2013, 01:52:44 am »

Greg.....it's on record that I am not a fan of "super glue" for anything but tacking.......
Having said this, why did one plank lift & not others?...to me discounts a moisture variation.....& suggests a defective original bond joint
Also must agree with Jerry that it is not really advisable to attempt to rebond a previously super glued surface without removing the original failed surface bond material
I do have a nasty story with super glue when a Navy Doctor  <*< was unable to open my left eye which had been sprayed with super glue <:( ........thankfully the Surgeons at the Sydney Eye hospital knew better ......Derek
 
Logged
Derek Warner

Honorary Secretary [Retired]
Illawarra Live Steamers Co-op
Australia
www.ils.org.au

vnkiwi

  • Full Mayhemer
  • *****
  • Offline Offline
  • Posts: 1,593
  • Location: SE Asia
Re: Solent steam launch build log
« Reply #67 on: July 25, 2013, 02:07:07 am »

Yes Derek, the joint bond had failed on that on strip, however, the fact it bent up was because of the sun driving the moisture from that surface, resulting in the strip bending up. (the stress caused in this may have been the reason the one poor bond failed).
Myself, I use mainly a thicker superglue gel, made in the USA and $27 a small squeeze bottle. Expensive, maybe, but haven't had a failure yet. Thin does have its uses as well, but you have to be very careful re tolerances as it don't have no gap filling capacity at all. Mearly bonds where it touches, which may not be enough, and certainly only a fraction of what you have assumed. Just don't use the elcheepo 'brands' from the pound/dollar shops.
You pays your money, and takes your choice.
cheers
vnkiwi
Logged
If it ain't broke. Don't fix it !

SailorGreg

  • Full Mayhemer
  • *****
  • Offline Offline
  • Posts: 1,358
  • Money talks - it says goodbye
  • Location: Hayling Island, Hants
Re: Solent steam launch build log
« Reply #68 on: August 01, 2013, 12:41:34 am »

I thought I'd post a quick (and late night!) progress report on the mend.  Thanks to all for the comments and advice.  I did consider everything you all said, and in the end I did the following -
I raised the broken seam in the foredeck again with gentle application of a hairdryer (as the sun chose not to shine just when I needed it  <*< ).  I then applied superglue to the raised edges and as far into the joints as I could.  I then pressed the section back into place.

Once I had peeled my thumbs off the deck without losing too much skin, I sanded the foredeck to remove the last vestige of a ridge around the mend and the stain of the superglue.  I then coated the deck (and the inside of the boat) in epoxy to stabilise everything.  Once this had cured, I sanded that to give a key and started applying varnish.  Here is the boat after a couple of coats.
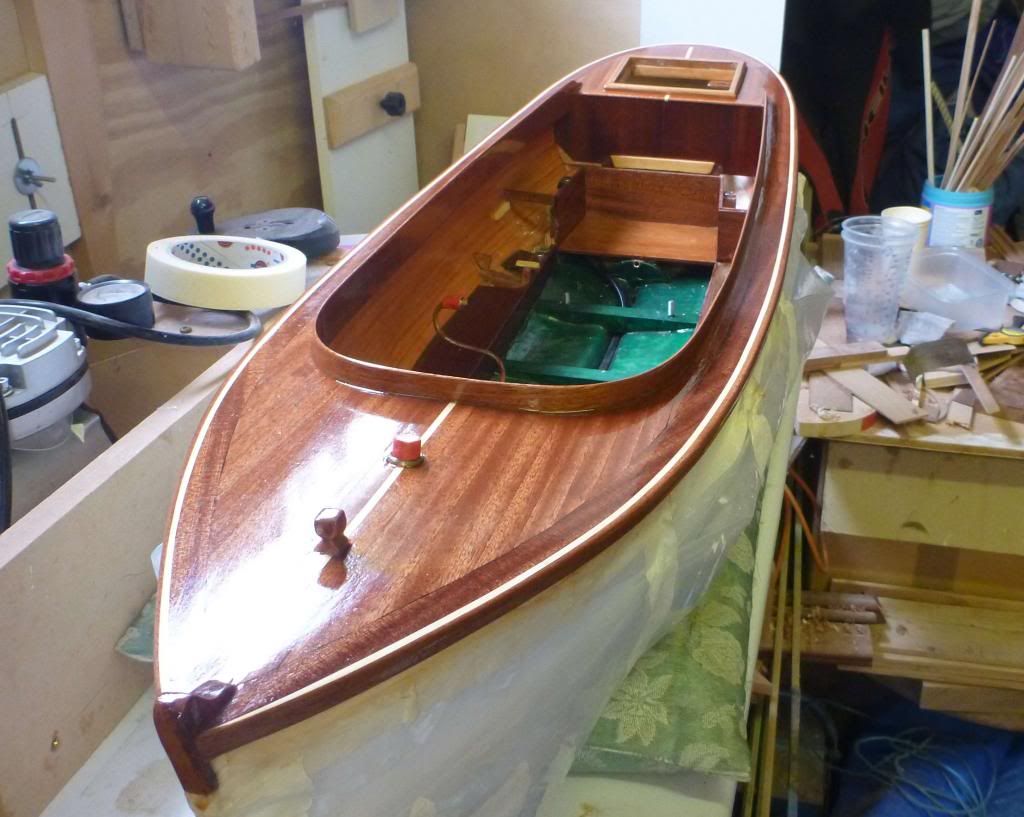


Of course, the glare has hidden the bit that failed before so you'll have to take my word it looks as smooth as the rest.   O0 O0   I haven't "stress tested" the mend by leaving it in the sun for a while, but I will do that once I have finished the varnishing.  Better it fails then than on the maiden voyage (fingers crossed smiley here!).

I have also fitted my electrical plug pin, otherwise known as the forward/reverse lever, to the engine.  Here it is.
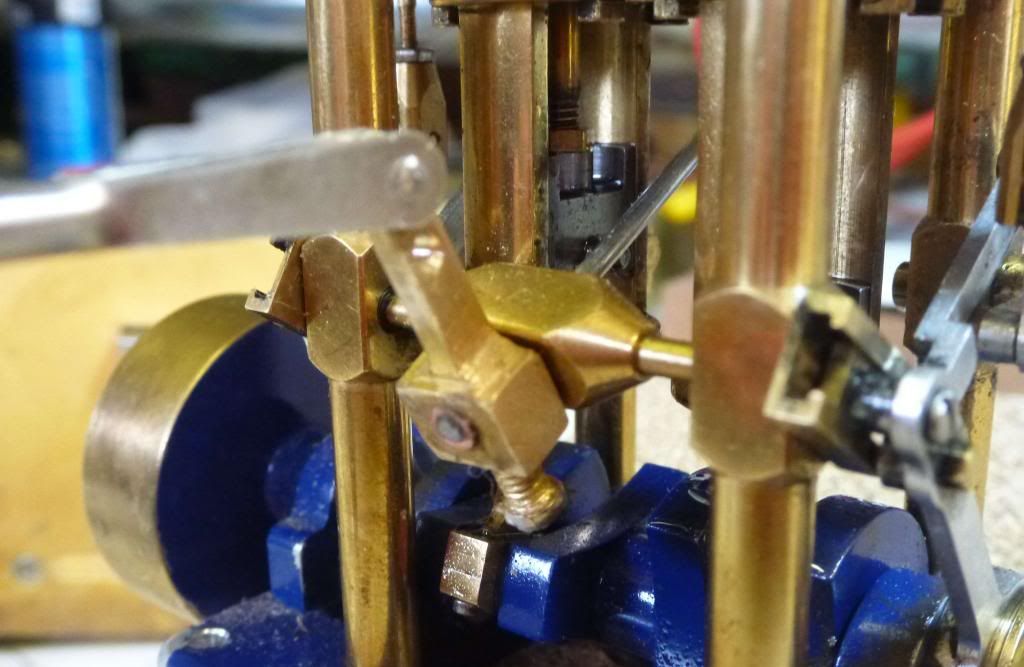


A piece of 1/8" copper tube fitted in the pin hole just fine, and a piece of servo connecting rod (that you get when you buy those clevis things) was just the right size to go through the connector on the engine and the inside diameter of the copper tube.  Pure luck!   :} :}   I glued the whole lot in place in the pin/lever and did the wire clamping screw up really tight as extra insurance.

I have also started insulating my steam pipes.  Here they are with the string added. Top right is a test piece with some household filler added as a coating, as recommended by Jerry - I think I might have overdone the thickness, but I'll see how the real ones turn out as I do them - I can always sand them down a bit if they look a bit too chunky.  (Jerry - I think you said you painted yours as well - what paint did you use?)
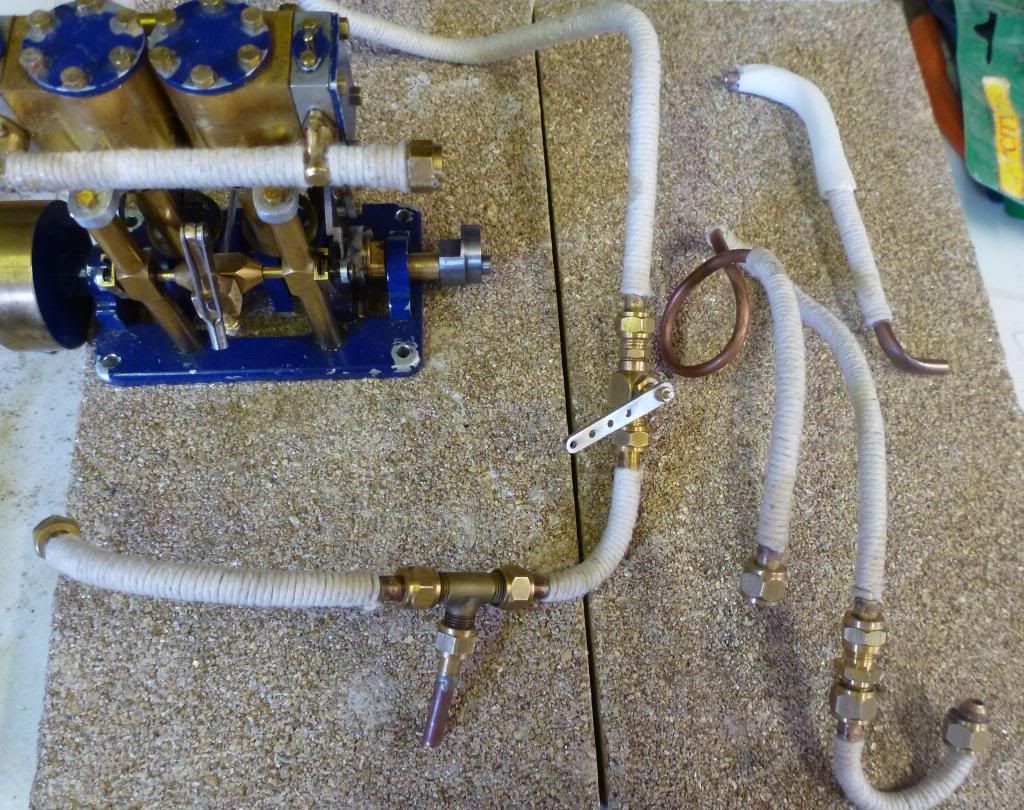


That's where we are at the moment.  A couple more coats of varnish should see the end of that then some paint on the hull.  Reassemble the steam plant, test run it, install it, test run the whole thing a couple of times, maiden voyage and Bob's your uncle!  Next Tuesday then  {-) {-) {-) {-) {-) {-) {-) .  OK, maybe the one after that.

Greg

derekwarner

  • Full Mayhemer
  • *****
  • Offline Offline
  • Posts: 9,539
  • Location: Wollongong Australia
Re: Solent steam launch build log
« Reply #69 on: August 01, 2013, 04:04:51 am »

Guys......I reckon Greg's selective glare is intentional....... {-) ...but the rest looks great.... :-))
Greg....what brand of steam regulator are you using?....& is that loop the steam dryer in the chimney?.........Derek
 
Logged
Derek Warner

Honorary Secretary [Retired]
Illawarra Live Steamers Co-op
Australia
www.ils.org.au

Jerry C

  • Full Mayhemer
  • *****
  • Offline Offline
  • Posts: 1,504
  • Location: Caernarfon, North Wales.
Re: Solent steam launch build log
« Reply #70 on: August 01, 2013, 08:49:04 am »

That looks lovely, knew it would. On the insulation I used the file that the engine maker told me to buy which I got from Bunnings in Oz. using a file diagonally helps to keep the level even. Finished off with the wife's emery boards. (She believes in fairys now). The first time I painted them with smooth white masonry paint. Worked Perfick. Next rebuild I used cream radiator paint baked for 20 mins at 180°c in the oven(really stinks), also worked Perfick but more glossy. When the oil and hot oily fingers start flying around the latter paint easier to wipe off. For major clean of engine I spray it all over with WD40, let it drain. Wipe off and re-oil. Simples.
Jerry.

SailorGreg

  • Full Mayhemer
  • *****
  • Offline Offline
  • Posts: 1,358
  • Money talks - it says goodbye
  • Location: Hayling Island, Hants
Re: Solent steam launch build log
« Reply #71 on: August 02, 2013, 12:11:23 am »

Thanks Jerry, I hope the final result is even better!  And thanks for the paint advice.

Derek - the regulator is from Polly Model Engineering - http://www.pollymodelengineering.co.uk - you have to download the catalogue and it's on page 43.  It is certainly smaller than a lot of other regulators, and does the job, although there isn't much fine control.  That said I haven't actually used it with a servo yet, only with my fat fingers.  The loop does go into the chimney but it is a pre-heater for the water being pumped into the boiler from the water tank.  I am not drying the steam, just pushing it straight to the engine.  And I'll post a photo without the glare soon!

Greg

KNO3

  • Full Mayhemer
  • *****
  • Offline Offline
  • Posts: 1,531
  • Location: Bucharest
Re: Solent steam launch build log
« Reply #72 on: August 02, 2013, 08:26:36 pm »

Is the regulator steam tight? Many of this type are not, that's why I'm asking.
Logged

SailorGreg

  • Full Mayhemer
  • *****
  • Offline Offline
  • Posts: 1,358
  • Money talks - it says goodbye
  • Location: Hayling Island, Hants
Re: Solent steam launch build log
« Reply #73 on: August 03, 2013, 09:11:16 am »

Is it steam tight?  Yes, it is.  I run at about 35-40 psi and there is no sign of any leakage.  :-))  That said, I haven't left it closed for any length of time, just the occasional stop and start.  When I am running the boat for real I might leave it closed for longer periods, but so far there is no indication of any problem.

Greg

steam up

  • Full Mayhemer
  • *****
  • Offline Offline
  • Posts: 441
  • Location: Gateshead UK
Re: Solent steam launch build log
« Reply #74 on: August 03, 2013, 09:32:13 am »

Just read an early post regarding your problems with silver solder.
One important point is that you use the tip of the flame not the blue section.
Hope this helps
Pages: 1 2 [3] 4 5   Go Up
 

Page created in 0.093 seconds with 21 queries.