Model Boat Mayhem

Please login or register.

Login with username, password and session length.

Author Topic: Panart/Mantua Anteo Steam Tug Build  (Read 144342 times)

Mark T

  • Full Mayhemer
  • *****
  • Offline Offline
  • Posts: 2,087
  • Location: Dudley in the Black Country
Re: Panart/Mantua Anteo Steam Tug Build
« Reply #325 on: January 05, 2020, 09:46:51 am »

Hi John thanks for the comments.  I had completely overlooked the thought of being able to see the water pressure gauge.  I can see it clearly without the superstructure being on but its something I will need to think about so thanks for that  :-))   Fortunately though the gas tank is removable and thats what I intend to do when it requires filling and also I can get quite a lot of ballast actually underneath the boiler/motor plate.  If I cant get enough there I'll probably fix it outside in the keel but here's hoping

Taranis

  • Full Mayhemer
  • *****
  • Offline Offline
  • Posts: 5,300
  • Balne Moor MBC
  • Location: Yorkshire
Re: Panart/Mantua Anteo Steam Tug Build
« Reply #326 on: January 05, 2020, 09:53:34 am »

Hi Mark.
Lead shot from a gunshop is incredibly heavy if expensive but can poor into shapes and add resin to bind it. Using with clingfilm or similar to prevent it sticking to the hull. If it then turns out to be over weight you can pull it out and cut some off. Alternatively just us individual bags and it still fits better than blocks of lead
Logged
ANDY
You’ll only know your best effort if you don’t give up.

Mark T

  • Full Mayhemer
  • *****
  • Offline Offline
  • Posts: 2,087
  • Location: Dudley in the Black Country
Re: Panart/Mantua Anteo Steam Tug Build
« Reply #327 on: January 05, 2020, 09:56:46 am »

Hi Mark.
Lead shot from a gunshop is incredibly heavy if expensive but can poor into shapes and add resin to bind it. Using with clingfilm or similar to prevent it sticking to the hull. If it then turns out to be over weight you can pull it out and cut some off


Hi Andy  - yep this is what I used on my last build and it worked great.  I like the way it moulds to the hull and doesn't move when underway  :-))

Taranis

  • Full Mayhemer
  • *****
  • Offline Offline
  • Posts: 5,300
  • Balne Moor MBC
  • Location: Yorkshire
Re: Panart/Mantua Anteo Steam Tug Build
« Reply #328 on: January 05, 2020, 09:57:56 am »

It may be you I got the idea from then  {-)   :-))
Logged
ANDY
You’ll only know your best effort if you don’t give up.

Jerry C

  • Full Mayhemer
  • *****
  • Offline Offline
  • Posts: 1,504
  • Location: Caernarfon, North Wales.
Re: Panart/Mantua Anteo Steam Tug Build
« Reply #329 on: January 05, 2020, 10:15:17 am »

I wouldn’t worry about removing the gas tank each time to fill it. I don’t.  If there’s a bit of gas lying around it just goes pop when you light the burner. You’ll have the tophamper off for filling anyway, keeps your eyebrows short!
Jerry.

southsteyne2

  • Full Mayhemer
  • *****
  • Offline Offline
  • Posts: 302
Re: Panart/Mantua Anteo Steam Tug Build
« Reply #330 on: January 05, 2020, 12:40:39 pm »

One needs a good sturdy bag for the lead shot nothing worse than the little black buggers rolling around in the hull and difficult to remove,
Cheers
John
Logged

Mark T

  • Full Mayhemer
  • *****
  • Offline Offline
  • Posts: 2,087
  • Location: Dudley in the Black Country
Re: Panart/Mantua Anteo Steam Tug Build
« Reply #331 on: January 05, 2020, 01:46:04 pm »

Hi John on my last build I found the places that I wanted to place the lead shot and then placed cling film into that area.  I then poured the lead shot onto the cling film and pulled it around to make a bag.  Next I poured epoxy resin into the bag of shot and then pushed the bag exactly into place.  Once the epoxy had hardened the shot was like a solid block and was going no where.  It was like a solid piece of lead that fitted exactly into the hull but was also removable because the cling film stopped it from sticking to the hull.  It is possible to remove the cling film but I've just left mine on.

rhavrane

  • Full Mayhemer
  • *****
  • Offline Offline
  • Posts: 883
  • Steam passionate collector
  • Location: Saint-Mandé, Val-de-Marne, France
Re: Panart/Mantua Anteo Steam Tug Build
« Reply #332 on: January 05, 2020, 05:23:57 pm »

Bonjour,
In France, we can find 2mm thick sheets of lead. I cut it with scissors to put in in the frame without any glue because, I have to finish the boat and remove some weight, nothing moves : https://www.youtube.com/watch?v=Y6q4yYpVcA8
Logged
Raphaël
Raphaëlopoulos Steam Lines UnLimited
Membre du Modele Yacht Club de Paris http://mycparis.fr/
Membre de l'Offshore Club de Paris : http://site-ocparis.wifeo.com/
My YouTube channel: http://www.youtube.com/user/rhavrane

KNO3

  • Full Mayhemer
  • *****
  • Offline Offline
  • Posts: 1,515
  • Location: Bucharest
Re: Panart/Mantua Anteo Steam Tug Build
« Reply #333 on: January 19, 2020, 06:55:40 pm »

I
Bonjour,
In France, we can find 2mm thick sheets of lead. I cut it with scissors to put in in the frame without any glue because, I have to finish the boat and remove some weight, nothing moves : https://www.youtube.com/watch?v=Y6q4yYpVcA8


I use lead sheet for ballast too, it is very good as it is easy to cut and  fit on the bottom of the hull even under the steam plant and other tight spots.
Logged

Mark T

  • Full Mayhemer
  • *****
  • Offline Offline
  • Posts: 2,087
  • Location: Dudley in the Black Country
Re: Panart/Mantua Anteo Steam Tug Build
« Reply #334 on: January 26, 2020, 09:38:55 am »

Sorry about the lack of updates on this build but I've had a bit of a set back.


I was using some 20 minute epoxy resin on the inside to fill up some of the weaker parts of the hull.  I did this on my last build and it worked well.  Unfortunately I poured a bit to much in one area and wow - the heat build up was so hot that I couldn't even touch the hull with my bare fingers.  I cooled it all down using wet cloths on the outside for about 30 minutes which worked well.


The good news was that the wood work did not move one bit under such heat so the planking has proven to be solid.  The bad news was that it blistered the epoxy finish on the outside of the hull in a few small places.  It really did look bad but after a few days of sanding back and repair work its all looking good again.


Such a silly mistake by me that has caused days of work.  Anyway I'm now back to where I was weeks ago so hopefully I'll have something more positive soon


Mark

Capt Podge

  • Full Mayhemer
  • *****
  • Offline Offline
  • Posts: 4,443
Re: Panart/Mantua Anteo Steam Tug Build
« Reply #335 on: January 26, 2020, 10:08:52 am »

That was a swift rescue with the wet cloths Mark, you definitely avoided a total disaster there.


Hopefully, that will be your last setback on this build  :-)


Regards,
Ray.
Logged

southsteyne2

  • Full Mayhemer
  • *****
  • Offline Offline
  • Posts: 302
Re: Panart/Mantua Anteo Steam Tug Build
« Reply #336 on: January 26, 2020, 12:37:16 pm »

Very lucky Mark its called exotherm we used to have lots of problems in telephone cable joints as it would melt the tiny plastic insulation.
 I updated my Joffre build post but so far no replies oh well tugs and towing.
Cheers
John
Logged

Mark T

  • Full Mayhemer
  • *****
  • Offline Offline
  • Posts: 2,087
  • Location: Dudley in the Black Country
Re: Panart/Mantua Anteo Steam Tug Build
« Reply #337 on: January 26, 2020, 02:54:37 pm »

Lads I was lucky - if this had been a plastic or resin hull it would have definitely ruined the complete thing.  I knew that epoxy could get warm but I never realised it could get as hot as it did.  I think its important to put our errors on our build logs so that others can see that nothing quite goes to plan  {-)


I can now get on with getting the inside of the hull coated as I've finished sanding it out which quite frankly is a thankless task.  Oh and I need to get the prop tube glued in too.

Mark T

  • Full Mayhemer
  • *****
  • Offline Offline
  • Posts: 2,087
  • Location: Dudley in the Black Country
Re: Panart/Mantua Anteo Steam Tug Build
« Reply #338 on: March 02, 2020, 05:49:18 pm »

Hi All


A bit of an update on this build


Firstly I gave the hull a good couple of coats of epoxy on the inside to protect it and give it some strength too.  I really dislike this job for some reason and I put it off for weeks.  Then I fitted the studs for the motor and boiler mount which go all of the way through the frames.


I then epoxied in the studs that will hold the servo for the gas valve as it will be impossible to fit them at a later stage


And then fitted the stainless steel servo mounts as I think it will be easier to do it now rather than later.  Sorry about the picture being the wrong way around.


Then the propshaft was epoxied into place and you can see how the oiler tube just fits around the separator mount


Next was to fit the deck beams in place which then had their first coat of resin


And so did the sub deck


The deck and the beams were then sanded and given a second coat of resin.  Whilst this was still wet the whole assembly was put together and screwed down using very small stainless steel screws


Once it was all dry the bulwark supports were removed


Next I did an experiment to see how to make the caulking in-between the decks.  I used an archival ink pen and you can see the results.  Side 1 is colouring only one side of each plank and side 2 is colouring both sides of each plank.  I really couldn't see much in it so I have decided to colour both sides.  I also gave them a coat of varnish just to make sure that the ink did not run.


So the next job is the planking of the deck.  I really like the colour of the sub deck so I have decided to use pear wood for the deck as its pretty much the same colour.  I spent a couple of hours on the table saw and made some 1mm x 6mm planks which should look very nice once they are glued on


So all in all things are going to plan albeit at my usual slow pace.  I should have the deck done this weekend  - well hopefully


Thanks for looking - Mark

Taranis

  • Full Mayhemer
  • *****
  • Offline Offline
  • Posts: 5,300
  • Balne Moor MBC
  • Location: Yorkshire
Re: Panart/Mantua Anteo Steam Tug Build
« Reply #339 on: March 02, 2020, 06:12:13 pm »

Quite amazing  8)
Logged
ANDY
You’ll only know your best effort if you don’t give up.

Capt Podge

  • Full Mayhemer
  • *****
  • Offline Offline
  • Posts: 4,443
Re: Panart/Mantua Anteo Steam Tug Build
« Reply #340 on: March 02, 2020, 06:22:41 pm »

Thoughtful, practical and inspirational application - great to see and follow - keep it going Mark.  :-)
Logged

Jerry C

  • Full Mayhemer
  • *****
  • Offline Offline
  • Posts: 1,504
  • Location: Caernarfon, North Wales.
Re: Panart/Mantua Anteo Steam Tug Build
« Reply #341 on: March 03, 2020, 03:08:35 am »

BOSTIN!
Jerry.

Mark T

  • Full Mayhemer
  • *****
  • Offline Offline
  • Posts: 2,087
  • Location: Dudley in the Black Country
Re: Panart/Mantua Anteo Steam Tug Build
« Reply #342 on: March 03, 2020, 12:56:10 pm »

Thanks all  :-))   The decking is going on really well so it shouldn’t take too long to do. Then I’ll need to fit the forecastle deck and plank that too. Then the bulwarks get another layer on the inside just to finish them off. Loads to do but enjoyable  :-)

Mark T

  • Full Mayhemer
  • *****
  • Offline Offline
  • Posts: 2,087
  • Location: Dudley in the Black Country
Re: Panart/Mantua Anteo Steam Tug Build
« Reply #343 on: April 03, 2020, 05:22:29 pm »

Hi fellow mayhemer's I hope that you are all staying in and staying safe  :-)   Sorry for the delay on this build but we had new windows fitted just before the lockdown and that created a load of decorating for me which is now done.


Anyway back to the tug.  The planking of the deck went ok but I was surprised by just how much timber and glue I used doing this.  The pile of planks that I made from pear wood was made again twice!  So I underestimated by 66% and used quite a quantity of my stock.


A work in progress trying to keep it as square and straight as possible


Fully planked but still in a rough state requiring sanding down


This is what the job looks like now with the rough edges knocked of of it.  The final sanding and finishing is still quite a long way away but its looking promising.  I think using a pen for caulking has worked quite well


Next up was fitting the forecastle deck - Now I haven't really criticised this kit but wow there are literally no instructions on how to fit this.  Just a picture and thats it and the parts were extremely inaccurate.  I think Panart need to look at this!  Anyway its mounted on two formers that need a lot of shaping and a guess of exactly where they go.


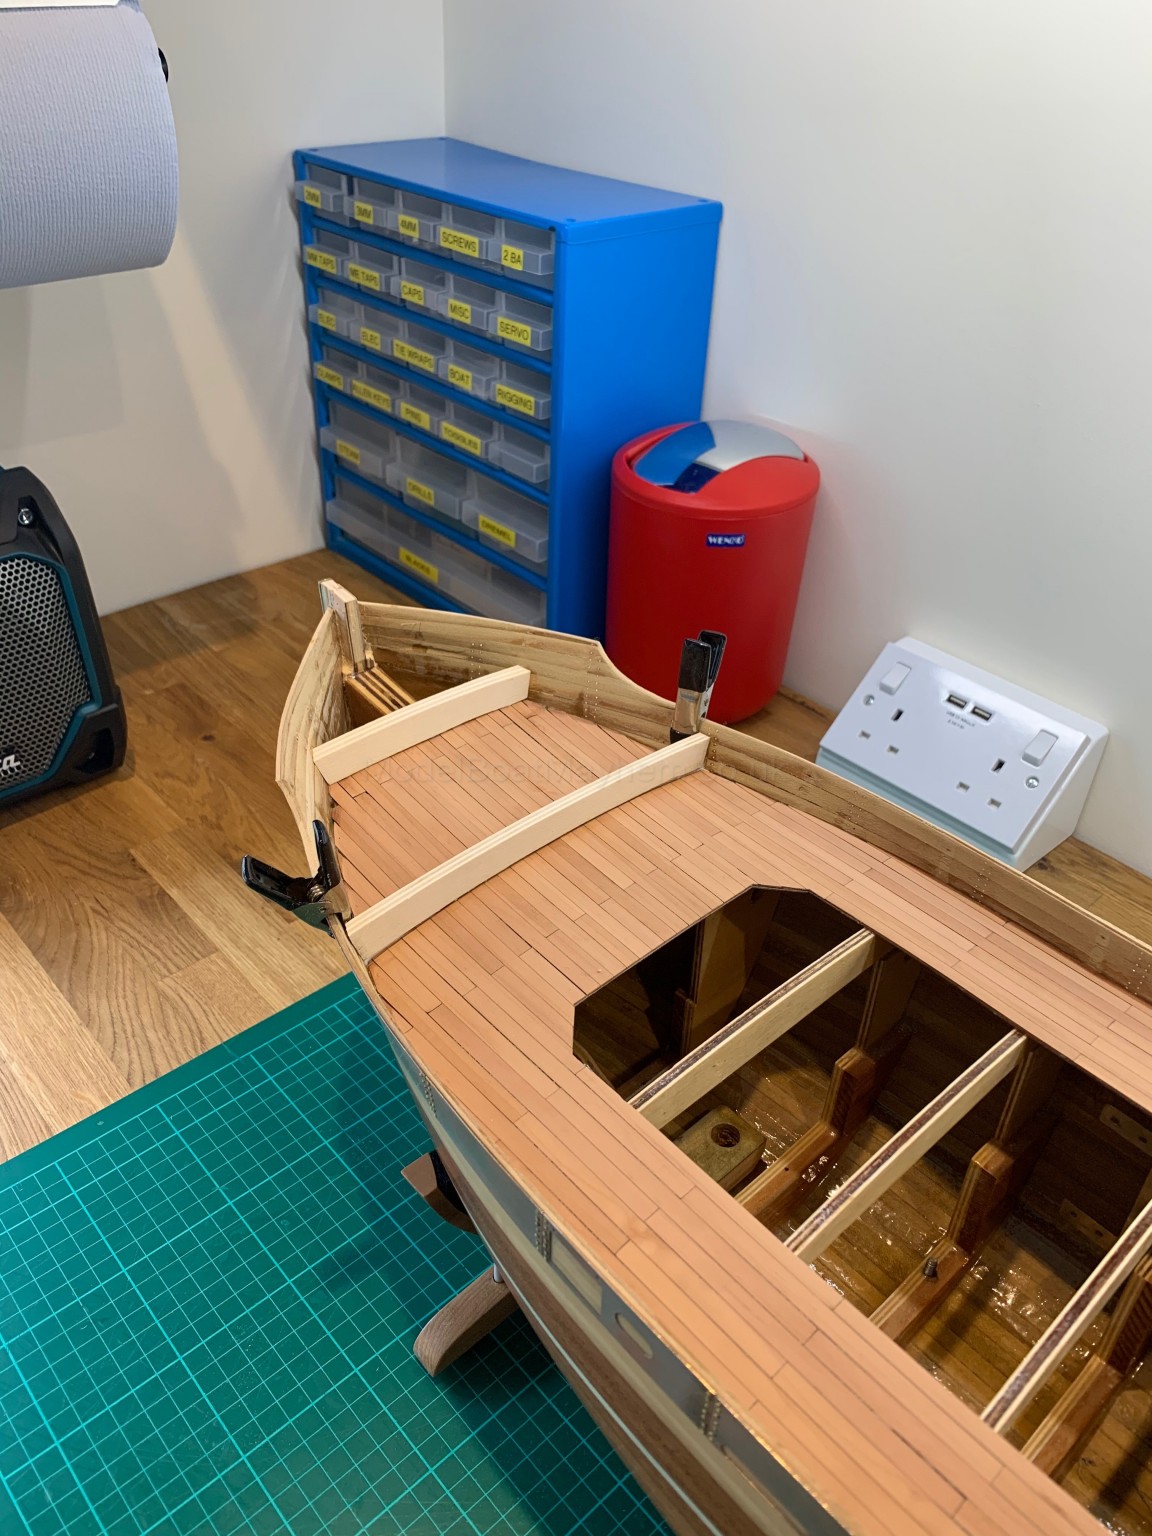
I also had to chisel away the former that you use to build the planking on the bow to free up the stem.  Its easy you just have to be very careful


Now once the deck goes on a void is created that cannot be got to at a later date so I painted the whole assembly in epoxy and screwed it together whilst wet.


I have decided to finish the bulwarks on the inside using boxwood to match the outside to I started on the step in front to the forecastle


Which I finished and sanded to shape and then laid the king plank for the forecastle deck


I also did the same for the stern bulwark


Now this is only rough sanded but again it looks promising


I then planked the forecastle deck which so far is looking okay.  The glue is still wet so its got to wait until tomorrow before any sanding can be done


But I did manage to get one of the bulwark strips on as a bit of a bonus for me.  The bulwarks are a full 5mm thick!!!


Thats it for now so thanks for looking and stay safe all  :-))


Mark :-)

Taranis

  • Full Mayhemer
  • *****
  • Offline Offline
  • Posts: 5,300
  • Balne Moor MBC
  • Location: Yorkshire
Re: Panart/Mantua Anteo Steam Tug Build
« Reply #344 on: April 03, 2020, 05:28:06 pm »

Well worth the wait! absolutely drop dead gorgeous  O0
Logged
ANDY
You’ll only know your best effort if you don’t give up.

Mark T

  • Full Mayhemer
  • *****
  • Offline Offline
  • Posts: 2,087
  • Location: Dudley in the Black Country
Re: Panart/Mantua Anteo Steam Tug Build
« Reply #345 on: April 03, 2020, 06:07:43 pm »

Hi Andy - thanks - yea its coming on ok and now that I've been furloughed I reckon I'll get quite a lot done.  I have been quite lucky as the main rail is made out of 10mm x 4mm mahogany - well it is now  :-))   I found a strip of mahogany and managed to mill 3 pieces that add up to 2.5m in length so I've got plenty to mess around with.  How I'm going to bend it I have no idea but I'm sure that I'll sort it.


Also my wood supplier is still doing mail order so I ordered some boxwood for the superstructure so that I can do away with all of the plywood.  When every cut and joint is on show - it takes time and expensive mistakes too!


I must say though  - I'm really enjoying this little tug boat and its actually starting to look like a boat now.

Jerry C

  • Full Mayhemer
  • *****
  • Offline Offline
  • Posts: 1,504
  • Location: Caernarfon, North Wales.
Re: Panart/Mantua Anteo Steam Tug Build
« Reply #346 on: April 04, 2020, 12:07:55 am »

Drop dead gorgeous matey. Stay safe. We all prisoners Cheeky baby, we all locked in!
Jerry.

Mark T

  • Full Mayhemer
  • *****
  • Offline Offline
  • Posts: 2,087
  • Location: Dudley in the Black Country
Re: Panart/Mantua Anteo Steam Tug Build
« Reply #347 on: April 08, 2020, 01:51:08 pm »

Thanks Jerry I hope that you and Mary are OK too  :-))


Ok a bit of an update on the build - I have carried on with the forecastle deck and the lining of the bulwarks which involved cutting some stealers to make the planks wide enough in places.  I've had a bit of practice at this now so its getting easier


As I often tell my wife a boat builder can never have enough clamps  {-)


Anyway here she is now with all of those jobs complete and the bulwarks sanded to their final shape too.


I really love this picture as you can really see the 3 layers of planking  :-))   There are so many angles that had to be cut here to get this tight  O0


Its only very rough sanded at the moment as theres still loads to do.  I need now to cut all of the cable holes and scuppers in the bulwark which I think is going to take a bit of time.  Then I can get on and try and make the main rail and also remove the deck beams to open up the hull.  Loads to do!!! 


I'll try and get another update on here later on today - Mark  :-)

Mark T

  • Full Mayhemer
  • *****
  • Offline Offline
  • Posts: 2,087
  • Location: Dudley in the Black Country
Re: Panart/Mantua Anteo Steam Tug Build
« Reply #348 on: April 08, 2020, 06:03:00 pm »

I had to move away from the hull for a bit just for a bit of light relief so I put the anchors together - quite nice castings too!


I then glued some bits of mahogany together as I needed to remake the anchor hawsers (I hope thats the correct name for them)


Here is what I needed to make.  The supplied ones are fine they are just the wrong type of wood.  I also wanted to make them 1mm thicker due to the way I wanted to mount the anchors.  So I marked out the blocks that I made - and as always clearly mark which bit you need to remove  :-))


I could have knocked them up by hand by the mill makes them far more accurate.  So I made a couple of wooden parallels to make sure it was all square at got milling


Then I popped a pilot hole through them at the required angle and then enlarged it to its final size


Just the job  :-))


I gave the anchors a bit of an airbrush and also modified them so that I can fit them without putting any holes in the hull


Then milled a little slot to into the back of the hawsers to allow me to glue the anchors in place once I've bent the brass wire


Ta da!!  I think these will look great once the hawsers are given a coat of epoxy and sanded flat


Cheers Mark  :-)

bfgstew

  • Full Mayhemer
  • *****
  • Offline Offline
  • Posts: 502
  • Comfortably Numb
  • Location: Retford (Robin Hood Country)
Re: Panart/Mantua Anteo Steam Tug Build
« Reply #349 on: April 08, 2020, 06:22:12 pm »

If there is an award for build of the century this has surely got to win it........ :-)) :-)) :-))
Logged
"Give me a ping Vasili. One ping only, please"
Pages: 1 2 3 4 5 6 7 8 9 10 11 12 13 [14] 15 16 17 18 19 20 21 22 23 24   Go Up
 

Page created in 0.093 seconds with 22 queries.