Model Boat Mayhem

Please login or register.

Login with username, password and session length.
Pages: [1] 2 3 4   Go Down

Author Topic: Deans Marine Motor Gun Boat 1/24 scale  (Read 17168 times)

SailorGreg

  • Full Mayhemer
  • *****
  • Offline Offline
  • Posts: 1,331
  • Money talks - it says goodbye
  • Location: Hayling Island, Hants
Deans Marine Motor Gun Boat 1/24 scale
« on: May 25, 2020, 10:37:05 am »

 This will be a build of the Deans Marine kit of MGB 77, a Christmas present from SWMBO (after a little strong hinting).  It’s taken a little while to get going because I was building something else for the first few months of the year, but I’ve been looking forward to this all the while.  Deans obviously have a pretty good reputation, although I have never built one of their kits and never done a warship of any size before.  Never too late to learn something new!


The instructions proudly announce that I have one of the first batch of this kit, released in April 2004 (or possibly 2007, as it says later on the same page!).  So maybe this has been sitting on the shelf for 16 years, or is it simply that the instructions haven’t been updated?  Well, I have the laser cut plastic sheets rather than the printed ones, so I guess this is actually a fairly recently boxed kit.  (Deans ask for “thoughts and suggestions” on the kit and the instructions in particular, and I will send a few comments on the instructions once I have finished because they do seem to leave a little to be desired in clarity and completeness for someone unfamiliar with kits of this type.)


So here we go – first, wash the hull in warm soapy water to get rid of release agent, grease and any other stuff that might have settled there.  OK, done that.  Then mark the cut line on the hull – hmm, where’s that?  I did have a quick interchange with Deans just to make sure I was looking at the right place, and then added some masking tape around the hull to make sure that I was clear where the line was (it was indistinct in some places) and that the hull edge would be a fair curve.


The hull was then sanded down to the tape line and we are ready to start building.


As you can see, I have also made a stand using the templates provided in the instructions.


The next job is cutting the holes for prop shafts and rudders.  The locations of these are moulded onto the hull so no tricky measuring, re-measuring and getting it wrong.  Just cut the marked areas.


(For those interested in the small saws that fit a scalpel handle, Accurate Armour.)


I had decided not to use the kit supplied shafts, tubes and P brackets and go for exposed shafts so ordered a new set of everything, including props, from the excellent Prop Shop.  I also made a new pair of rudders more in keeping with those illustrated in Angus Konstam’s “British Motor Gun Boat 1939-45”.  Here are the rudders being made, alongside one of the kit rudders.


The rudders were given a more hydrodynamic profile on a palm sander held in the vice.


The rudder tubes were fixed through a piece of wood glued (UHU Plus Acrylit) into the hull.  As the rudders are flush against the bottom of the hull, they need to be at right angles to the hull surface, hence the angle they are set at.


The instructions suggest completing the internal fitout of all running gear at this point but as I was waiting for the Prop Shop order to arrive, I moved on to fitting the balsa strips around the top of the hull.  That will be in the next post.


Happy isolation!


Greg

Dean's Marine

  • Full Mayhemer
  • *****
  • Offline Offline
  • Posts: 380
    • Dean's Marine
Re: Deans Marine Motor Gun Boat 1/24 scale
« Reply #1 on: May 26, 2020, 01:52:27 pm »

Hi thanks for the note, missed at update should read

                           B.P.C.  MOTOR GUN BOAT  77

Thank you for joining the world of Deans Marine. I am sure you are as excited as us with this long awaited updated addition to our range of Fast Launch kits.
This first batch of production laser cut kit has yet to be seen around the regattas, however the prototype has been through the normal trials and has been tested and proved at many events in the past year, its first release date was the 01- 04-20 and yours is one of the first batch.
Please follow the additional instruction for handling the laser cut sheets especially the marking of part numbers.

Whilst every care has been taken in the design and production of this quality kit there is always the possibility that further refinements can be made.
If you have discovered any aspect that can be improved upon in either the fittings, method of construction, or more importantly the information in the instructions, please contact us as your thoughts and suggestions on these matters to assist us and all fellow modellers.
We run a continual improvement program on our production kits, and any input from modellers in valued.

Having said that please follow the instructions carefully since our methods have been tried and tested over many years.
Our prime consideration is your satisfaction and pleasure in building and sailing this vessel.
We at Deans Marine look forward to seeing your model on the water or at the competitions and exhibitionsthroughout the world.

                                                        Deans Marine.


Logged

Dave_S.

  • Full Mayhemer
  • *****
  • Offline Offline
  • Posts: 499
  • Member of Oxford Model Boat Club
  • Location: between Oxford and Witney
Re: Deans Marine Motor Gun Boat 1/24 scale
« Reply #2 on: May 26, 2020, 03:14:55 pm »

When I read the thread title I thought it was like the one I built about 30 years ago and took to quite a few shows. It is not the same, though, but I am sure they'd look good together. I sold mine when I left the country in 1996, no idea where it is now or even whether it still exists.


It looked like this:
Logged
Ruining perfectly good kits since 1969.

SailorGreg

  • Full Mayhemer
  • *****
  • Offline Offline
  • Posts: 1,331
  • Money talks - it says goodbye
  • Location: Hayling Island, Hants
Re: Deans Marine Motor Gun Boat 1/24 scale
« Reply #3 on: May 26, 2020, 06:31:13 pm »

 Ah, so the kit isn't 16 years old!  I have to say it certainly doesn't look it!  And Dave, nice boat.  Shame you don't still have it.  Was it a kit or did you scratch build it?


The next job is installing the shelf around the hull that takes the deck.  I did a quick check that the deck was going to fit approximately.  It seemed that either the deck had been cut a fair bit oversize or the hull sides had pulled in a bit.  I checked the plan and the full size beam (20’ 7”) and it seemed that the bare hull was a tad too narrow so I fitted a temporary spreader to keep the beam correct as I fitted the shelf.  The first job is to mark a line 2mm down from the hull top to show where the shelf should be.  I drew it like this –


After taping the pencil to the piece of plywood I refined the offset by gluing a small piece of card to the bearing surface and the line is pretty well 2mm down from the top.  In case it isn’t clear, the other end of the piece of wood runs along the opposite side of the hull.


The kit provides ¼” balsa for the shelf.  I confess that me and balsa don’t always see eye to eye.  >:-o Yes, it has advantages – it is light, easily cut, …. well, that’s about it.  But as it was supplied I used it.  The instructions suggest multiple half cuts to allow the strips to bend to conform to the hull.  Well, I tried that but it still snapped, so I ended up gluing short lengths in place where the hull curved appreciably. 


The instructions say to add another strip alongside the first to give a nice broad seating surface, but there is the issue of getting a flat surface for the deck when the hull flares quite a bit.  I got around this by cutting more balsa strip from a spare piece I had and putting this below the first part, then gluing the inner piece to both.  This sketch should show what I mean.


I then sanded it down flat with a sanding stick similar to my marking out tool.  You just need to make sure the sanding surface is around 2mm (or a teensy bit less as the deck material is 1.7mm) from the surface of the ply by adding shims of card and/or thin ply under the piece of abrasive.


Then just work your way round the hull sanding the balsa down until you have a nice flat shelf.


The package from Prop Shop arrived full of lovely shiny goodies,  :-) so I have moved on to installing the running gear.  First I made up a couple of braces to hold the two shafts parallel and at the correct spacing.


The tubes were epoxied in place following the style of Radiojoe – build a small dam around the slot, chock the hull so that one side is flat and flood with epoxy (30 minute Z-poxy).  Obviously, tape up underneath first!  The small scrap wedges are just spot glued in place to hold the tubes at the right angle.  I also had the shafts in place and held by the two wood braces to ensure the tubes were placed parallel. Once the epoxy was set the temporary wedges were popped out and replaced by a tailored wedge to support the inboard end of the tube.


I decided to try an Action Electronics P40E to help in the turns, this being my first twin motor boat.  Before I got much further with the running gear, I set up the motors, speed controllers, and the P40E to make sure everything was working as it should, and that I understood how the P40E affected the motors.  Here is my rather scruffy rig –


The setup of the P40E was entirely straightforward and the instructions supplied by Action are simple and complete.  They even provide an illustrated guide to removing the centre wire from the ESCs to disable the BEC since they recommend a separate Rx battery when using their little box.  I confess I did need to use a magnifying glass to see what I was doing!


Having removed the wire, I discovered the programming card for the ESC now doesn’t work.  {:-{ So I put the wires back in place, programmed the ESCs and removed them again.  Good practice!
 
Next time will be steering gear and P brackets I think. 
 
Keep smiling!   :} :}
 
Greg
 

Dave_S.

  • Full Mayhemer
  • *****
  • Offline Offline
  • Posts: 499
  • Member of Oxford Model Boat Club
  • Location: between Oxford and Witney
Re: Deans Marine Motor Gun Boat 1/24 scale
« Reply #4 on: May 26, 2020, 07:34:57 pm »

Hi Greg, my MGB was a Dean's kit, lovely boat. I was sailing it once at Black Park and a chap stood behind for a while and then spoke to me when I brought it in. Said he'd been crew on one of them in the war and that mine looked 'just right' on the water. There were a few dodgy types around there at the time, so I wasn't entirely convinced, but I accepted the compliment - they're few and far between!


I took that boat to various shows in the 90s, Beale Park, Brighton, Greenwich and others I can't remember. It was a good scene back then, no idea if that still exiits.


I'm still enjoying your magazines,, BTW!
Logged
Ruining perfectly good kits since 1969.

ballastanksian

  • Full Mayhemer
  • *****
  • Offline Offline
  • Posts: 6,447
  • Model Boat Mayhem inspires me!
  • Location: Crewkerne
Re: Deans Marine Motor Gun Boat 1/24 scale
« Reply #5 on: June 01, 2020, 11:15:04 pm »

Great work so far! I look forward to seeing your work on the Rolls Royce gun.
Logged
Pond weed is your enemy

SailorGreg

  • Full Mayhemer
  • *****
  • Offline Offline
  • Posts: 1,331
  • Money talks - it says goodbye
  • Location: Hayling Island, Hants
Re: Deans Marine Motor Gun Boat 1/24 scale
« Reply #6 on: June 02, 2020, 11:03:03 am »

Great work so far! I look forward to seeing your work on the Rolls Royce gun.

Thanks.  Although the gun on this one isn't the Rolls Royce one, it is the 2 pounder "pom-pom", like this -


I admit that keeping track of which MGBs had which armament fit and when is something most of us will only find out from a well researched book.  I am sure Deans have done their homework and this is the correct gun for this boat. I have made a tentative start on it, and found out how brittle resin castings can be.  {:-{   But that's a story for another day.  ok2

Greg

TailUK

  • Full Mayhemer
  • *****
  • Offline Offline
  • Posts: 1,672
  • Location: East Midlands
Re: Deans Marine Motor Gun Boat 1/24 scale
« Reply #7 on: June 02, 2020, 06:09:51 pm »

Thanks.  Although the gun on this one isn't the Rolls Royce one, it is the 2 pounder "pom-pom", like this -


I admit that keeping track of which MGBs had which armament fit and when is something most of us will only find out from a well researched book.  I am sure Deans have done their homework and this is the correct gun for this boat. I have made a tentative start on it, and found out how brittle resin castings can be.  {:-{   But that's a story for another day.  ok2

Greg


The second volume of " Allied Coastal Forces of WW2" by Al Ross and John Lambert covers Vospers and should give some ideas which number series carried as their weapons fit.  It should also have scale drawings of the weapons used.
Logged
No human society has ever functioned without models to capture, explain,disseminate,
persuade, sell, reinforce and analyse all kinds of ideas, values, concepts and situations.

SailorGreg

  • Full Mayhemer
  • *****
  • Offline Offline
  • Posts: 1,331
  • Money talks - it says goodbye
  • Location: Hayling Island, Hants
Re: Deans Marine Motor Gun Boat 1/24 scale
« Reply #8 on: June 02, 2020, 06:39:15 pm »

Thank you.  Yes, I looked at that and the other volumes, but this model is a British Power Boat 71' 9" design. The only book I found that covered them specifically was "British Motor Gun Boat 1939-45", mentioned previously here.  Even that has a relatively brief overview, as it also looks at all the other designs (and there are a lot of them), up to and including the Fairmiles.  If anyone has a good reference for the BPB designs and their armament, please do let me know.  (I believe there is a book on coastal forces weapons from John Lambert in the offing, but know no more than that.  I am keeping my eyes open.)

Greg

SailorGreg

  • Full Mayhemer
  • *****
  • Offline Offline
  • Posts: 1,331
  • Money talks - it says goodbye
  • Location: Hayling Island, Hants
Re: Deans Marine Motor Gun Boat 1/24 scale
« Reply #9 on: June 02, 2020, 09:53:27 pm »

 With the prop shaft tubes in place I now had to fix the P brackets.  I reckoned that, as these take the thrust of the props, I should make sure the fixing was good and strong.  The Prop Shop P brackets were plenty long enough for this model so I had a good length inside the hull.  I cut 2 short lengths of plastic pipe and superglued them over the stubs of the brackets.  With the shafts in place to keep the brackets properly aligned, I then filled the pieces of pipe with thickened epoxy, encapsulating the ends of the brackets.  On the principle that you can’t have too much strength, I added a web between the pipe and the rudder post blocks and I reckon the P brackets will now take all the thrust the props can throw at them.


The next bit to fit is the steering servo.  Here I took a minimalist approach (as I did with all the internals), just 2 pieces of ply fitted to the hull bottom.  The pieces are placed to give a nice snug fit to the servo, and in order to give space for the wire grommet if the servo needs removal I cut a gap in the forward piece.  This was cut most of the way through before fitting, needing only a few strokes with the razor saw to finish the job once the glue had dried.  Here it is before removal of the gap.


The kit provides some white metal castings for the rudder arms, together with some small self-tappers to fix them to the rudder post.  I tried these but managed to strip the thread of the hole before I had tightened the screw sufficiently to prevent any rotation.  Maybe I drilled the hole too big in the first place, but in any case I decided to ditch the white metal and get some more conventional rudder arms from Model Boat Bits. These were augmented by some ball and socket joints, as the angle the rudders sit at means the two arms move in different planes.  The ball and sockets allow more freedom of movement than a pinned joint.


The motors were next.  I had bought Model Boat Bits’ flexible couplings as well as the alignment tool.  With the shafts and motors in place I made up wooden wedges to sit under the motor mounts.  I would like to say that I have a process for determining the exact height and angle of the wedge.  Well, I have – it’s called T&E.  That’s trial and error.  I make up a wedge that looks about right, try it and see if it matches the angle of the motor mount.  After a couple of false starts and a fair few trips to the disc sander, I have a wedge that looks about right. I hold the mount down hard on the wedge and turn the prop.  If I can see a slight movement of the mount as the shaft rotates, the height is wrong.  I slide the wedge in or out to reduce the movement.  Repeat the process until you have a wedge which holds the mount just right – that is, there is absolutely no movement in any plane when you rotate the shaft.  Mark the wedge position on the hull and the motor mount position on the wedge.  With the wedge out of the boat, fix the motor mount in the marked place.  I put a couple of dabs of cyano on the mount to hold it in the exact spot while I drill screw holes.  Glue the wedge in the marked position and reinstall the motor with the flexible coupling, and you should be good to go.


Astute observers (yes, you Derek!) will notice that the two wedges are of noticeably different thicknesses.  At some point when I was fixing the tubes in place, I must have jogged something, because the starboard tube is set at a shallower angle than the port one.  Fortunately the prop is still clear of the hull.  I did briefly consider digging the starboard tube out and refixing but decided that the potential for damaging the hull was pretty high and so I left it alone.  You do have to look pretty carefully under the hull to see the different heights of the props.
 
With the motors in place I then set about placing all the other bits and pieces that drive the boat along.  Here is my initial placing to find a space for everything.


This is broadly how I ended up, although the aft battery was rotated 90 degrees and stood on edge to allow the wiring to go over the top of the forward battery, and the Action Electronics P40e and Rx battery will be fixed to a shelf that is elevated as you will see in the next picture.  (Actually, here was another boo-boo – having glued this shelf onto its bearers, I later realised there was insufficient clearance under the deck for the P40e with the ESC and servo plugs in place.  I broke the shelf out and refitted it under the bearers – that fixed it!)  Here are all the locating pieces in place in the hull, all sealed with a coat of varnish (because I had some on the bench).


The Rx will be fixed with Velcro on to a deck beam just above the P40e/Rx battery shelf.  I did try to keep all the workings towards the rear of the hull as that is how it is shown in the plan.  The plan also gives a balance point for the hull, but until I have the superstructure and fittings in a more complete state, checking that will have to wait.
 
Happy modelling all.  And happy sailing for those who can venture forth now!
 
Greg


ballastanksian

  • Full Mayhemer
  • *****
  • Offline Offline
  • Posts: 6,447
  • Model Boat Mayhem inspires me!
  • Location: Crewkerne
Re: Deans Marine Motor Gun Boat 1/24 scale
« Reply #10 on: June 03, 2020, 08:05:23 pm »


You are right Greg, MGBs and MTBs are a weapons nightmare! I thought you might be fitting a Rolls Royce because the weapon on the model shown near the top of the topic was one of those I think.


This is another turret with lots of variations as I think they also came fitted with twin Oerlikons  %% It will look fab anyway as a turret is always a good thing to have on your model  :-))
Logged
Pond weed is your enemy

SailorGreg

  • Full Mayhemer
  • *****
  • Offline Offline
  • Posts: 1,331
  • Money talks - it says goodbye
  • Location: Hayling Island, Hants
Re: Deans Marine Motor Gun Boat 1/24 scale
« Reply #11 on: June 10, 2020, 02:34:01 pm »

The deck in this kit is plastic card so has little inherent stiffness.  The instructions show a relatively sparse (IMHO) framework on which the deck is laid, so I made some additions to stiffen things up a bit.  The deck comes in two pieces (limited by sheet size I guess), and I added a cross member under where the join will be in addition to the one at the forward end of the hatch.


I also added an additional central beam forward of this, under where the gun will be fixed, and a vertical support as the beams seemed quite flexible. 


When I had finished the deck framework it looked like this


When I checked everything for flatness, there seemed to be a slight upward bow in the longitudinal beam so I added a brace to try and pull it down.  I duplicated this on the other side as well, as it also made the long beam more rigid.


I also wanted to have good access to the rudder system in the stern.  The deck as provided covers over this area and would make adjusting or repairing the rudder linkage a bit of a chore.  I cut out the rear portion of the deck and made up a latch system to hold the piece in place.  I don’t envisage taking this off very often, but if it ever gets messy under there, I have room to see what I am doing and swing an allen key.


I then came to glue the deck on.  Based on multiple recommendations here on Mayhem, I had bought some UHU Plus Acrylit specifically for this job, but when using it on other smaller jobs I realised that the working time for this once mixed is about 3 minutes.  I reckoned I was going to need a bit longer than that to get the glue spread over all the beams, the deck properly positioned and clamped/weighted down.  I did a little experiment with the UHU, Z-poxy resin, Gorilla gel superglue and Gorilla glue (the standard foaming stuff) to see which would be best for gluing the plastic deck to the wood frame.  I wasn’t too impressed with the performance of the standard Gorilla glue or, to be honest, the UHU.  Both broke away with relatively little pressure.  The epoxy and the superglue both gave good bonds, and I reckoned that the epoxy was easier to work with (and considerably cheaper given the amount I would need).  So that was what was used to glue the deck on.


There is a variable gap around the deck edge, and I filled this with a combination of Milliput and Humbrol Model Filler.  I was a bit dubious about the latter as it has been knocking around for a good few years, but it seemed to do the job just fine.  I used the Milliput on the larger gaps and the Humbrol where there was little more than a crack to fill.
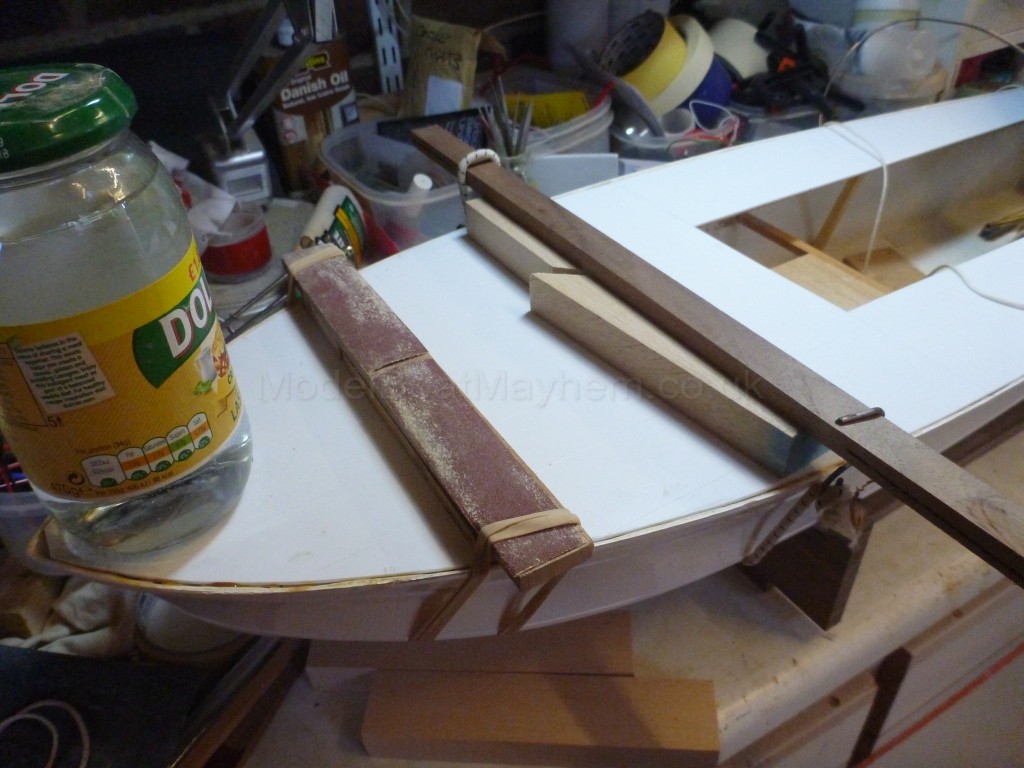
The main hatch piece, which is laser cut so a good fit, needs some stiffening of its own.  The instructions suggest a combination of wood and fabricated plastic I-beams, which seemed a bit complicated to me, so I used two pieces of nice straight wood, again glued with epoxy.  When I tried it in place, it became clear that I hadn’t eradicated the slight upward bow in the deck frame and one end of the hatch piece stuck up a bit.


I could push the hatch into place relatively easily, so I made a fixing system consisting of a lip at the forward end that engages under the hatch support shelf and a couple of magnets at the aft end to pull the hatch into place.


The magnets in the hull are fixed under those little plywood ears.  As an aside, if you use magnets for fixing pieces like this, but find the force isn’t quite enough to hold the piece in place, just pop another magnet under the fixed one – double the attraction!
 
A little more filling around the edge to catch those little bits I had missed and the basic hull is pretty well complete.


 At last been out to the lake for some sailing.  Unfortunately, our hot dry spring has encouraged a record crop of weed, so it's airboats only at the moment.  >:-o >:-o   Still, be thankful for small mercies.  O0   And it should have cleared by the time the MGB is finished, cos I think that might be a while yet!


Greg

radiojoe

  • Full Mayhemer
  • *****
  • Offline Offline
  • Posts: 2,376
  • Location: Gosport , Hampshire , England
Re: Deans Marine Motor Gun Boat 1/24 scale
« Reply #12 on: June 11, 2020, 04:23:29 pm »

Hi Greg I didn't realize you were building another one so soon, I've built a few Deans kits nothing wrong with them at all they taught me a lot and because they require a deal of builder input even gave me the confidence to scratch build, you are going at quite a pace on this one, that is some power train in there you are going to need a bigger pond  %% {-)


I'll be following, :-))


Joe
Logged

SailorGreg

  • Full Mayhemer
  • *****
  • Offline Offline
  • Posts: 1,331
  • Money talks - it says goodbye
  • Location: Hayling Island, Hants
Re: Deans Marine Motor Gun Boat 1/24 scale
« Reply #13 on: June 12, 2020, 12:46:01 pm »

Well, not much else to do at the moment!  And I felt I was going quite slowly (certainly compared to some builds on here), but that's OK, I don't want to finish too soon - I'd only have to start another one!  As to the power train, I guess there will be plenty of power, but I don't have to use it all.  Not all the time anyway.  :}

Greg

radiojoe

  • Full Mayhemer
  • *****
  • Offline Offline
  • Posts: 2,376
  • Location: Gosport , Hampshire , England
Re: Deans Marine Motor Gun Boat 1/24 scale
« Reply #14 on: June 12, 2020, 03:44:39 pm »

Yeah quite right about the power, I just put me in mind of a certain "power boat" at a certain pond and a length of rope I'll say no more  %% {-) {-)


Joe
Logged

SailorGreg

  • Full Mayhemer
  • *****
  • Offline Offline
  • Posts: 1,331
  • Money talks - it says goodbye
  • Location: Hayling Island, Hants
Re: Deans Marine Motor Gun Boat 1/24 scale
« Reply #15 on: June 13, 2020, 02:35:52 pm »

Yeah quite right about the power, I just put me in mind of a certain "power boat" at a certain pond and a length of rope I'll say no more  %% {-) {-)


Joe

I remember it well.   {-) {-) {-)

ballastanksian

  • Full Mayhemer
  • *****
  • Offline Offline
  • Posts: 6,447
  • Model Boat Mayhem inspires me!
  • Location: Crewkerne
Re: Deans Marine Motor Gun Boat 1/24 scale
« Reply #16 on: June 13, 2020, 03:34:15 pm »

Tidy work especially with your installations, and the lockable deck is a good idea. I did similar on the destroyer model using a torpedo mount as the knob!
Logged
Pond weed is your enemy

Martin (Admin)

  • Administrator
  • Full Mayhemer
  • *****
  • Offline Offline
  • Posts: 23,414
  • Location: Peterborough, UK
    • Model Boat Mayhem
Re: Deans Marine Motor Gun Boat 1/24 scale
« Reply #17 on: June 14, 2020, 08:38:35 am »


Great build Greg!

 ..... and a proper cluttered workbench too....  :-))
Logged
"This is my firm opinion, but what do I know?!" -  Visit the Mayhem FaceBook Groups!  &  Giant Models

SailorGreg

  • Full Mayhemer
  • *****
  • Offline Offline
  • Posts: 1,331
  • Money talks - it says goodbye
  • Location: Hayling Island, Hants
Re: Deans Marine Motor Gun Boat 1/24 scale
« Reply #18 on: June 14, 2020, 12:29:25 pm »


Great build Greg!

 ..... and a proper cluttered workbench too....  :-))


Thank you Martin.
And yes, a place for everything, and everything.... somewhere or other!  :D :D

Greg

SailorGreg

  • Full Mayhemer
  • *****
  • Offline Offline
  • Posts: 1,331
  • Money talks - it says goodbye
  • Location: Hayling Island, Hants
Re: Deans Marine Motor Gun Boat 1/24 scale
« Reply #19 on: June 15, 2020, 05:31:10 pm »

 Just a short update this time.  With the functional parts of the hull complete we move to some of the scale detail. First are the deck strips that, in the full size boat, hold down the deck covering.  These are provided as laser cut strips, which saves a lot of scoring of plastic card.  Just release them from the sheet and use.  Well, almost.  The laser cutting does raise a slight burr on the edges, which the instructions suggest you remove by sanding the whole sheet before removing the parts. I chose to do each piece individually, by pulling a strip under a Stanley knife blade held vertically. Two or three passes and the burrs are gone.  I reckon that’s much less effort than sanding whole sheets.  The strips are taped in place and some glue run along the joins.  (The glue I used is a little bottle I have had for ages – can’t remember where it came from – but I guess, from the smell, it is MEK.  It certainly welds the plastic together.)


Next were the toe rails that run around the edge of the deck.  These have part numbers shown in the instructions but I couldn’t find them anywhere on the supplied sheets.  No problem, I can cut them from plastic card.  Because I was going to cut a number of strips to do the full edge, I made up a jig to ensure I had identical pieces.  This was a cutting mat (turned upside down to use the unmarred surface), a metal rule, some wood pieces, a couple of scraps of plastic card to hold the rule at the right height and a nice new blade in the knife.  Here is the jig ready for cutting.


These strips were taped in place as before and glued to the deck. There were a couple of places where the strips were more on the filler than the plastic deck, and I resorted to superglue in these spots.  I made up a little wood gauge to make sure the strips were a consistent distance from the hull edge.


And here is the hull as it stands now.


I have been dabbling with the 2 pounder gun that is mounted on the foredeck as I have been going along, and now will focus on that to get that completed before doing much more on the hull or superstructure.  One of those “model within a model” projects.  I hope all the tiny pieces provided don't vanish through that miniature black hole in the workshop floor!

 
Happy building folks.
 
Greg


Pauli

  • Full Mayhemer
  • *****
  • Offline Offline
  • Posts: 70
  • Model Boat Mayhem is Great!
  • Location: West Midlands, UK
Re: Deans Marine Motor Gun Boat 1/24 scale
« Reply #20 on: June 18, 2020, 12:48:19 pm »

Hi Greg,

Thanks for putting up your build log of the Deans Marine MGB 77, which is excellent by the way with clear photos and good descriptions of your construction methods.

I have only recently joined the forum and my interest was piqued when I started to read your build as I also have this kit. Like you I also received it as a Christmas present from my wife (after some prompting!)

I am new to the world of model boat building and this will be my second attempt (just finishing off a Robbe Najade) so I haven't started on the MGB77 yet.

Might I ask what rating motors and speed controllers you are using and also the size and style of props.

Also what type and size are the prop shafts you are using with the exposed shafts and "P" brackets.

Sorry for all the questions, but I am starting to put together a "shopping list" of any extras I will need before actually commencing the build and considering any modifications that I might make.

Thanks once again for putting this build commentary together - looking forward to the next installment  :-))


- Pauli
Logged

ballastanksian

  • Full Mayhemer
  • *****
  • Offline Offline
  • Posts: 6,447
  • Model Boat Mayhem inspires me!
  • Location: Crewkerne
Re: Deans Marine Motor Gun Boat 1/24 scale
« Reply #21 on: June 18, 2020, 08:14:12 pm »

She's coming along so well Greg. I am looking forward to the 2pounder.
Logged
Pond weed is your enemy

SailorGreg

  • Full Mayhemer
  • *****
  • Offline Offline
  • Posts: 1,331
  • Money talks - it says goodbye
  • Location: Hayling Island, Hants
Re: Deans Marine Motor Gun Boat 1/24 scale
« Reply #22 on: June 19, 2020, 11:06:28 am »

Thanks Ian. I am discovering that my fingers are not as nimble as they once were (if they ever were!).

Hi Pauli, great to see another MGB in build.  The first thing I need to say is that I have zero experience with twin motors, all my previous models have single ones.  So what follows on the motor front is a bit of a shot in the dark, based on running single motor boats of about the same size.  The motors are Leopard Hobby LC2830 730 kV from Component Shop.  I went for a relatively low kV (that is, revs per volt) because I run other boats on a single 1100-1300 kV motor, and I guessed I would need less revs from 2 motors to get a similar performance.  I plan to start off with a 3s (11.1V) LiPo but if life gets too interesting I will drop down to 2s (7.4v) batteries.  You might have gathered from Radiojoe's comment a few posts ago that I will probably have plenty of ooomph in reserve.  Time will tell!  The ESCs are Hobbyking 30A boat ones.  I have used these before and am perfectly happy with them, although I see they are out of stock in the UK at the moment.  There are plenty of other ESCs that will fit the bill though.

The joints between motor and prop shaft are from Model Boat Bits.  The Powerflex couplings are probably overkill for this application, but they were the ones that had an M5 option, and the motors have an M5 thread on the shaft.  I also bought the alignment tool to get everything in line.

The rest of the running gear came from Prop Shop.  The propellers are 35mm standard scale, STD/1315/3/LH/BR and  STD/1315/3/RH/BR - one left hand, one right hand.  This is the same size as the white metal ones provided in the kit.  The tubes are 4" long and the shafts are 4mm 9.5" long.  The P brackets are made to fit the 4mm shaft.  I phoned up to place this order as it isn't one of the standard options on the website.

I hope that helps.  Do keep asking questions, and if I can't answer there will almost certainly be someone who can.  As I said at the beginning, I am feeling my way a bit and obviously I haven't run my MGB yet.  If anyone else wants to chip in, please feel free!

Greg

Pauli

  • Full Mayhemer
  • *****
  • Offline Offline
  • Posts: 70
  • Model Boat Mayhem is Great!
  • Location: West Midlands, UK
Re: Deans Marine Motor Gun Boat 1/24 scale
« Reply #23 on: June 19, 2020, 01:55:25 pm »

Hi Greg, thanks very much for your detailed reply to my questions - very much appreciated. Your choice of running gear will give me some ideas to explore with my build.

I believe the motors you have chosen are "outrunners" - will these require any additional cooling? Also I noticed that the ESC's have provision to be water cooled - do you intend to water cool them?

The only experience I have had in this regard is with my "Najade" where I chose a Roxxy Inrunner 3656/06 brushless motor but mounted it inside a water cooled jacket along with water cooling for the ESC.

I used lead acid gel batteries in the Najade, so have no experience of Li-Po's. I have read that these are sensitive to being discharged below a certain voltage and some modellers fit low voltage alarms to protect them. Would this be something you would do with your model?

- Pauli
Logged

SailorGreg

  • Full Mayhemer
  • *****
  • Offline Offline
  • Posts: 1,331
  • Money talks - it says goodbye
  • Location: Hayling Island, Hants
Re: Deans Marine Motor Gun Boat 1/24 scale
« Reply #24 on: June 19, 2020, 05:12:21 pm »

Yes, they are outrunners.  I don't plan to cool them (which is tricky for outrunners - you can only cool the mount) or the ESCs.  I don't expect to be running either the motors or the ESCs close to their maximum so I expect them to remain warm rather than hot.  Of course, I will only find out if I am right once I run the boat for a while, which won't be any time soon!

As for LiPos, yes you do need to be careful not to run them below a certain voltage (which varies depending on who you listen to, but is around 3.2V for each cell).  I have a couple of cheap, simple alarms like these which plug into the balance lead and have used them on other boats. I did find that they tended to alarm quite early, even after re-setting the trip voltage a bit lower.  After a while I got to know when the voltage was falling off and stopped the run.  I don't use them any more, but I still have them and might use them for the first few runs of the MGB.  If you are at all worried, buy a couple, they are cheap enough.  One thing I do recommend if you are using LiPos is one of these testers - I use mine all the time to check battery capacity and individual cell health.

Happy building!

Greg
Pages: [1] 2 3 4   Go Up
 

Page created in 0.139 seconds with 21 queries.