Model Boat Mayhem

Please login or register.

Login with username, password and session length.
Pages: 1 2 [3] 4 5 6 7 8 9 10 11 12 13   Go Down

Author Topic: Jerry C starts building a Stuart Twin Launch Engine from castings.  (Read 34241 times)

ooyah/2

  • Full Mayhemer
  • *****
  • Offline Offline
  • Posts: 757
  • Location: Glasgow
Re: Jerry C starts building a Stuart Twin Launch Engine from castings.
« Reply #50 on: December 12, 2020, 04:59:54 pm »

Hi Jerry,
There is no problem putting the lagging strips behind the exhaust  flanges, this is how I did it with my engine as shown in pic Just make sure that the lagging strips are flat before bolting down the flanges The lagging strips are made from .020" Ali sheet.
Of all the engines that I have made I never fit lagging below the plates, in my opinion it's not necessary as any benefit is negligible, but of course anybody that has done temperature tests before and after I am willing to listen, it's the same with pipe lagging and I must confess that I do that as it's more like the real thing but again I have never found any advantage.


Jerry the reason that I have made steel Con Rods and split bearings is that I made a complete mess of turning the taper on one of the rods as the tool dug into the base at the bottom of the bearing so I decided on M/S which I like better, did the same with a Score engine by making the rods in M/S.


How did you manage to break your 4 jaw, did you have a tube on the end of the chuck key.


George. 
Logged

Jerry C

  • Full Mayhemer
  • *****
  • Offline Offline
  • Posts: 1,504
  • Location: Caernarfon, North Wales.
Re: Jerry C starts building a Stuart Twin Launch Engine from castings.
« Reply #51 on: December 15, 2020, 08:57:09 am »

Hi George, I broke the chuck turning inside the flywheel. I broke 3 carbide tipped tools. Ground down too much to get them inside. The third one jammed the chuck and the jaws on the scroll retainer snapped off damaging the scroll at the same time. Suppliers sent me a replacement chuck which wings it’s way at snail pace to me. Still lucky it seems. I don’t expect much joy machining the con rods. Not liking PB. Steel looks a lot better.
Over the last 3 1/2 days I’ve been metal bashing the lagging plates. First I milled 20thou of the sides of the cylinder block cylinder block in way of the valve chests. Then creasing the Ali sheet, hammering over the flywheel to form the curves, lots of filing and buffing (finally found some scotchbrite in green and blue. A few scratches to remove and they’re ready for paint. I’ve chosen Triumph Amaranth Red. Don’t fancy Stuart’s green. Hopefully there’s an auto paint supplier nearby that can mix me a small batch and put it in an aerosol can. Got etch primer and Rustoleum undercoat.


Jerry C.

ooyah/2

  • Full Mayhemer
  • *****
  • Offline Offline
  • Posts: 757
  • Location: Glasgow
Re: Jerry C starts building a Stuart Twin Launch Engine from castings.
« Reply #52 on: December 15, 2020, 11:32:43 am »

Hi Jerry,
The lagging strips look good, you could try e-bay for a rattle can spray paint in the colour required as there is still a lot of Bonny's about, at least I think that the pic is a Bonnyville .


I rebuilt a B.S.A. 350 cc with a T100 engine when I was 19 , it turned out to be a flyer. but decided to stick to bicycles..
Let me know if you want pics of steel con rods.


George.
Logged

derekwarner

  • Full Mayhemer
  • *****
  • Offline Offline
  • Posts: 9,471
  • Location: Wollongong Australia
Re: Jerry C starts building a Stuart Twin Launch Engine from castings.
« Reply #53 on: December 15, 2020, 11:57:35 am »

Jerry ...I am convert to Rust-Oleum


Their Colonial Red Gloss is a pretty good match to your Triumph color.......provides a good reflectiive qualities


Derek
Logged
Derek Warner

Honorary Secretary [Retired]
Illawarra Live Steamers Co-op
Australia
www.ils.org.au

Jerry C

  • Full Mayhemer
  • *****
  • Offline Offline
  • Posts: 1,504
  • Location: Caernarfon, North Wales.
Re: Jerry C starts building a Stuart Twin Launch Engine from castings.
« Reply #54 on: December 15, 2020, 12:48:45 pm »

Here you go George. Don’t get me on bikes, I built 36 of these in another life. This one I built for the Chairman of Aston Martin Lagonda, Victor Gauntlet. When he died The Barber Motor Museum in Birmingham Alabama bought  it. It’s listed as Barbers’ Best. Still gets run once a month on their track.


My problem is I’m in Oz and stuffs hard to get. The code for the paint exists so I can get it made here.
Enjoy.
Jerry C.

ooyah/2

  • Full Mayhemer
  • *****
  • Offline Offline
  • Posts: 757
  • Location: Glasgow
Re: Jerry C starts building a Stuart Twin Launch Engine from castings.
« Reply #55 on: December 15, 2020, 05:42:37 pm »

Hi Jerry,
The Norton is superb, when I said that I had done re furb on a 350 B.S.A. and installed a T100 Triumph engine into it it never turned out in such show room condition but bearing in mind My brother and I did it in a single car lockup, it did turned out very nice.
Not enough to tempt me away from my bike and racing activities however as I had started very young about 1943 or 1944.
Can you guess what the corrugated structures in the back ground are.


Sorry Jerry pic is a bit squashed will need to check for size, still working on sending pics.


George.
P.S.
Wide wheel base for turning corners at speed.
Logged

ooyah/2

  • Full Mayhemer
  • *****
  • Offline Offline
  • Posts: 757
  • Location: Glasgow
Re: Jerry C starts building a Stuart Twin Launch Engine from castings.
« Reply #56 on: December 15, 2020, 06:02:31 pm »

Jerry
please excuse the phafing about but I want to try an squash my last pic but when I try preveiw it will not come up.


Yipee it worked, I can now change pics as well


George
Logged

Jerry C

  • Full Mayhemer
  • *****
  • Offline Offline
  • Posts: 1,504
  • Location: Caernarfon, North Wales.
Re: Jerry C starts building a Stuart Twin Launch Engine from castings.
« Reply #57 on: December 15, 2020, 10:20:20 pm »

I’d guess blast screens outside air raid shelters. I used to play in some in the field back of our garden next to an ack ack station. Also had the same trike! Look at my bike pics again. It’s a hybrid Triton Featherbed frame (slimline) with pre-unit Bonnie Engine.
Jerry C.

ooyah/2

  • Full Mayhemer
  • *****
  • Offline Offline
  • Posts: 757
  • Location: Glasgow
Re: Jerry C starts building a Stuart Twin Launch Engine from castings.
« Reply #58 on: December 15, 2020, 11:43:17 pm »

Jerry,
Bang on for the blast shields ,by memory they were about 7ft high x 3ft wide x about 10 ft long all filled with sand, I remember in V.E. they were turned over and the square where I lived looked like a sandy beach, big bonfire at the street corner with all of the timber that was used to shore up the buildings in case of a bomb hit which thankfully never came.


Yes I new that the machine on the R/H side was a Triton, I would say that the Norton is the same machine that you say is now in a Museum, both fantastic machines, I do salivate over the pics now and again.


George.
Logged

Jerry C

  • Full Mayhemer
  • *****
  • Offline Offline
  • Posts: 1,504
  • Location: Caernarfon, North Wales.
Re: Jerry C starts building a Stuart Twin Launch Engine from castings.
« Reply #59 on: December 16, 2020, 07:34:43 am »

George, two pics, one bike.
Jerry.

Jerry C

  • Full Mayhemer
  • *****
  • Offline Offline
  • Posts: 1,504
  • Location: Caernarfon, North Wales.
Re: Jerry C starts building a Stuart Twin Launch Engine from castings.
« Reply #60 on: December 16, 2020, 08:22:24 am »

Day 4 on lagging sheets sees then getting a couple of coats of etch primer inside and out, ditto the cylinder block under the covers.
Attempted to machine the pistons but both castings badly chilled. I know there’s a treatment for it but I can’t be arsed so made them out of brass. If anyone wants to compare coefficients of expansion of brass and cast iron and their implications , feel free and I’ll increase the clearances later. Inserted the piston rings in the bores  and gapped them at 4 thou” each.


Jerry C.

RST

  • Guest
Re: Jerry C starts building a Stuart Twin Launch Engine from castings.
« Reply #61 on: December 16, 2020, 10:30:03 am »

Sorry to ask what might be obvious but I've seen "chilling" a couple of times but can't find what it means. Google keeps saying about introducing cooling of the piece being worked on. What does it mean please as that doesn't sound like what you're saying?


Thanks


Rich
Logged

Jerry C

  • Full Mayhemer
  • *****
  • Offline Offline
  • Posts: 1,504
  • Location: Caernarfon, North Wales.
Re: Jerry C starts building a Stuart Twin Launch Engine from castings.
« Reply #62 on: December 16, 2020, 10:46:30 am »

Hi Rich. Chilling occurs when the mould is broken too early making the casting like diamond in places. By heating it up again and forcing it to cool slowly I believe sorts it out. The money these parts cost is eye watering but they’ve been doing this for yonks and should really be getting it right. It’s almost as though they want to make it difficult. Resting on their laurels I’m afraid.
Jerry C.

RST

  • Guest
Re: Jerry C starts building a Stuart Twin Launch Engine from castings.
« Reply #63 on: December 16, 2020, 11:33:23 am »

Ah, yes thanks. Was thinking it was a machining phenomenon rather than casting.  That makes sense!


Rich
Logged

Jerry C

  • Full Mayhemer
  • *****
  • Offline Offline
  • Posts: 1,504
  • Location: Caernarfon, North Wales.
Re: Jerry C starts building a Stuart Twin Launch Engine from castings.
« Reply #64 on: December 19, 2020, 04:27:14 am »

Machined two piston rods and added the two 1/16” tommy bar holes to the tops of the pistons. Gapped the piston rings in the bores, reassembled the lot with Loctite on the threads then promptly dropped one on the floor and shattered a ring. What’s the drill using o rings?  Yesterday I went to an auto Paint distributor and got them to mix me up some Amaranth red paint and put it in an aerosol can. $35 but worth it. I’m not a fan of Stuart green. Next I made a start on the eccentric rods. They seems to be made from a different batch of phosphor bronze and mill quite nicely. Milled the right hand side of the top part then backed out and cleaned up the bottom face to dimension then replaced with the next one and repeated using the same settings. I noticed on the first one that the movable vice jaw was lifting a fraction so used a clamp to hold it down. Not strong enough so bought a pair Of cheap 3” metal clamps which did the trick without obstructing movement. Having the weekend off and catching up on the cricket. Internet has been problematic possibly due to lightning damage in a storm the other day.
Jerry C.

Jerry C

  • Full Mayhemer
  • *****
  • Offline Offline
  • Posts: 1,504
  • Location: Caernarfon, North Wales.
Re: Jerry C starts building a Stuart Twin Launch Engine from castings.
« Reply #65 on: December 19, 2020, 07:05:43 am »

I forgot to post these pics. I milled the steam valves and nuts. The steam valve castings came in one piece so I machined them joined together then separated them which saves time setting up. The other pic is my setup for milling the eccentric rods.


Jerry C.

Jerry C

  • Full Mayhemer
  • *****
  • Offline Offline
  • Posts: 1,504
  • Location: Caernarfon, North Wales.
Re: Jerry C starts building a Stuart Twin Launch Engine from castings.
« Reply #66 on: December 20, 2020, 06:06:13 am »

It occurred to me that I have been very remiss in posting what I’ve done without saying how I went about it. I will remedy this when I’m forced into down time waiting for stuff. The silver solder I ordered locally arrived Friday, flux is in transit. Four jaw chuck is getting close and still awaiting Blackgates package.
Jerry C.

Jerry C

  • Full Mayhemer
  • *****
  • Offline Offline
  • Posts: 1,504
  • Location: Caernarfon, North Wales.
Re: Jerry C starts building a Stuart Twin Launch Engine from castings.
« Reply #67 on: December 21, 2020, 10:51:02 am »

Here’s how I’m going about machining the eccentric rods and caps. It’s all about standards and repetition. Looking at the drawing I decided to start on the right hand face so set the piece in the machine vice on parallels for the big end and feeler gauges across the top bit for support (PB is soft and bendy). Clean up the boss then using the vertical slide move the piece downwards until it clears the boss and sits over the rod part. I fixed a digital tire tread depth gauge to the lathe bed, using superglue, with the probe extended to touch the saddle. Then I made sure the auto feed gears were free and engaged the  screw with the halfnut lever on the apron. I can now move the saddle incrementally with a spanner on the right hand end of the feed screw. Before moving anything I zero the dro then, using a finger on the end of the dro slide to allow it to follow the movement on the saddle until the dro shows 0.047” then lock the saddle and release the halfnut. The cutter  is now set to mill the rod face. On completion remove the piece and put the next piece in the vice and repeat until right face of all four  pieces are done.  Other half, turn the piece so unmachined side faces the milling cutter and repeat the process bringing the boss to size then move saddle 0.047” towards the cutter and complete the rod, Finally move the saddle away from the cutter by 0.281” and mill the top connection to size. Repeat in the last 3 pieces. Now I need to size the bottom for width so rotate the piece in the vice with the rod vertical and clean up one side where the bolts will go to fit the rod to the sheaves. Now I remove the piece and do some measurements to see how much material needs to be removed each side to keep the hole for the sheaves central to the piece and again, using temp dro, mill to size. Repeat with remaining three pieces.
Next it’s time to drill and tap the holes in the tops 7BA. Marked out the centre as close to the top as looked right and centre popped  for centre drill. Clamped the top in the vise and drill the tapping size (2mm) then tapped the hole right through, rotated the part 180° and drilled the clearance hole half way through. Repeated on all the rest. First time I tapped I broke the tap when it was all the way in. After finding out there is only one spark erosion firm in Australia and that making my own, (YouTube) was probably a bridge too far I used plan B. Using a Dremel disc cutter, I cut 1/2” off the shaft of the tapping drill, leaving enough that it can be reused. I drilled a clearance hole in a piece of round brass bar disc. Put the brass disc on the vice jaws, rested the piece on the brass disc with the broken tap over the hole. Put the cut off piece of drill in the hole resting on the broken tap then hit it once with my biggest hammer. Success!! Came out in one. Still half the thread remaining (think of the breach of a big gun) and a nut goes on the end of the bolt anyway. Lucky again!! The rest went ok.
Using the vertical slide I centred on the 7BA tapped hole then 40 turns on the wheel lifted the piece 2” so with a scribe in the chuck I marked the cut line for the end caps.
That’s it for the last two days.


Tomorrow I’ll drill for the 5/8” 7 BA bolts for the end caps.
I’ve been thinking about the 3/4” hole for the sheaves. I can’t see how I’ll get the pieces on the four Jaw chuck (when it arrives) so thinking of putting a boring tool in the 4 jaw and the parts in the machine vice and boring the holes. Then doing some tool grinding to cut the little groove in the bearing surfaces.  I’ll sleep on that a few days.
Cut the slots for the reversing plates, some filing and wet and dry and their done.


Jerry C.

derekwarner

  • Full Mayhemer
  • *****
  • Offline Offline
  • Posts: 9,471
  • Location: Wollongong Australia
Re: Jerry C starts building a Stuart Twin Launch Engine from castings.
« Reply #68 on: December 21, 2020, 01:03:26 pm »

Following on Jerry and a question from left of centre...I thought I noticed on November the 9th, then dismissed it....but today confirms  :o  .is the drip/swarf tray for the lathe upside down?


I have a very valid reason to question this as I have just acquired a 2nd hand Sieg C3 - [could be the same [basic variant] as your machine I think]..... & this one does hot have a drip/swarf tray, but mounted on a slab of Melinite board


Derek
Logged
Derek Warner

Honorary Secretary [Retired]
Illawarra Live Steamers Co-op
Australia
www.ils.org.au

Jerry C

  • Full Mayhemer
  • *****
  • Offline Offline
  • Posts: 1,504
  • Location: Caernarfon, North Wales.
Re: Jerry C starts building a Stuart Twin Launch Engine from castings.
« Reply #69 on: December 21, 2020, 10:40:26 pm »

Derek, mines bolted to 3”thick Aussie hardwood. The bolts pass through the tray so if it was upside down it would be crushed. And all the oil would run out. Mines also got a tin splash back which fouls the cross slide at full travel.
Jerry.

Jerry C

  • Full Mayhemer
  • *****
  • Offline Offline
  • Posts: 1,504
  • Location: Caernarfon, North Wales.
Re: Jerry C starts building a Stuart Twin Launch Engine from castings.
« Reply #70 on: December 23, 2020, 03:06:43 am »


I’ve completed most of the machining of the eccentric rods but next I need to bore out the 3/4” hole for the sheaves. I’ve been following the very informative and very helpful guy that built the compound engine, however, he omitted these from the site.
I’m thinking of mounting the assembled rods in the mill vice, centred on my 3 jaw chuck then shipping the 4 jaw chuck loaded with my boring bar and using shims move it out in stages to achieve the 3/4” hole.
For the 1/32” guide groove I assume I Grind the boring bar to suit.
Any advice welcome. (Needed).


 [size=78%][/size]


Jerry C.

tghsmith

  • Full Mayhemer
  • *****
  • Offline Offline
  • Posts: 256
  • Model Boat Mayhem is Great!
  • Location: raleigh NC
Re: Jerry C starts building a Stuart Twin Launch Engine from castings.
« Reply #71 on: December 23, 2020, 11:25:37 am »

page 5 of the reversing links pages,, I used his method, but turned the rod section of mine down to get the look I needed,, made a drilling jig to make sure the "lengths" were equal for the four rods..
Logged

ooyah/2

  • Full Mayhemer
  • *****
  • Offline Offline
  • Posts: 757
  • Location: Glasgow
Re: Jerry C starts building a Stuart Twin Launch Engine from castings.
« Reply #72 on: December 23, 2020, 11:56:25 am »

Jerry,
If you can mount the eccentric strap in the 4- jaw as per pic it will be much more accurate than trying to pack out the strap .


Clean out the flash in the hole with a round or 1/2 round file and you can then roughly centre the hole to run as true as you can get and then bore it out with the tool in the cross slide, you will have much more control of the dimension required this way.


If you can't mount the strap with the 4- jaws at a pinch and with very light cuts you can machine the bore using only 3 jaws, put packing strips in between the job and the jaw to prevent marking the job you can tighten the jaws very tight with the 3- jaws only.


I can't help with the boring off the groove as you can see in the pic that I machined the eccentrics smooth but with an upward flange on both sides of the eccentric to keep the strap on the eccentric but would suggest that you grind up a boring tool to suit the groove and machine the strap while still on the same setting.


To finish off the strap I mounted it on a mandrill put it in the rotary table and finished off the outsides of the strap.
George.
Logged

SteamboatPhil

  • Full Mayhemer
  • *****
  • Offline Offline
  • Posts: 2,776
  • Location: Dieppe, France
Re: Jerry C starts building a Stuart Twin Launch Engine from castings.
« Reply #73 on: December 23, 2020, 01:20:28 pm »

I ground a tool bit to do the grooves in mine, the bit is also useful for banjo fittings  :-))
Logged
Steamed up all the time

Jerry C

  • Full Mayhemer
  • *****
  • Offline Offline
  • Posts: 1,504
  • Location: Caernarfon, North Wales.
Re: Jerry C starts building a Stuart Twin Launch Engine from castings.
« Reply #74 on: January 03, 2021, 11:16:44 am »

Sorry I haven’t posted for a while but I’ve been keeping a journal to assist me when I build the next one. Situation at the moment is that
1) 4 jaw chuck still broken and replacement should arrive any time now.
2) replacement bearing cap castings arrived from Stuart’s.
3) copper pipe, 5BA studding and a 1” cube of gunmetal are on the way from Blackgates but that’s a month ago.
4) Christmas pressies of money means I’ve got enough to get a cheap 3 axis DRO setup. As soon as Ausee tools opens up on the eighth I’ll get my order in plus a slitting saw and arbor.
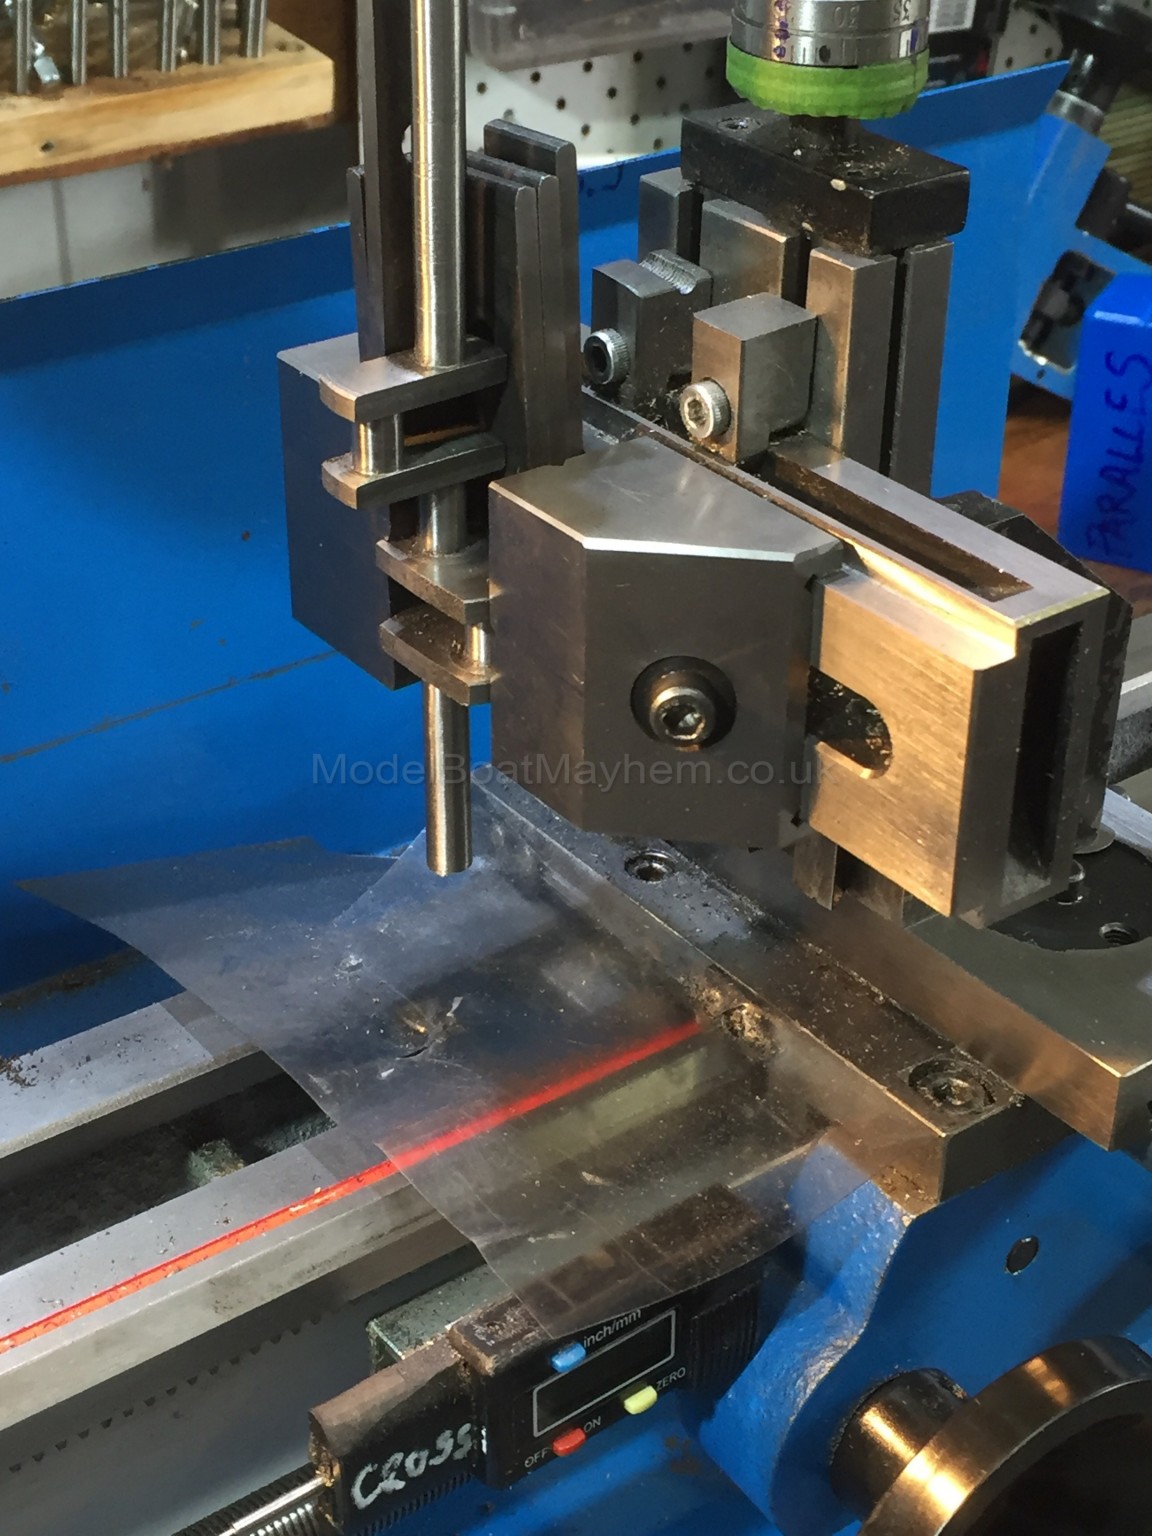
However I’ve not been idle. In day 38 I started on the conrods. I marked out the centres top and bottom. Next I set up in the vertical slide and drilled 2 7BA clearance holes with 9/16” centres in the big ends for the end caps. Then I jury rigged the broken 4 jaw chuck to hold a big end and marked a centre on top of the little end and using a live centre in the tail stock was ready to turn the rod tapers.
I calculated the angle to set on the compound slide as :-
tan-1 is 1/4-3/16/2= 1/16”/2= 1/32=0.03125= 1.8°.


Set that on the compound and turned the tapers when I’d finished the last one before I could remove it I was interrupted by domestic drivel and on my return, looked at the part and thought as it’s there now would be a good time to turn the 1/4” dia. At the top of the taper. Silly me!  Should have milled 1/4” flats, not diameter. "xxxxx" if I’m going to order a new one from Stuarts so I went for a repair.
Day 39.
Cut a short length of 3/8 A/F brass hex bar in half then silver soldered it back together again. Popped witness marks on each piece then drilled a 1/4” hole through the join. Next I unsoldered them and clamped them around the 1/4” top of the conrod  and butting up against the gugeon bits and soldered them back on again. A bit of carving with the Dremel and that’s the top of the conrods done. When I get a slitting saw and the 4 jaw I’ll fish the big ends.


Day 40 I finished the top of the conrods by drilling the 1/4” diameter bottoms of the slots then using a milling cutter I completed the slots then drilled and tapped for the gudgeon bolts. Next, the the crossheads, just a matter of cleaning up the castings and drilling 3 holes in one plane and a bit of tapping. I need the 4 jaw to Finnish off the sliding faces and the boss for the end of the piston rods. Yesterday’s repaired conrod soaked overnight in citric acid solution from Woolies in Erindale Centre.


Day 41 I decided to see if I could remedy the cock up when I put the 1/4” drill through for the crankshaft bearings and bed plate. I bolted no 1 and two bearing caps to  and drilled a 1/4” hole through and repeated with 2 and 3. Fitted the caps loosely and put a 1/4” drill bit through by hand. It didn’t look nearly as bad as I thought so mounted baseplate in milling vice, squared everything up and with bearing caps loose ran the 5/16” reamer through. Tightened down the caps and ran reamer through again. The only thing wrong is the crankshaft is 1/32” lie in the bed plate and to drop the crankshaft in needs a little relief on the sides of the bed plate. Will adjust the lengths of the column to compensate.


Day42 As I’m running out of things to do and I’ll have a long wait for materials to build up a crankshaft I decided to have a go at the forged crankshaft supplied. It came with big lumped on the end who I assume is to put the centres on for machining between centres. I don’t have an MT3 dead centre, faceplate or lathe dog but do have an MT2 live centre. So I marked out the 3 centres on the extremities of the end lumps and put small starter centres in with a small centre drill enough to get me started. I put my biggest centre dril in the chuck ant the live centre in the corresponding hole on the other end then shuffling about as necessary drilled all six centres leaving the big centre drill permanently in the lathe chuck until everything complete. I let the pilot of the centre drill come through the other side and tapped the holes 6mm and used a 6mm cap screw and locknut as a lathe dog driven by one of the chuck jaws.
Material very difficult to get a good finish and seems to come add as dust rather than clippings. So special resharpening of lathe tools and experimenting with grinding angles I started to make progress. There’s plenty of spare metal to eventually get it right however there ar some areas with problems similar to chilling but I’m not familiar with forgings.


Day43 turned my attention to the crank journals. The only possible tool available was my parting off tool which with care took the inner crank webs to size admirably 10 thou at a time. Same with the outer web faces. Turning the journals themselves was uneventful and I’m happy with the results.


Day 45. Completed machining the crankshaft by milling the webs to final size. Cut off the ends.
Fitted crankshaft in bed plate and fitted caps. There is a small amount of play so skimmed a little of the bases of the caps with wet and dry paper on a glass plate until they started to nip up. Got some Brasso. Marked up rubbing surfaces with blue to indicate contact patches for filing/ scraping. Must have assembled/ disassembled 30 times but got there in the end. It’s not perfik  but it’s ok.
Removed caps and drilled and tapped 5BA for oil cups for brasso for bedding in.
With hindsight the perfect solution would have been to skim the top of the bed plate 3/64” as there’s plenty of meat in the casting.
Made three brass oil cups. Reamed flywheel to 5/16”. Fitted concentrate and flywheel. Not happy with supplied slotted head grubscrews. Next time it’s Allen headed metric grubscrews for flywheel and eccentrics. When I’ve finalised the timing I’ll file flats on the crai for the fasteners.


So that’s me up to date. Happy New Year everyone.
Jerry C.

Pages: 1 2 [3] 4 5 6 7 8 9 10 11 12 13   Go Up
 

Page created in 0.137 seconds with 21 queries.