Model Boat Mayhem

Please login or register.

Login with username, password and session length.
Pages: 1 2 3 4 5 6 7 [8] 9 10   Go Down

Author Topic: 1/5 Riva Aquarama...  (Read 28756 times)

T888

  • Full Mayhemer
  • *****
  • Offline Offline
  • Posts: 1,309
  • Location: NewForest
Re: 1/5 Riva Aquarama...
« Reply #175 on: March 08, 2023, 10:01:18 am »

David, still following your build   :-)) :-)) :-))
Logged
Regards David

Circlip

  • Full Mayhemer
  • *****
  • Offline Offline
  • Posts: 4,465
  • Location: North of Watford, South of Hadrians wall
Re: 1/5 Riva Aquarama...
« Reply #176 on: March 08, 2023, 11:11:23 am »

Have you tried HSS turning tools for Brass Dave? Carbides with everything (Bit like Cyano) not always the answer. Not knocking the final result, just an observation.


  Regards  Ian.
Logged
You might not like what I say, but that doesn't mean I'm wrong.
 
What I said is not what you  think you heard.

DJW

  • Full Mayhemer
  • *****
  • Offline Offline
  • Posts: 685
  • Location: London
Re: 1/5 Riva Aquarama...
« Reply #177 on: March 14, 2023, 05:03:27 pm »

Hi Ian

I do have a set of HSS tools, but I don't have a grinder that I've always thought I needed to sharpen them.  So I must admit that I like the replaceable carbide tip tools as I can just replace the tip when I start something that needs a good sharp tool.  I'll have a go at sharpening the HSS tools, I'm guessing that you mean the shapes of the HSS tools may be more suited to brass / aluminium (rather than the carbide 'points')..?

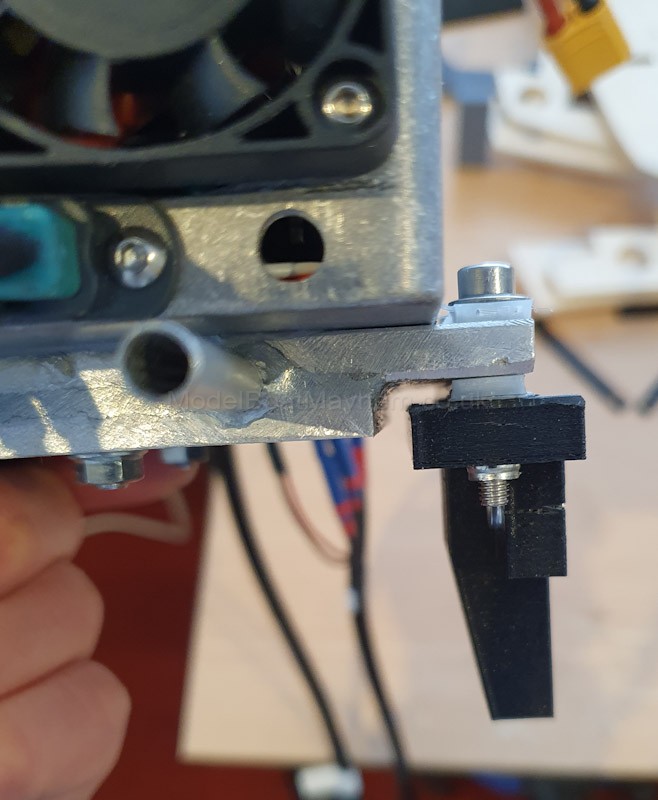
In other news...  I've got the ESC Case mounts fully sorted.  I used the 3D printer and some flexible TPU filament to create some mount inserts that keep the case 100% isolated from the mounting bolts and the hull mount. Might be overkill and a waste of time, but I'll know that I tried. (To avoid any sounds from the ESCs being passed to the hull...)


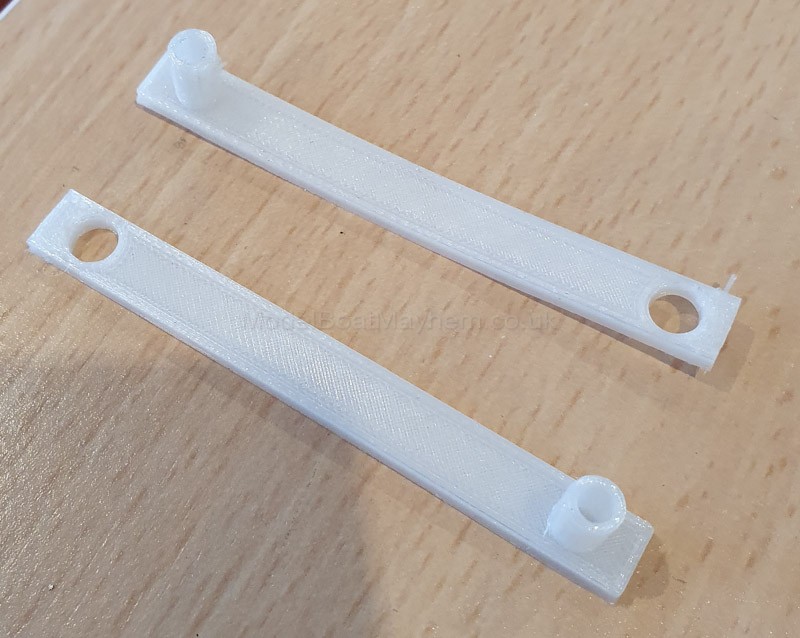
Also some progress on the dock lights to report.  I reduced the diameter of the 'reflectors' a shade in the lathe, bit precarious, but got there in the end.


This pic shows the original reflector, then cut down, then in the dock light


And the pair installed


Need to get them powered up to see if I'm on the right track. I call them reflectors, but there's no silvering and they're solid plastic, so by changing the shape I may have altered their characteristics, I'm thinking of silver painting the outer face and seeing what happens.

Very pleased to have made some progress on the actual hull, rather than just fittings..!!  I'm two years into this build, so about time I reckon.

Here's the Stringers ready to shape and install.  Transom / Stern assembly in the background being glued.


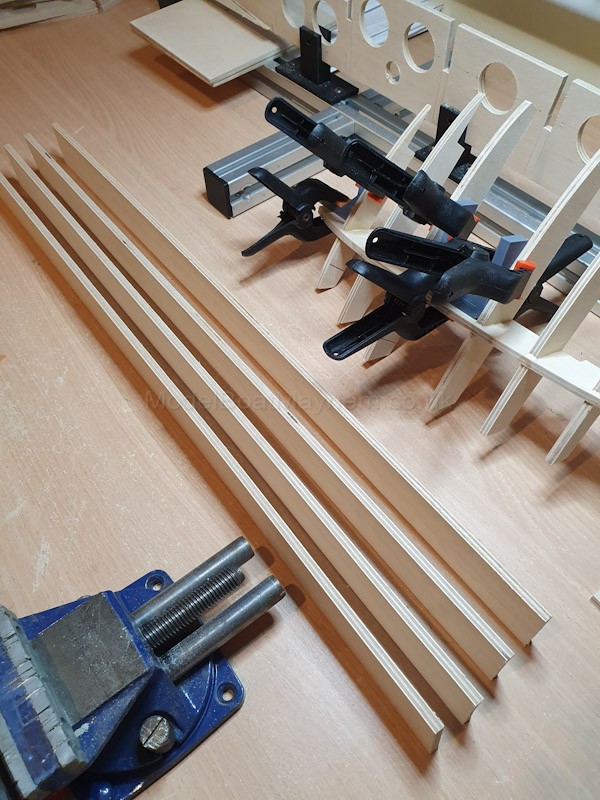
And that stern assembly in place on the keel, just dry fit.


And this stringers cut to fit the frames


Again still dry fit, but nice and tight, some shaping left to do, and some holes to drill. The 'underside' of the stringers is deliberately protruding beyond the frames so I can plane them flush and plank over them once bonded in. The stringers not part of the Amati design, just my attempt to add some stiffness. They are 10mm apart so they can act as strengthening for the prop tubes, P brackets and rudders.  And provide some good alignment for that hardware.


P Brackets will need some sort of padded insert, and rudder tubes will need boring out a shade.


But finally feeling like a model boat project rather than a model engineering exercise...  Flat sections of the hull are bases for the motor mounts.  And some comparison with my 86cm 1/10 Aquarama...


Finally.  I have an order in for 100 Mahogany and 80 Lime planks...  Hopefully picking them up next week.  2m lengths.

Best regards to all.
David.

Capt Podge

  • Full Mayhemer
  • *****
  • Offline Offline
  • Posts: 4,448
Re: 1/5 Riva Aquarama...
« Reply #178 on: March 14, 2023, 05:50:11 pm »

Everything coming together nicely and thanks for the write up, it helps in understanding what you're looking to achieve.


Aye,
Ray.
Logged

Stuw

  • Full Mayhemer
  • *****
  • Offline Offline
  • Posts: 314
  • slow motion modeller...
  • Location: Surrey, England
Re: 1/5 Riva Aquarama...
« Reply #179 on: March 16, 2023, 11:40:36 am »

Agree. Looks like a boat to me. What a project!  :-))
Logged
2 Lesro Javelins... and that’s it. Not even close to finished!

DJW

  • Full Mayhemer
  • *****
  • Offline Offline
  • Posts: 685
  • Location: London
Re: 1/5 Riva Aquarama...
« Reply #180 on: March 20, 2023, 05:06:58 pm »

Afternoon All


And Hey Stuw, certainly feels like an epic from this side of the build too..!


It was my birthday last week, and so I got a new toy...


And once I'd got my head around it, I love it.  Its the smallest Proxxon Scroll Saw, the 230/E. My rookie error was to install the provided blade (pinless) but to not fully seat it in the lower clamp, the result being the 'toothless' part of the blade was above the main plate for part of the cut...  And so I was initially a bit underwhelmed as it was taking an age to cut anything.... Then I added an LED worklight to the area and realised my error...  An adjustment later, and all was well.  Also realised the 'foot' has to be adjusted to the height of the wood being cut. Very impressed to be honest, I know it's modest given the range of scrollsaws out there, but it's now cutting through 6mm birch ply as fast as I need, and very accurately.  Together with the Proxxon bandsaw, which I'm also very happy with, I have no excuses when it comes to cutting model sized wood...


So I've made a start on a few of the parts that I've recently scaled and printed.


I'm using the sample blades supplied but have ordered some spare straight and spiral cut blades to try.  Need a finer blade too I think, I've noticed the cut is not as clean as the bandsaw, or maybe that can be improved with experience.  Any recommendations for optimal scroll blades for cutting 3 to 6mm ply..?


Very best regards to all.
David.

DJW

  • Full Mayhemer
  • *****
  • Offline Offline
  • Posts: 685
  • Location: London
Re: 1/5 Riva Aquarama...
« Reply #181 on: March 29, 2023, 10:56:48 am »

Morning All


A little more progress to report, been looking at supporting and securing the electronics cases and batteries.


The electronics cases sit to port and stbd of the batteries, so I've cut some 6mm ply to go around the base of each case, these pieces will be held by a couple of screws so that removal allows the case to be removed too.  I think they'll keep wiring out of view too so make the build look tidier.  Been through 3 sheets of 4 x 2 ft 6mm ply so far, and just ordered some more.  Also cut some bases for the battery compartments.  Pretty much everything in sight is still dry fit at the moment (except the rear hatch frame) so I can modify the frames and keel as I build in the subsections. I'm now way off piste from the Amati plans.  Also using some 3mm birch ply for some non structural parts.


Still not sure about how much battery to build in, but I will be able to stack the LiPos and use in parallel if needed.


And the ancillary battery will sit in the middle.


It just works out that the battery compartments are longer than the batteries, I think I can leave it like that so I can move the batteries for / aft if I need to alter weight distribution later.


I'm also working on the exhausts a little, developing a 3D mount that uses the ply stringers as a fixing point, and thinking through how best to waterproof the exhausts as they pass through the transom, they'll need to be removable.  The original Amati kit uses very short cosmetic exhaust stubs that don't really penetrate the hull.  Pictures on next update.


I've been told by John at Jotika that the planks are now cut and ready to collect, now need to get a date for day trip to pick them up..!


Very best regards to all.
David.


ChrisF

  • Full Mayhemer
  • *****
  • Offline Offline
  • Posts: 1,319
  • What's my favourite cake!
  • Location: Warwick
Re: 1/5 Riva Aquarama...
« Reply #182 on: March 29, 2023, 05:32:43 pm »

Hi David

Stirling work as usual and making real progress now.

As far as scroll saw blades go, I use Olson, which is one make recommended on woodwork forums. I did some reading up on the subject and bought various types of blades as I was looking for a fine cut as well. The ones producing the finest cut tend to be the pinless type but I rarely use them as they are fiddly to fit in my Record scroll saw (especially when having to remove and refit for cutting out internal sections) and you can't turn them through 90 degrees to cut longer pieces. For the thicknesses of ply you mention I nearly always use pinned blades now - 15 TPI (Ref. 41101) and 18.5 TPI (Ref. 42401) - these are 5" that I use. The latter used where less splintering is required and tighter turns. Both are pretty good though and as long as you cut a little way from the line and sand to the finished size then you get a good finish. The pinless blades I have are 12 TPI PGT (Ref. 45502).

This is a useful reference:

https://www.olsonsaw.net/wp-content/uploads/2020/01/2020-scroll-chart-WEB.pdf

Chris
Logged
Building Fairey Marine boats: River Cruiser 23 prototype, Huntress 23 Long Cabin with stern-drive, Huntsman 28, Huntsman 31 and Swordsman 33 and two more to come! All scratch built and to a scale of 1:12

SteamboatPhil

  • Full Mayhemer
  • *****
  • Offline Offline
  • Posts: 2,780
  • Location: Dieppe, France
Re: 1/5 Riva Aquarama...
« Reply #183 on: March 29, 2023, 07:23:35 pm »

Chris
Much appreciate the info on saw blades, I might just get it right now next time  :-))
Logged
Steamed up all the time

DJW

  • Full Mayhemer
  • *****
  • Offline Offline
  • Posts: 685
  • Location: London
Re: 1/5 Riva Aquarama...
« Reply #184 on: April 04, 2023, 05:11:09 pm »

Afternoon Chris


Very useful PDF re the scrollsaw blades, I'd been guessing at which blades to choose, I'll be taking a good look at that table. The Proxxon uses pinless, I'm finding the current (proxxon) blades are a bit unpredictable in terms of the direction they cut, behaving like they have a twist in them, or maybe I'm applying too much pressure to the cut.  It's all a learning curve... (No pun intended)


Some more progress to report on the build.


Cut the sun deck, it's quite a significant component as it's quite large, has a frame, and then the base of the sundeck has to be removed in a single inside cut.


It went OK, had to use a little filler to lose the pilot hole that I had to use to start the cut.


And in position.


Then I've temporarily aligned the bow with the stern section, and the 1/10th for comparison.


And then cutting some pieces that span the bow and stern sections.


Had a bit of a busy couple of weeks so plank collection will be after Easter.


Very best regards to all.
David.

ChrisF

  • Full Mayhemer
  • *****
  • Offline Offline
  • Posts: 1,319
  • What's my favourite cake!
  • Location: Warwick
Re: 1/5 Riva Aquarama...
« Reply #185 on: April 04, 2023, 09:28:39 pm »

Hi David - you made a good job of cutting that out. Yes, I find sometimes that even though ply has laminates with the grain laid in different directions the piece has to be angled quite a bit on occasions to achieve the cut in the direction required. Sometimes I can cut nice and straight and other times it's all over the place!

Chris
Logged
Building Fairey Marine boats: River Cruiser 23 prototype, Huntress 23 Long Cabin with stern-drive, Huntsman 28, Huntsman 31 and Swordsman 33 and two more to come! All scratch built and to a scale of 1:12

Stuw

  • Full Mayhemer
  • *****
  • Offline Offline
  • Posts: 314
  • slow motion modeller...
  • Location: Surrey, England
Re: 1/5 Riva Aquarama...
« Reply #186 on: April 05, 2023, 10:30:45 am »

More great progress David and excellent job on the one piece cut out. No Pressure!


Also thanks to Chris and others for some very useful tips. I’m thinking of getting a scroll saw one day so interested to see all this info.
Logged
2 Lesro Javelins... and that’s it. Not even close to finished!

DJW

  • Full Mayhemer
  • *****
  • Offline Offline
  • Posts: 685
  • Location: London
Re: 1/5 Riva Aquarama...
« Reply #187 on: April 05, 2023, 05:23:13 pm »

Thanks Both.


@Chris, well that makes me feel a bit better, in that you also find the blade does it's own thing sometimes.  I can end up holding the piece offset at 10/15° sometimes to get the blade cutting along a line.


@Stuw, the scrollsaw is allowing some work that I can't do with the bandsaw (inside cuts) and with attention gives more precision and consistency that I could achieve with a coping saw or similar.  In fact without a laser CNC I think it was the only way to get that sunbed / hatch out of the frame.  I'm using a quite bright LED work light clamped to fully illuminate the blade and cut, and an extra pair of glasses to make sure I stay on course...!  The scrollsaw has a built in air blower that is really useful to keep the working area clear, and when a vacuum is used on the extraction port it sucks dust from the underside of the wood being cut.  I have noticed that on occasion I've not used the vacuum, and have felt the wood jamming, I suspect from a build up of sawdust on the underside.


Best regards
David.

DJW

  • Full Mayhemer
  • *****
  • Offline Offline
  • Posts: 685
  • Location: London
Re: 1/5 Riva Aquarama...
« Reply #188 on: April 11, 2023, 07:45:37 pm »

Evening All

Some progress to report.  I've been busy on the PC printing off some more parts that have been enlarged, and cutting them out, but not yet fitted them to the hull, getting ready to dry fit them. I think if I sneeze too close the the sections of hull they'll fall apart.  Still not much glued.  But I am still finding holes that need to be drilled, and cut outs that need power tools, so happy with the approach of not gluing at this stage.

Also been busy with the exhausts, or at least getting ready for the exhausts.  I need to join the brass stubs to the plastic manifolds, I was thinking silicone pipe would do it, then tried 3D printing with TPU as for this application I just need the flexibility, not heat resistance.  And they seem fine, they're an interference fit, so should keep things water tight, but be removable. Also able to build a step into the printed tubes, so the inside diameter is 25mm at one end and 23mm at the other.


And readers that have built the Amati version may recognise some extra cut outs on the main transom frame, these are for the exhausts and the stringers.


Some progress at the bow, I have started using glue here as I can't see any need to rework this area, it then gives me an anchor point to start shaping some of the other bow woodwork.  Then checking the fit of a few other 6mm ply parts, so far so good.  I need to reprint a couple of the guide clamps that I'm using to maintain alignment up at the bow as the 6mm reinforcement sections either side of the keel are now taking that part of the keel to 18mm.


That's about it for now.
Best regards to all.
David.

T888

  • Full Mayhemer
  • *****
  • Offline Offline
  • Posts: 1,309
  • Location: NewForest
Re: 1/5 Riva Aquarama...
« Reply #189 on: April 12, 2023, 02:26:31 pm »

Enjoying your modelling David. :-))
Logged
Regards David

Capt Podge

  • Full Mayhemer
  • *****
  • Offline Offline
  • Posts: 4,448
Re: 1/5 Riva Aquarama...
« Reply #190 on: April 12, 2023, 02:44:59 pm »

Hi David, good to see your progress and still enjoying your updates  :-))


Ray.
Logged

DJW

  • Full Mayhemer
  • *****
  • Offline Offline
  • Posts: 685
  • Location: London
Re: 1/5 Riva Aquarama...
« Reply #191 on: April 18, 2023, 05:09:06 pm »

Afternoon All


Another Tuesday update.  A little more progress around the bow, added the side padding parts to the keel, I think these just give a bit more stiffness and area to attach the planks to once the sanding gives the right profile for planking.  And the revised 18mm clamp in place to keep everything lined up.  Frames are still dry fit.


I've been spending time getting the fit of the side ply parts up at the bow right, also reinforcing here and there on the frames to give more surface area to glue to.  Not sure if I need to, but better to build it too strong rather than too weak... 


I've brought the two halves together again for a while to work on cutting out a few parts that span both halves.


I'm getting a but tired of moving the vacuum between power tools for dust extraction duties so am setting up a manifold of sorts with three take offs for bandsaw, scrollsaw and disc sander. The vacuum has a power take off that powers it up when an attached power tool is switched on (Vacmaster Multi 20 PTO).  So I'll use a power strip from the power take off to allow multiple tools to be attached, only using one at a time of course.  I've got the 3D printer busy at the moment printing 'slam gates' to control which tool gets the vacuums attention.  Hoping it works out and makes switching between tools a bit more efficient than it is right now.  I'll update and post pictures next time.


And finally.  On a road trip tomorrow to collect the planks, looking forward to that..!


Best regards to all.
David.

Capt Podge

  • Full Mayhemer
  • *****
  • Offline Offline
  • Posts: 4,448
Re: 1/5 Riva Aquarama...
« Reply #192 on: April 18, 2023, 05:58:00 pm »

Hi David, it's good to see your progress on the boat and I've also tried to fathom out how to create a vacuum manifold so I'll be looking in on your idea(s) as well  :-) .


Ray.
Logged

Stuw

  • Full Mayhemer
  • *****
  • Offline Offline
  • Posts: 314
  • slow motion modeller...
  • Location: Surrey, England
Re: 1/5 Riva Aquarama...
« Reply #193 on: April 19, 2023, 11:37:49 am »

Wow. Vacuum controlled by power tools. More ideas for the future!
Logged
2 Lesro Javelins... and that’s it. Not even close to finished!

DJW

  • Full Mayhemer
  • *****
  • Offline Offline
  • Posts: 685
  • Location: London
Re: 1/5 Riva Aquarama...
« Reply #194 on: April 19, 2023, 03:52:05 pm »

Hi Ray, printer is busy with slam gates and manifold parts as I type, will post some pics as soon as I have something ready.  And Stuw, yes, the vacuum with PTO does work well.  Basically on mine I can switch to '1' and its a normal vacuum, or '11' and it only powers up when a connected power tool is switched on.  And as you can see, it's quite a modest vacuum but supports over 1700W.  My power tools are in the 100W range and it works fine.


So I'm back from my road trip to Droitwich where the very capable and friendly chaps at Jotika have produced the 2m planks for the Aquarama as a custom order.


Plenty of work to be done before I start to use the planks, but good to know I now have them ready.


Best regards to all.
David.


Capt Podge

  • Full Mayhemer
  • *****
  • Offline Offline
  • Posts: 4,448
Re: 1/5 Riva Aquarama...
« Reply #195 on: April 19, 2023, 10:48:26 pm »

Hiya David and yeah, like you I too have a vacuum with that same switch set up. Mine is from Screwfix and is their Titan wet/dry and blow capable unit. I've had this for about 8-10 years now and it's been faultless so far.  :-))


Ray.
Logged

DJW

  • Full Mayhemer
  • *****
  • Offline Offline
  • Posts: 685
  • Location: London
Re: 1/5 Riva Aquarama...
« Reply #196 on: April 26, 2023, 05:13:17 pm »

Afternoon All

Minor progress with a few of the hull parts and more templates created, but main effort this week has been to relocate the three bench tools, and hook up the vacuum.


Made up 4 slam gates on the 3D printer, made up of a back and a front with the gate in.  I've used a 25mm bore as its based around some spare vacuum hose that I had to hand, should be a bit larger really, but it seems to work.  The bench tools are all pretty small to I hope it'll be OK.  Bench tools are also now screwed down which is better, I was using clamps before and it became painful to keep swapping the tools.  Should have done this a while ago.  This setup also allows the vacuum to be in a separate room (large cupboard really) which keeps the noise down.


And bolted together in open position.


And closed.


Then each gate gets a connector on the back, and these join to make a manifold.  Vacuum hose is coming in at the left, three gates for three machines, and a fourth with just a hose on it for general tidying (and it reaches the lathe which is useful).


No excuse now...  Next update should have a load more wood cut...    :-))

Best regards to all.
David.

ChrisF

  • Full Mayhemer
  • *****
  • Offline Offline
  • Posts: 1,319
  • What's my favourite cake!
  • Location: Warwick
Re: 1/5 Riva Aquarama...
« Reply #197 on: April 27, 2023, 12:03:41 am »

That's a very neat setup you have there David.


Chris
Logged
Building Fairey Marine boats: River Cruiser 23 prototype, Huntress 23 Long Cabin with stern-drive, Huntsman 28, Huntsman 31 and Swordsman 33 and two more to come! All scratch built and to a scale of 1:12

DJW

  • Full Mayhemer
  • *****
  • Offline Offline
  • Posts: 685
  • Location: London
Re: 1/5 Riva Aquarama...
« Reply #198 on: May 05, 2023, 02:13:54 pm »

Hi Chris, thanks for that.  Have to say it's working really well, I'm at the stage where a lot of wood is getting cut.  So much easier / quicker / efficient having the three tools available as required.

And to underscore that...  More templates being printed, some parts fit on single A4 printouts but some span several sheets so I need to line up the cut marks then tape together. Here's a few more:


I had an A3 printer til a couple of years ago, it ended up on a skip as it wasn't getting used... Big mistake.

And some general shots of the current state of the build, still mainly dry fit apart from some of the sub assemblies...


Planning to get the 1/10th serviced and maybe out on the water this long weekend, getting ready for a trip to Wicksteed...

Best regards to all.
David.

DJW

  • Full Mayhemer
  • *****
  • Offline Offline
  • Posts: 685
  • Location: London
Re: 1/5 Riva Aquarama...
« Reply #199 on: May 11, 2023, 05:21:21 pm »

Afternoon All


Anyone who's built the Amati Riva Aquarama will know it builds bow heavy, and then can dig in at the bow when on the water.  This version will have similar issues I suspect as it's heavily based on the Amati design and layout.  So I've been cutting out the structural wood and have now got to the stage of having the structural parts to the correct basic shape, so have now set about lightening these structural parts, particularly at the bow.


Some of the holes will double as cable routes, also I'm aiming to use a fan to force cooling air through the length of the hull, these holes will help.


Also taken delivery of a nice piece of mahogany, 20mm x 100mm x 600mm.  Plan is to use it for things like the side rubbing strips on on the waterline either side of the Aquarama hull, also there's a 20mm thick piece of shaped mahogany used as part of the transom.  It's 2 parts in the Amati Kit, would be nice to create in one piece.


Best regards to all.
David.
Pages: 1 2 3 4 5 6 7 [8] 9 10   Go Up
 

Page created in 0.099 seconds with 21 queries.