Model Boat Mayhem

Please login or register.

Login with username, password and session length.
Pages: 1 2 3 [4]   Go Down

Author Topic: Deans Marine Motor Gun Boat 1/24 scale  (Read 17331 times)

Pauli

  • Full Mayhemer
  • *****
  • Offline Offline
  • Posts: 70
  • Model Boat Mayhem is Great!
  • Location: West Midlands, UK
Re: Deans Marine Motor Gun Boat 1/24 scale
« Reply #75 on: July 13, 2022, 11:55:46 am »

Hi Greg,

The twin Oerlikon that you purchased from "Battlecrafts" looks really good and the breakwater although fiddly comes together quite well.

I am intrigued by the vents which I don't think I have spotted before - be interesting to see them when installed on your model.

Good luck with the rest of your build.  :-))


Kind regards,

Pauli
Logged

SailorGreg

  • Full Mayhemer
  • *****
  • Offline Offline
  • Posts: 1,335
  • Money talks - it says goodbye
  • Location: Hayling Island, Hants
Re: Deans Marine Motor Gun Boat 1/24 scale
« Reply #76 on: July 13, 2022, 01:20:47 pm »

You can see the vents in this rather blurry picture below, just to the right of the depth charge.  They haven't been reproduced on the restored MGB 81 and I don't know which space they vented, but they do seem to be a standard feature.


Pauli

  • Full Mayhemer
  • *****
  • Offline Offline
  • Posts: 70
  • Model Boat Mayhem is Great!
  • Location: West Midlands, UK
Re: Deans Marine Motor Gun Boat 1/24 scale
« Reply #77 on: July 13, 2022, 05:30:29 pm »

Hi Greg,

Yes, I can just about make it out - if you hadn't of pointed it out I wouldn't have noticed.

I like to see as much accurate detail as possible on models such as these - really makes them stand out.


Kind regards,

Pauli
Logged

Daleb

  • Full Mayhemer
  • *****
  • Offline Offline
  • Posts: 152
  • Model Boat Mayhem is Great!
  • Location: Hayling Island
Re: Deans Marine Motor Gun Boat 1/24 scale
« Reply #78 on: July 13, 2022, 10:34:33 pm »

Hi Greg,


the vents are on 81 now although in a different position as I believe they needed extra ventilation to get her coded for passenger trips.


Dale.
Logged

John W E

  • I see no ships !!
  • Full Mayhemer
  • *****
  • Offline Offline
  • Posts: 8,819
  • Location: South shields
Re: Deans Marine Motor Gun Boat 1/24 scale
« Reply #79 on: July 14, 2022, 08:23:10 am »

hi ya


If you want a little more information on these Craft, Mr John Pritchard did a series of drawings back in the early 1980s and one of them was for this gun boat.  I believe the drawings are still available from Sarik Hobbies.  The ventilators at the side of the superstructure, I believe, if I remember correctly, are vents for venting the compartment which housed the fuel tanks.   I do have an internal drawing from the makers somewhere and if I can find it I will put a copy on.


British Powerboat MM1377 - Sarik Hobbies - for the Model Builder
2/plans  MTB ,and the  MGB plan :-))


John
Logged
Knowledge begins with respect
But fools hate wisdom and discipline

SailorGreg

  • Full Mayhemer
  • *****
  • Offline Offline
  • Posts: 1,335
  • Money talks - it says goodbye
  • Location: Hayling Island, Hants
Re: Deans Marine Motor Gun Boat 1/24 scale
« Reply #80 on: July 14, 2022, 03:08:20 pm »

Thanks John for the link and info on the purpose of the vents.  And thanks to Dale for pointing out that 81 does indeed have them, just in a different place.
A little more progress - the Holman projector assembled -


To give it some added security on the deck, I added a 1.5mm brass rod peg to provide some positive location.


I have also taken a very deep breath and orderd some 1/24 figures from Shapeways.  Although expensive, these do seem to be a lot more realistic than some of the others available.  I will have to brush up ( %) ) on my figure painting.


I have also stuck the breakwater in place - taped it down then ran MEK along all the joins.  Seems nice and solid now.


Then to give myself a bit of impetus, I put most of the big stuff in place to take a look at the whole thing as it currently stands.


I need to get to some painting while this weather holds.  That will probably be next, although I will get a few more of the detailed bits and bobs in place before that.


Happy modelling one and all.

Greg


SailorGreg

  • Full Mayhemer
  • *****
  • Offline Offline
  • Posts: 1,335
  • Money talks - it says goodbye
  • Location: Hayling Island, Hants
Re: Deans Marine Motor Gun Boat 1/24 scale
« Reply #81 on: July 31, 2022, 04:07:44 pm »

 Well, I haven’t got to the painting yet, still playing with all the bits and bobs.  The three resin moulded vents for the foredeck needed a bit of fettling.  I had picked up a set of small grinding tools from the Middle aisle, and one of those proved ideal in my Dremel for removing the unwanted stuff.


Much of the other small stuff is just a matter of identifying the right location, drilling a small location hole for some of them and supergluing in place.  I did replace the large vents that are provided in the kit as vacforms with Battlecraft ones and added a pin so that these prime candidates for a casual knock would be more secure.


Some of the moulded hatches provided are over-thick with a lot of flash around the edges.  Rubbing flat on some abrasive paper soon produced a useable piece.  It also removed a fair bit of flesh from my thumb – ouch!


One kit item I rejected was the mooring cleats, which seemed very over-size to me.  They scale out at 2 feet long and 9” high.  Looking at photos of the boats, it seems these cleats were nearer half this size, so I ordered some Caldercraft ones that seemed to me to be much more in keeping with the actual ones.  In general, I would prefer a fitting to be slightly under size rather than over, as they aren’t so intrusive.  I suppose I could have sanded down the kit ones, but my thumb was quite sore enough already.


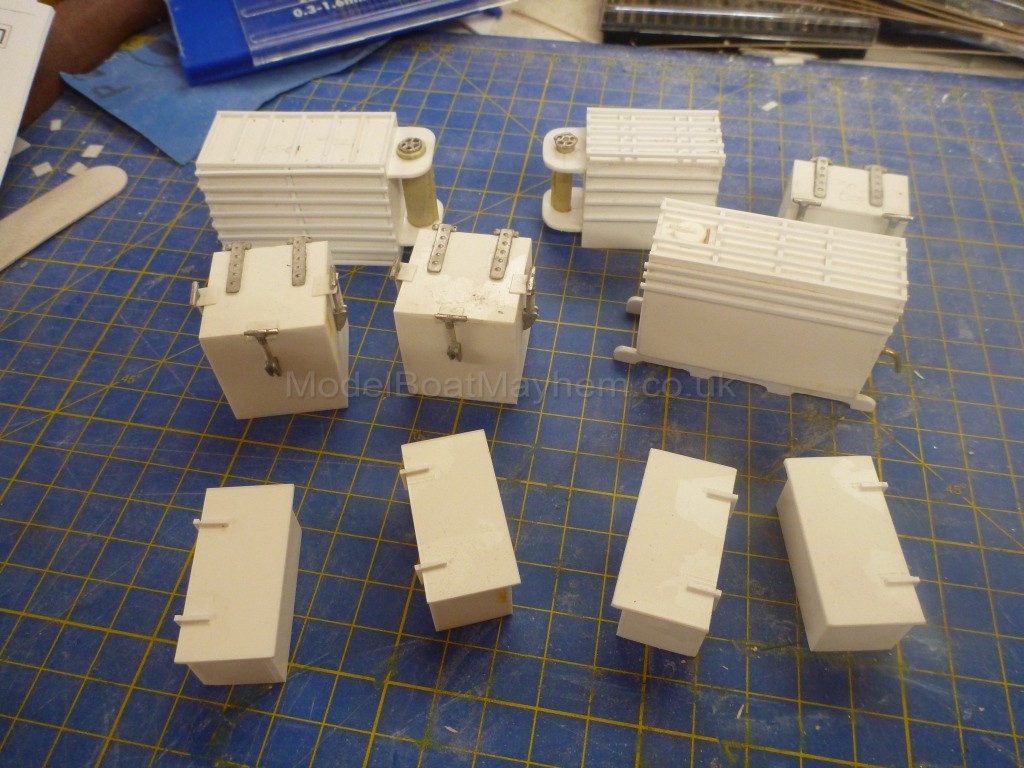
Next was a production line for the multitude of lockers and other containers that are present on the deck.  These are supplied as laser cut plastic and are simply glued together – once you have figured out which edge is glued to which to make a regular, smooth box.  The sizing is spot on if you get the orientation of each piece right.  Took me a little thought on a couple of them.


Aside from the build, I have been trying to decide on a colour scheme, as there is conflicting information available.  I have recently bought Mark Smith’s Coastal Craft History Vol 2 - BPB Co MTBs, MGBs and MA/SBs (as suggested back in June by gra2 – thanks Graham).  This shows MGB 77 in a different configuration to that given in the kit.  It also shows the same boat after conversion to MTB 414.  The colour scheme shown for MGB 77 is vertical surfaces in white, while the kit suggests a two-tone grey/blue scheme, more akin to the scheme shown for her as a MTB.  The smoke generator shown on 77 is the older, side mounted type, while the MTB configuration shows the newer, larger type at the stern, as supplied in the kit.  Also, the book shows the twin Lewis gun mounts level with the bridge on MGB 77, not towards the stern as suggested in the kit.  The more information I get, the more confused I am.  Is the kit configuration/colour scheme an amalgam of different times in the hull’s life, or is it a documented state at a specific time in the hull’s evolution?  Hmmm………  I know all these Coastal Forces craft changed throughout their lives, and maybe even had individual tweaks according to the CO’s preferences, so perhaps there is no right answer.  I admit I am tending at the moment to reproduce the picture in the book (despite having equipped myself with a plentiful supply of light grey paint!) – white topsides and cabin sides, dark grey decks and upper surfaces, etc.  Any knowledgeable folk out there who can offer me better guidance, or an even more authoritative source?


Happy modelling folks.


Greg

Pauli

  • Full Mayhemer
  • *****
  • Offline Offline
  • Posts: 70
  • Model Boat Mayhem is Great!
  • Location: West Midlands, UK
Re: Deans Marine Motor Gun Boat 1/24 scale
« Reply #82 on: August 01, 2022, 10:12:20 am »

Hi Greg,

Great progress - thanks for the update!

When building my MGB77 I was surpised at how well the items made from the laser cut plastic sheets such as the ammo box's and the water container went together to create quite nice fittings. I was less pleased with some of the resin fittings such as the "bull horn" cleats which I consigned to the bin.

Its a pity about the quality of a few of the fittings because overall I was very happy with the kit and I would definately buy another Dean's Marine kit.

I was also somewhat confused over what colour scheme to use and opted for red oxide for the lower hull, light grey for the upper hull and superstructure and dark grey for the deck. Probably not authentic but I'm happy with it.  :-)
   
Pauli
Logged

SailorGreg

  • Full Mayhemer
  • *****
  • Offline Offline
  • Posts: 1,335
  • Money talks - it says goodbye
  • Location: Hayling Island, Hants
Re: Deans Marine Motor Gun Boat 1/24 scale
« Reply #83 on: August 17, 2022, 09:31:57 am »

 The production line for all the deck lockers is complete.  I did find it very useful when putting the pieces together to use small 90 degree braces to keep everything square.  The plastic sheets in the kit provide a plentiful supply of 90 degree corners that can be snipped off and added to the inside.


And here are all the boxes completed.


Another little oddity with the laser cut pieces – the water tank sits on two bearers, but something has gone awry with the design of the pieces supplied – I had to cut new ones.  The picture shows the kit piece (top) and my replacement.  Easy to see what happened there!


I moved on to some metal work.  Firstly, the various handrails around the superstructure.  The supports for these are supplied as white metal castings and needed very little fettling to be used.  The brass rod for the rails isn’t supplied, but 1mm rod is easy to come by.  All held in place with CA glue.


Then on to the mast with its radar arrays.  The lower part of the mast is a supplied wood dowel that needs tapering.  I popped it into the chuck of my drill and held a piece of abrasive paper around it until I had a suitable size/taper.  The whole mast with the upper part and radar arrays looks very, very fragile so I intend to remove it and keep it in a separate container for transport.  I put a socket from brass tube into the deck just behind the bridge, held in place with Araldite and with the lower half (below deck level) plugged with a piece of wood.  The lower mast is a snug fit in this tube (or it will be once I have fine-tuned the diameter of the base – it’s a bit sloppy at the moment).


The upper part of the mast is a 2mm brass rod, which fits snugly in the two supports supplied.  There are two parts to the radar array, one at the very top of the mast, the second slightly lower down.  The main struts of these are 1mm rod.  Fixing these to the 2mm rod was my next job.  I considered both soft and silver soldering, but decided in the end to try drilling 1mm holes through the 2mm rod.  I had spare 2mm for when this went horribly wrong, but actually it turned out to be fairly easy.  I filed a small flat on the rod where the holes were to be, used a spring loaded centre punch to mark the spot and drilled through.  Just like that.


Creating the arrays themselves wasn’t quite as straightforward.  I did a test piece with the array elements from 0.5mm wire soft soldered in place, and another one with an element CA glued in place.  I tried pulling each off, and both just bent rather than coming loose. (Yes, I know the soldering is a bit messy, but it was just a trial run  ;) )


I decided in the end to solder the 1mm rod parts and to add the 0.5mm elements with CA.  The completed arrays were then CA glued into the mast holes.  To get the soldered parts square, I used a piece of marked out masking tape on a fireproof brick with the parts held in place by weights.


Then the frame was taped over a marked out piece of paper to add the elements.


The complete upper mast was added to the lower and here is the finished article.


I’ve now got to put it away somewhere I won’t keep knocking pieces off!
On the more general construction front, the superstructure is now glued to the removable deck panel.  I had kept it separate until I had added the mast mounting tube mentioned above, so I could glue from the inside.  No more work needed inside the superstructure so now it’s in place.


I think I am nearing the end of the various bits and bobs, at least the fittings trays are nearly empty now.  The Lewis gun mounts are the only obvious bits left, should get those done this week. Summer activities have slowed me down a bit recently and I have another week away coming soon, but I think all construction should be finished by the end of August.  There, I’ve set myself a deadline!


Happy modelling folks


Greg

ScottW

  • Full Mayhemer
  • *****
  • Offline Offline
  • Posts: 223
  • Model Boat Mayhem is Great!
  • Location: A little Missouri River riverbank burg
Re: Deans Marine Motor Gun Boat 1/24 scale
« Reply #84 on: August 17, 2022, 07:32:31 pm »

Absolutely do see why a removable mast with its own transport container is desired, even required.
That radar antenna will make it a unique looking model amongst the others.
Logged
"If it is something that you can make use of, that's a bonus, but the real value is in the creation." Steve Bennett; Sidelines

Chris Preston

  • Full Mayhemer
  • *****
  • Offline Offline
  • Posts: 28
  • Model Boat Mayhem is Great!
  • Location: Victoria, BC, Canada
Re: Deans Marine Motor Gun Boat 1/24 scale
« Reply #85 on: August 17, 2022, 07:38:38 pm »

Hi Greg,


Beautiful work. I have Deans BPB Co MTB 488 on the building board as well, and like you, am doing more than an out-of-the-box build. Keep the update coming - they're most useful.


Cheers,


Chris Preston
Victoria, BC
Canada
Logged

essexbill

  • Full Mayhemer
  • *****
  • Offline Offline
  • Posts: 70
  • Location: Derbyshire
Re: Deans Marine Motor Gun Boat 1/24 scale
« Reply #86 on: August 18, 2022, 05:12:22 am »

Thanks for your informative post, it is full helpful hints and tips.
Logged

SailorGreg

  • Full Mayhemer
  • *****
  • Offline Offline
  • Posts: 1,335
  • Money talks - it says goodbye
  • Location: Hayling Island, Hants
Re: Deans Marine Motor Gun Boat 1/24 scale
« Reply #87 on: September 06, 2022, 10:47:36 am »

 Well, I said construction would be finished by the end of August, but I don’t think I said which year  :D


It is mostly done, including the wood strips for spray rails and rubbing strakes.  Although provided in the kit and covered in the instructions, Ron Dean did suggest leaving these off as they can be a bit delicate.  Being a perverse old soanso I went ahead and fitted them anyway.  The instructions suggest making a series of cuts part through the strips to allow them to bend to follow the hull, but I produced the curves around the shaft of a hot soldering iron.  I clamped the soldering iron in the vice and drew a pattern of the curve of the forward part of the hull on a piece of paper so I would have a reference to check I had got the curve about right.  You do need to keep the wood moving, as if you hesitate you will start to burn it, but constant movement and a steady light pressure will allow the wood to take on a curve, like this  -


Once curved, I glued the pieces in place with CA, doing about 200mm at a time in the straight sections, and about half that when I did the curved bits.  Once glued in place, I pinned the wood to the hull with 1.5mm brass rod as suggested in the instructions for extra security.


The hull is moulded with reinforcing pieces at the aft corners which are, I believe, for towing bitts.  As far as I can see, these were only fitted to this hull when it was converted to an MTB, so I ground and sanded them off.  It would have been better to mould the hull without these as they are easily added with plastic card, but a pain to remove!


Despite the weather breaking, there was still plenty of opportunity for painting, so I reckoned I had got far enough to pop on a coat of primer.  This always makes the model look like a single piece rather than a collection of bits with filler and scrapes all over and gives me renewed enthusiasm to crack on.


The Battlecraft twin Oerlikon comes primed but needed the details painting and I also added a bit of weathering.  I also replaced the sighting ring with a photo etched part from the kit, as the Battlecraft one was quite chunky.


And that’s it for this thrilling instalment.  I keep finding little bits I had forgotten to stick on, but hopefully they will all be done soon and I can begin to do the final painting.  I still haven’t finally decided on colour scheme or configuration on the deck, but I am tending towards representing the boat in an early stage of its evolution, such as shown in this picture –


This seems to have an overall light grey colour scheme (although is the superstructure white with the aft part much darker - ?) and has an early model smoke generator fitted on the port side aft, rather than the dustbin affair on the stern as provided in the kit.  I will have to build a representation of that, but that shouldn’t be too tricky.  There seem to be fewer lockers around the deck, and overall I will be happier following (as far as I can) a picture of the actual boat than the model configuration which appears to be a mixture of features from different times.
 
Happy modelling folks!
 
Greg

SailorGreg

  • Full Mayhemer
  • *****
  • Offline Offline
  • Posts: 1,335
  • Money talks - it says goodbye
  • Location: Hayling Island, Hants
Re: Deans Marine Motor Gun Boat 1/24 scale
« Reply #88 on: October 14, 2022, 12:39:43 pm »

 This rather stop-start build has had another spurt, mostly to do with painting.  However, having decided to do an early version of the boat, I needed to make a different smoke generator from the one provided in the kit (and visible in the picture of MGB 77 in the last post, aft on the port side).  I started with a short length of brass tube and glued a piece of balsa into one end.  Then chucked in the drill, this was sanded to a dome shape.


I made a couple of brackets to hold the tube, two pieces taped together to make sure they were the same.


Then put together and a disc glued to the other end.


Then a piece of wood and some wire to make the control box and a length of aluminium rod to represent the outlet pipe.


And leaping ahead a little, here it is installed on the boat.


The close up makes it look a bit rough but it’s not too bad at normal viewing distance.  The hull and superstructure was painted with a light grey on the sides and a dark grey on the deck and top surface of the superstructure. 


A couple of points here.  Firstly, you might be wondering why the front windows have those odd scraps of card stuck behind them.  This is because I made a mess of fitting the glazing (twice) so decided to present the model with the blackout blinds rolled down, thus saving my embarrassment.  I used painted masking tape for the blinds, so needed something firm behind them to stop inquisitive fingers simply poking a hole in it.  I imagine these blinds were used all the time when the boat was operating, as this was invariably at night and any stray light from the charthouse would be most unpopular.  There is a photo on page 5 of “British Motor Gun Boat 1939-45” by Angus Konstam showing MGB 108 running in daylight with these blinds lowered. 


Secondly, you can see that I have masked off the breakwater as this is the light grey rather than the dark grey of the deck.  The tricky bit was the triangular support pieces which ideally would all have been individually masked as well.  I couldn’t face that, so I hand painted the deck between these supports then masked off the whole structure.  This didn’t work out brilliantly, as the paint I collected from the spray can for the brushing didn’t end up as smooth and consistent as the sprayed areas.  In the spirit of full disclosure, the next picture shows the result but I couldn’t see any other way of doing it without driving myself potty.   %%


Now was the time to start adding the detailed bits and pieces to the deck.  I am wary of gluing to paint, so I scraped it off wherever I was adding things.  Here is where the liferaft is going –


I made my own Sampson post from a piece of wood and short length of brass rod as the white metal version did not impress.  The wood will be darkened a little.


Many of the photos of these boats show a mooring line fastened to an eye low down on the bow with the other end stowed on deck.  The photos show what appears to be quite a large hard eye in the fastened end, so I made this by forming a thimble with a piece of wire and supergluing the line around it. 


And here it is in place.


I have also added flag halyards to the mast.  Again, these look less messy when viewed from a distance (I find about 100 yards to be sufficient  :D )


Well, that’s it for the time being.  I am into all those fussy little details that seem to be never ending.  I think I’ve finished then realise there’s something else to be added.  I still have to put the windscreen in place, and can’t see a way of doing a robust job of this.  The kit just provides some clear plastic without a frame or any directions as to how to fit it.  Any suggestions welcome!


Happy modelling folks.


Greg
 

SailorGreg

  • Full Mayhemer
  • *****
  • Offline Offline
  • Posts: 1,335
  • Money talks - it says goodbye
  • Location: Hayling Island, Hants
Re: Deans Marine Motor Gun Boat 1/24 scale
« Reply #89 on: October 29, 2022, 03:56:12 pm »

 A few details – the rigging for the mast needs to be detachable to allow me to store the mast in its protective cradle, so I made the rigging from shirring elastic and used little hooks to attach the rigging to eyes on the mast.


As for the crew, as previously mentioned I had bought a selection from Shapeways but I had never done any sort of figure painting before.  Then the November Model Boats turns up with a full article on painting figures.  How fortunate!   :} I admit that I didn’t go the whole hog as advised in the Article, but it did give me a few steers when I set about my crew members.  Although I had 5 figures, I ended up only using three of them.


A bit more painting and a few little bits stuck on – and all of a sudden (!!) she’s finished!  OK, the crew aren’t there in these pictures, and I had already knocked my rather fragile windscreen off,  {:-{   but here is the (very nearly) finished boat.  It also shows my cradle/launcher with the storage cradle for the mast (which still needs a coat of paint).  I also added a little bit of weathering, as photos show these boats often showed signs of their hard use.


Nothing else for it, but off to the lake for a proper maiden voyage.  I did manage to snap off one of the twin Lewis mountings when putting the batteries in the boat,  :(( and then knocked the gunsight ring off the twin Oerlikons when putting the lid back on,  >:-o which will teach me to be a little more careful in future (and to replace the white metal Lewis supports with brass rod!) but I guess a little battle damage is acceptable for a boat like this.  Crew now on board –


And some video evidence that everything worked as advertised.  I have to say I am delighted with the on-water performance.  Top speed is probably a little above scale, but even at that speed, handling is excellent.   :-)) :-))
 
https://www.youtube.com/watch?v=jprreEu__yo
 
Well, it’s taken a while – to put it mildly – but I am very happy with the final result.  I confess I won’t be rushing back to white metal, resin castings and similar – it’s back to wood for my next project – but I am very satisfied with the end result.  And we had a bit of a Dean’s Marine fest on maiden day, courtesy of Daleb’s two boats.


I hope that those who have been patient enough to follow this all the way have enjoyed the marathon.  I have certainly learnt a few things along the way - that's all part of the fun of building models!


Happy modelling folks.

 
Greg
 

ScottW

  • Full Mayhemer
  • *****
  • Offline Offline
  • Posts: 223
  • Model Boat Mayhem is Great!
  • Location: A little Missouri River riverbank burg
Re: Deans Marine Motor Gun Boat 1/24 scale
« Reply #90 on: October 29, 2022, 06:49:01 pm »

Yes, frustration about breaking those parts.
But, man, that baby gets moving!  :} Cool stuff.
Logged
"If it is something that you can make use of, that's a bonus, but the real value is in the creation." Steve Bennett; Sidelines

Shipmate60

  • Global Moderator
  • Full Mayhemer
  • *****
  • Offline Offline
  • Posts: 5,806
  • You bark - I will bite!!!
  • Location: Fareham
Re: Deans Marine Motor Gun Boat 1/24 scale
« Reply #91 on: October 29, 2022, 08:21:12 pm »

She looks great.


Bob
Logged
Officially a GOG.

Daleb

  • Full Mayhemer
  • *****
  • Offline Offline
  • Posts: 152
  • Model Boat Mayhem is Great!
  • Location: Hayling Island
Re: Deans Marine Motor Gun Boat 1/24 scale
« Reply #92 on: October 30, 2022, 07:24:06 am »


Greg, your MGB 77 looks superb and runs beautifully very nice build indeed :-))


Logged

Pauli

  • Full Mayhemer
  • *****
  • Offline Offline
  • Posts: 70
  • Model Boat Mayhem is Great!
  • Location: West Midlands, UK
Re: Deans Marine Motor Gun Boat 1/24 scale
« Reply #93 on: October 31, 2022, 09:57:31 am »

Hi Greg,

Your MGB looks great and performs extremely well on the water.
Thanks for continuing to update your build log even after  your enforced break due to a house move!
Congratulations on a terrific model  :-))

Pauli

Logged
Pages: 1 2 3 [4]   Go Up
 

Page created in 0.092 seconds with 22 queries.