Model Boat Mayhem

Please login or register.

Login with username, password and session length.
Pages: [1]   Go Down

Author Topic: A first foray into steam with a Wilesco D48  (Read 1306 times)

captain_reg

  • Full Mayhemer
  • *****
  • Offline Offline
  • Posts: 61
  • Model Boat Mayhem is Great!
A first foray into steam with a Wilesco D48
« on: December 30, 2022, 11:53:12 am »

This will be a bit of a retrospective build series. I started in March this year as a bit of an experiment with no intent to document the build series, however after joining a club and having a bit of interest in what I was doing, I thought some of you here might also find it of interest.

I’ve had a Wilesco D48 sat on a shelf for somewhere in the region of 15-20 years given to me by one of my Granddads. I’ve had many a plan for it over this time but never the time or ability to bring them to reality. My main idea was for a canal boat. Never having sailed with steam before I could never quite bring myself to commit to building the hull for what would be little more than an experiment.
 
Fast forward many years and I came across a part finished hull in my Grandmas loft that my other Grandad had started building many years ago and has sat unfinished since then. I already have two boats built by him to pretty much exactly the same hull shape, one with a single shaft and one twin. I was sure I was never going to complete this boat, with my interests going in a different more scale orientated direction, nor could I bring myself to get rid of it. That left me with one option. It was going to sail but as a steam launch.


The plan at this point was for a ‘quick & dirty’ prototype, not much more than a proof of concept with the purpose of answering two questions, could the hull accommodate the engine and was the engine any good on the water? I cut both shafts out, patched the resulting holes and cut most of the bulkheads came out with help from Mr Dremel.


Logged

captain_reg

  • Full Mayhemer
  • *****
  • Offline Offline
  • Posts: 61
  • Model Boat Mayhem is Great!
Re: A first foray into steam with a Wilesco D48
« Reply #1 on: December 30, 2022, 12:03:18 pm »


I made a ‘new’ propshaft made from parts salvaged from the old ones with new custom bushes at both ends, the lower end to take a lip seal as I figured the shaft was going to need to be low and probably have both ends below the waterline. I wasn’t sure at this point if the lip seal would add too much drag but it would be easy enough to remove this later.


I fitted the upper end with an experimental drip feed oiler. Due to the shape & size of the D48 engine I was going to have to be a bit creative connecting it to the prop shaft. I decided initially I would try a pulley drive for a few reasons. It would allow a shallower propeller angle and remove most concerns about getting good alignment. I’ve not got a good photo to show it but I made a square mahogany block with a hole drilled to be a tight fit over the prop shaft and profiled the bottom to fit the hull. This supports the end of the propshaft and gives a solid flat surface to mount the engine to which will be pretty much in-line with the propshaft.


An initial bath test looked promising. I was having an issue with my chosen servo drawing too much current for my usual receiver battery packs, hence the lead acid battery sat up in the bow. It was promising that even which such a large lump of lead aboard, there was still plenty of freeboard leaving plenty of scope for adding decorations.


Logged

captain_reg

  • Full Mayhemer
  • *****
  • Offline Offline
  • Posts: 61
  • Model Boat Mayhem is Great!
Re: A first foray into steam with a Wilesco D48
« Reply #2 on: December 30, 2022, 12:33:26 pm »


I made a pair of pulleys to connect the engine to the propshaft with an approximate 2:3 ratio which should just keep engine revs a bit lower with the 55mm 2 blade propeller I had to hand. The gas tank was nestled behind the boiler. It may have made more sense to fit the boiler with the gas tank forwards which would have put the sight glass to the rear. This however would have pushed the weight further back and due to the hull shape I really wanted this as far forward as possible.


Due to the flat base of the boiler there was a handy void below which I had the idea to fit a oil & water trap from the exhaust. It will add some mass down low and also reduce weight shift as the boiler empties. As it comes from the factory there is no water pump so it operates essentially as a matched pair, one fill of the boiler roughly equates to one fill of the gas tank so as run progresses the boiler loses about 250ml of water. Due to the low pressure (~1 bar) a large amount of this condenses so by putting the water collector under the boiler  about 1/3 to ½ the water lost, collects in the same place. This also has the advantage of being wasted space otherwise so the tank can fill the space, giving good capacity for a day of running without dealing with the mess.


A card template was transferred onto an old copper sheet and brass sheet made the end plates and the whole assembly was soft soldered. Some rivets were used to hold the tank together whilst soldering.


Due to the position of the gas tank the only real place for a funnel without a weird kink was off centre, not my preferred option but I didn’t see it being an issue. The plan was to connect the exhaust from the steam engine directly into the funnel, letting as much of the exhaust steam escape and give a pleasing plume, while letting any condensate drop down into the tank. The first test revealed that the condensate wouldn’t drain into the tank, I was hoping that the hole was big enough to allow it to drain without making an airlock but no such luck. Fairly easy fix to add a separate vent an run it up the funnel, adds a nice typical feature and will probably end up dressing it up as a dummy whistle.


Logged

captain_reg

  • Full Mayhemer
  • *****
  • Offline Offline
  • Posts: 61
  • Model Boat Mayhem is Great!
Re: A first foray into steam with a Wilesco D48
« Reply #3 on: December 30, 2022, 03:08:42 pm »

After a successful first test on the lake I decided I wanted to have a go at dressing up the boat roughly in the style of a victorian steam launch. No plan to go from, I had a rough picture in my mind of what I wanted to achieve but planking & decking isn't something I've done before. I started with a bit of supporting framework from 6mm square Lime. As you'll see in the image I had a mid way change of heart as to the height I should have installed it. So I added on top of what I already built at the front and carried on working back at the new level flush with the top of the hull. I had to plane away an existing 'beading' strip that ran along the length of the hull on the outside, the idea being to replace the semi circular (pine?) profile with square profile walnut. That was a barrel of fun, planing it away around the curve with the hull flexing and twisting in protest. I used a laser to establish a centreline between the bow and the centre of the stern and marked this at as many points as I could along the length of the hull.


I cut a load of 3mm thick walnut planks about 10mm wide and 1mm lime strips. I started by gluing a central plank in place and then on each side, clamps forcing it to conform slightly to the gentle curve of the hull and to hold it down. The plan was to have a subtle curve to the deck at the bow, levelling off to a flat deck at the back.


This left me with two triangles to be filled in either side of the centre plank. I sanded the ends of the walnut strips to match the inside profile and tapered ends of the lime strips to match. What worked quite well was to make each plank as a group of 3 and by firmly pushing it forward into the narrow point of the 'vee' it become self locking and didn't need any support to hold it in place.


I worked out from the centre each side in turn making up each walnut blank with its flanking lime strips. Each was numbered to help with reassembly for gluing. I used waterproof exterior wood glue along the edges of each plank with a dab of superglue on each cross member to hold it down. So you may ask 'what supports the ends of the planks?' and it's a fair question to which the answer is really nothing. They butt up to each other and the glue holds it all together, most of the planks fall where there is a cross member somewhere within the end of the plank to support it but not all of them. So far it's looking like the gamble has paid off but we'll see and maybe it will be a good learning experience :-))


Sanded and an initial thinned (white spirit 75%) coat of tung oil (25%). Very happy with how it has come out, it just remains to be seen how well it stands the test of time. It certainly feels solid enough to the touch. There is one plank towards the centre on the port side that has a bit of a dip in it which might take too much sanding to remove. I think a coiled rope or some other deck ornament will hide this with me having to sand any strength out of the decking.


Logged

SteamboatPhil

  • Full Mayhemer
  • *****
  • Offline Offline
  • Posts: 2,780
  • Location: Dieppe, France
Re: A first foray into steam with a Wilesco D48
« Reply #4 on: December 30, 2022, 03:17:13 pm »

Looking really good, some excellent work  :-))
Logged
Steamed up all the time

captain_reg

  • Full Mayhemer
  • *****
  • Offline Offline
  • Posts: 61
  • Model Boat Mayhem is Great!
Re: A first foray into steam with a Wilesco D48
« Reply #5 on: December 30, 2022, 04:17:18 pm »


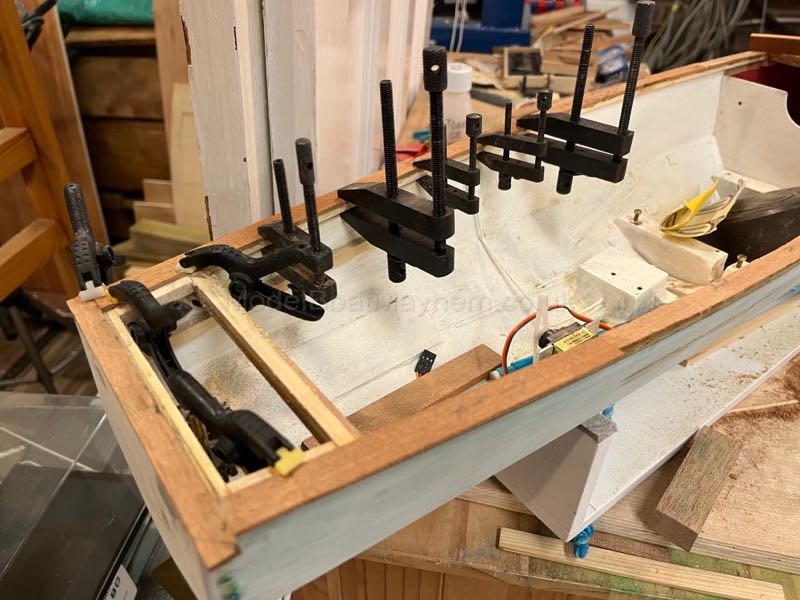
Now it was time to continue (apologies if my terminology if off) along the gunwales. I framed out a few inches at the rear for a small planked deck there. I wasn't sure at this point if I was going to continue the rudder upwards and have a visible tiller arm or go with a more hidden linkage to a forward mounted ships wheel. Research shows that both are popular so for now I'm just going to leave my options open. I cut wider strips of 3mm thick walnut for the gunwale planks and staggered and slightly angled the ends of the planks so the joins will blend in. The width is to accommodate the curve of the hull and they will eventually be sanded flush inside & out to meet with vertical planks to give a good finished edge. I worked in sections about 6 inches long, clamping with toolmakers clamps as I went. At some points I also used weights where the curve of hull was more forgiving.


Progress was limited by the amount of clamps I could lay my hands on, I think I used regular wood adhesive here but I can't remember. The other advantage to cutting the planks off at an angle, was that I made sure that the last plank ended up with two opposing angles, so it was a trapezoidal shape. This meant that I didn't have to be exact with the cutting to length as you can just insert it from the side until the angled ends meant the length is correct. If the angles don't meet up exactly, just sand a bit and then as it's now shorter it just goes a bit further in but still fits exactly because of the angled ends.


I was getting quite into it by this point so decided to fit a curved front to raised 'coaming?' that I was going to fit across the inside. Not really sure on the terminology for this part. I cut three strips of walnut and laminated them together between two curved plywood formers. Took two attempts to get it right but I was happy with how it came out eventually. I notched the ends so it sat down below the deck level and figured it would nicely hide a removable panel to cover where it might install some of the radio gear.


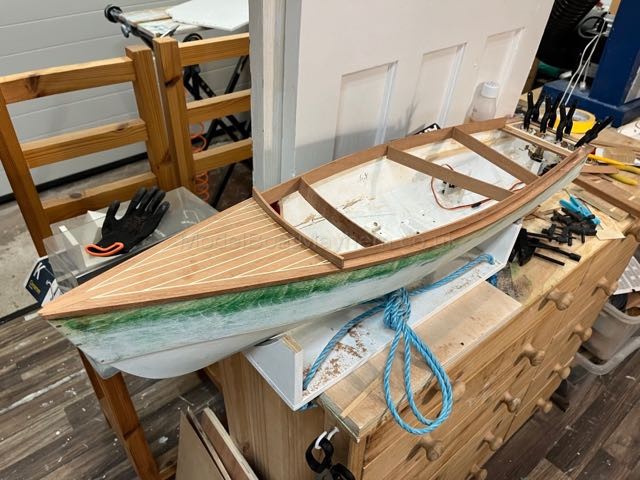
You can also see in these last two images how I have installed a 6mm x 4mm walnut rubbing strip around the outside to tidy up and reinforce the edge of the gunwale planks. This was quite simple to clamp in place once the outside had been sanded flush. I had a bit of trial and error with the size but eventually settled on what I like the look of. The plan was to sand the top edge to match the curved profile of the foredeck. Actually worth mentioning that although the foredeck is curved, the effect is barely noticeable now it is planked and if I could do it again, I would exaggerate the curve to make it stand out more.


I cut long strips of walnut for the inside coaming, only about 3mm thick but about 18-20mm wide this should give a nice slender scale effect whilst standing up nice and tall. I've not mentioned previously, but by this point in the build I had settled on 1:12 as the scale for the build which puts the full size boat at about 28ft. I'm not overly worried about the risk of water coming over the side as I have sailed a similarly proportioned hull for many years and never had issue, however with this being a deckless boat, I wanted to make sure I had every mm of freeboard I could get while looking in scale, hence the tall coaming. This can always be trimmed down later if I want. Fixing the coaming in proved to the shockingly simple. I used offcuts of the walnut strip, wedged in place to hold the coaming in while it glues. I was expecting this bit to be really awkward so this was a pleasant surprise.


Logged

captain_reg

  • Full Mayhemer
  • *****
  • Offline Offline
  • Posts: 61
  • Model Boat Mayhem is Great!
Re: A first foray into steam with a Wilesco D48
« Reply #6 on: December 30, 2022, 05:22:56 pm »


Now for a decision I regretted at the time after committing to do it and I'm still undecided on. I had inexplicably finished the side rubbing stips short of the bow leaving a bit of an awkward 'nose' to it. In hindsight I now wanted to finish it flat and let it come to a point and run the rubbing strip around the front and have a sharp but radiused bow with a flat top.


I decided to fit a walnut bow, the name for this escapes me but I think on a real boat this would be where the keel extended up above the foredeck, I was trying to create the effect and might finish the top off with a brass cap eventually


Painting was done late on the Saturday night before I wanted to sail it on the Sunday morning. A few coats of Halfords white & red undercoat would have to do. I started with the lightest of mist coats and slowly built it up from there due to the remnants of Humbrol enamel that I hadn't managed to sand away 100%. I know from experience that you can put the Halfords on top of the Humbrol but only if you mist coat it. If you put a hair too much on, it will blister and bubble. Once it was painted and shaped a bit more I was hating the protruding bow less but still not sure it was the right choice.


Back on the water again. Still a lot to do but what a difference 5 weeks makes. The RC equipment was still a lash up with double sided tape and cable ties but I'd also started to swap out the various silicone tubes with copper pipes. At this point I was starting to get things figured out and into a routine. The gas tank can be a bit difficult to get a good fill into but with the 'knack' I've been getting a good 15min run on a fill which would consume about 3/4 of a full boiler of water. The large condensate tank has been working well, easily enough capacity for a full morning of running with capacity to spare. Easy enough to empty as long as everything is secure, simply turn upside down and it drains into a suitable container, the process can be sped up with a length of silicone tube on the vent and a blow.


Time to introduce you all the Miss Dollothy Waterman. Once the funnel was painted white with its polished brass cap in place the boat was fit to welcome Dollothy aboard. An eBay special, she came delivered in a box that simply says 'DOLL' on it and nothing else, all delivered for less than £10... perfect  :-)  Still to be decided how to dress up the throttle servo, I'm thinking extend the servo arm with a brass throttle lever & dummy ships wheel all in a wooden locker or bunker or something similar.


Logged

captain_reg

  • Full Mayhemer
  • *****
  • Offline Offline
  • Posts: 61
  • Model Boat Mayhem is Great!
Re: A first foray into steam with a Wilesco D48
« Reply #7 on: December 30, 2022, 05:50:22 pm »


I had been enjoying weekly sailings through the end of the summer into the Autumn. Performance was just about right, speed at full throttle seems to be about scale but I down want to measure this with GPS just out of curiosity. Steering performance was a bit questionable and accounting for the turning circle took a bit of forethought. I actually bought material to make a massive brass rudder, much bigger than those commercially available. I swapped the 55mm two blade prop out for a 62mm 4 blade to see if I could get a bit more speed but it had the totally unexpected side effect of massively reducing the turning circle and steering responsiveness. Speed was slightly improved but the effect on the steering was a bit of a surprise so the material for the rudder has gone into the brass drawer and I might treat myself to a propshop 3 or 4 blade prop. I think that 3 blade might be more prototypical but I might still go for the 4 blade. I can only think that the increased prop diameter means that more of the rudder is experiencing prop wash hence the improved steering but the change must be in the region of low double digit change so maybe something more complex is happening.


I started figuring out what I was going to do with the rear end. Seating along the sides out of walnut strips and floorboards out of similar to be made based on the card template you can see in the last photo. The flag was 50mm from BECC on a home made flag pole from Olivewood with brass end fittings. I've gone off the idea of having a tiller arm and will have a small ships wheel next to the throttle servo. There will also be a chain to a whistle with a servo hidden somewhere in the same vicinity as the ships wheel so that it actuates the whistle by pulling on the chain.


I have got some red & white striped material for a canopy and had a bit of experiment with making barley twist columns from 3mm square brass. That was meant to be my project for this winter along with finishing fitting out the rear end but endless illnesses have so far kept me our of the workshop and in the wam. So that pretty much wraps up the retrospective part but I'll keep updating as things progress from now on, the intention is to get it 'finished' for the summer. Not sure if you have figured it out by now, but I've been well and truly bitten by the steam bug and the list of potential next projects has been growing & growing so this won't be the last.
Logged

Geoff

  • Full Mayhemer
  • *****
  • Offline Offline
  • Posts: 1,185
Re: A first foray into steam with a Wilesco D48
« Reply #8 on: January 03, 2023, 12:46:51 pm »

Very nicely done sir, welcome to the world of steam. There is something fascinating about the smell of steam, hot oil and burnt fingers!! Yes that bit that was really hot last week was still just as hot this week when I touched it again!


Cheers


Geoff
Logged

Geoff

  • Full Mayhemer
  • *****
  • Offline Offline
  • Posts: 1,185
Re: A first foray into steam with a Wilesco D48
« Reply #9 on: January 03, 2023, 12:49:50 pm »

I meant to add, if you try a larger propeller you may get better performance in terms of speed and duration. I always think of so many bites of steam available from a boiler and unless overlarge a larger prop will slow the engine down and may give more thrust. Its an interesting balancing act.


In the past I went from 3 blade to four blade and added 50% to the diameter and both the speed and duration doubled.


Cheers


Geoff
Logged
Pages: [1]   Go Up
 

Page created in 0.1 seconds with 21 queries.