Model Boat Mayhem

Please login or register.

Login with username, password and session length.
Pages: 1 2 3 4 5 6 [7] 8 9 10 11 12 13 14 15   Go Down

Author Topic: 1/5 Riva Aquarama...  (Read 140802 times)

T888

  • Full Mayhemer
  • *****
  • Offline Offline
  • Posts: 1,535
  • Location: NewForest
Re: 1/5 Riva Aquarama...
« Reply #150 on: January 19, 2023, 03:58:05 pm »

 :-)) :-))  Nice
Logged
Regards David

DJW

  • Full Mayhemer
  • *****
  • Offline Offline
  • Posts: 785
  • Location: London
Re: 1/5 Riva Aquarama...
« Reply #151 on: January 21, 2023, 06:56:11 pm »

Thanks for that Dave..!

Been busy with the mill. 3mm slots first.


Then a 10mm mill to take out 3 of the lugs.


To end up with this.


Then remove the guide jig...


Still needs a bit of finishing but quite pleased with the result and the technique seems to work. Need to make the remaining three parts to make up the two couplings now...

Here with a centre inserted.


And here with a 3D printed part to show what I'm aiming for.


Best regards to all
David.
Logged
1/10th Aquarama Build - https://tinyurl.com/riva-aquarama
1/5th Aquarama Build - https://tinyurl.com/riva-aquarama2

DJW

  • Full Mayhemer
  • *****
  • Offline Offline
  • Posts: 785
  • Location: London
Re: 1/5 Riva Aquarama...
« Reply #152 on: January 24, 2023, 04:32:04 pm »

First coupling pretty much ready. A bit more milling on the second to go.

Inserts are flexible but strong enough I think. Not sure how far over the top I'm going... But hoping that the flexible centre damps some of the sound from the motor getting to the hull via the propshaft.
We'll see.


I do need to trim a couple of mm in the overall length so they fit properly in the mount. Pics to follow.

Best regards to all.
David.
Logged
1/10th Aquarama Build - https://tinyurl.com/riva-aquarama
1/5th Aquarama Build - https://tinyurl.com/riva-aquarama2

T888

  • Full Mayhemer
  • *****
  • Offline Offline
  • Posts: 1,535
  • Location: NewForest
Re: 1/5 Riva Aquarama...
« Reply #153 on: January 24, 2023, 04:52:07 pm »

Nice bit of engineering on these coupling 😀😀
Logged
Regards David

DJW

  • Full Mayhemer
  • *****
  • Offline Offline
  • Posts: 785
  • Location: London
Re: 1/5 Riva Aquarama...
« Reply #154 on: January 26, 2023, 05:48:42 pm »

Now have the drive trains pretty much sorted.

Had to remake the thrust collars, first ones didn't have enough diameter to take the grub screws properly.


And on the coupling, machined them a little to seat the 'reverse' thrust bearing.


Then assembled everything less the motors.  It's important that the motors can be added when the shaft and mounts are installed in one piece like this, so they can be removed without taking out a load of the other hardware too.  So the coupling on the motor end can slide up the motor shaft to be installed, then mated with the other side of the coupling and locked onto the shaft.


To end up with this.


Have to admit, Stbd is silky smooth and aligned well.  Port has a tight spot, will have to investigate that.  Otherwise pleased with the result.  Full isolation of the watercooled motors and thrust taken by the mounts.

This part of the build has taken longer than I'd thought.  But should be moving on to other areas now.  And that means a drive out to get some wood...

Best regards to all.
David.
Logged
1/10th Aquarama Build - https://tinyurl.com/riva-aquarama
1/5th Aquarama Build - https://tinyurl.com/riva-aquarama2

Capt Podge

  • Full Mayhemer
  • *****
  • Offline Offline
  • Posts: 4,499
Re: 1/5 Riva Aquarama...
« Reply #155 on: January 26, 2023, 07:05:13 pm »

Great piece of work yet again and it'll be interesting to see how you deal with the Portside tight spot  :-)


Ray.
Logged

DJW

  • Full Mayhemer
  • *****
  • Offline Offline
  • Posts: 785
  • Location: London
Re: 1/5 Riva Aquarama...
« Reply #156 on: January 27, 2023, 05:45:29 pm »

Hi Ray
Thanks for that.  While the lathe was warmed up I machined a couple of brass discs for the vibration motor and silver soldered them together. This is going to be active while the 'startup' sound is running, hopefully to vibrate the hull as a V8 would while being cranked.  Case is 3D printed, motor is a 300rpm 12v unit, it outputs via a 4mm shaft with a flat on it so I've added a grub screw to secure the rotating offset weight.  I'm hoping the current chunk of 25mm diameter brass will be about right, but i can always add some more brass, or drill some out to adjust. Teflon washer as a spacer.  Motor will only be called on for short 1 second periods, so wear on the bearings should be fine.


Best regards to all.
David.
Logged
1/10th Aquarama Build - https://tinyurl.com/riva-aquarama
1/5th Aquarama Build - https://tinyurl.com/riva-aquarama2

DJW

  • Full Mayhemer
  • *****
  • Offline Offline
  • Posts: 785
  • Location: London
Re: 1/5 Riva Aquarama...
« Reply #157 on: January 27, 2023, 07:26:00 pm »

I've started thinking about the woodwork. In particular the planking. The 1/10 Amati version uses 1.5mm x 7mm lime followed by 1.5mm x 8mm mahogany planks. I've started to wonder about the thickness of the planks I should use for a larger 1/5 build. I can get 2.4mm or 3.2mm. I'm going to use penetrating (thin) epoxy, so using two layers of 2.4mm would give me a 4.8mm hull, or 2 x 3.2mm would be 6.4mm... Less a bit for sanding. Both pretty strong when epoxied. Could mix the thickness. Maybe thicker lime layer (actually bass on this build) then a thinner skin of mahogany.


I'm hoping for some comments. My concern is getting thicker planks to conform to the curves required. Its a dilemma at the moment. The planks need to be able to bend to the fore / aft curves. But also maintain that curve over several frames, rather than straighten out between frames.


I guess weight becomes an issue too...


I suppose I can order a couple of sample planks to see what works, but would be grateful for any thoughts re how I shoud be thinking about it. Its not the sort of purchase I want to get wrong...


Best regards to all
David.
Logged
1/10th Aquarama Build - https://tinyurl.com/riva-aquarama
1/5th Aquarama Build - https://tinyurl.com/riva-aquarama2

DJW

  • Full Mayhemer
  • *****
  • Offline Offline
  • Posts: 785
  • Location: London
Re: 1/5 Riva Aquarama...
« Reply #158 on: February 07, 2023, 05:15:25 pm »

Afternoon All


Made some progress in my head with the woodwork...  But that's about it.  I'm thinking that while I can use the Amati plans as a guideline for scaling up, there will need to be some fundamental changes.  One of these is to use similar thickness planking to the 1/10 build, but add stringers to the hull to reduce distance between support frames, build in rigidity to reduce flexing during the build, and on the water.  So current thinking is to use 2mm bass as the first layer, then 1.5mm mahogany as the second.  But first to get the stringers sorted, the frames modified and so on.  I also plan to add (I don't know the name...) a square section run of bass along the chine, to make the chines and frames in general firmer.


In the meantime, been playing with the 3D printer and working on a set of docklights, and how to fabricate the cabin vents and cleats.


This is the full sized Dock Lights:


And I'm approaching in a similar way, a lamp (for a 5mm LED) in a housing with a flange, then an acetate sheet and a brass frame over the top, to be chromed.


Printed a couple of guides for cutting and drilling the acetate and brass.  Screwholes are just pilot holes at the moment so look a bit out of scale.


I plan to spray the plastic parts with a few coats of white primer, and eventually gloss white.  The lamps are a push fit into the housing so I can build these up with wire tails and add them in when ready.


The deck vents are quite prominent on the forward deck of the Aquarama, at 1/5 they're about 48mm in diameter, I want to machine them from 50mm diameter brass bar as one piece if I can... I've put the vent together as a 3D printed object so I have the dimensions sorted, then designed a jig to hold and wrap around the printed vent for the milling phase, and drilling the screwholes around the flange.


A work in progress, waiting for the brass bar to arrive.


And started to look at how the cleats could be fabricated.  Again the large single cleat on the forward deck is a Riva statement piece, so I'd like to fabricate in brass so it can be shaped and eventually added to the parts to be chromed.  at 1/5 its 50mm long, so I'm using same approach of 3D printed jigs to hold the components for machining.  These are the Riva items:


And my starting point...


I've since cut and drilled the 'plate' shown above with the grey template, that's fine, and the easy bit. And the two grey holders at lower right, the right one has an 8mm hole straight down the middle to hold the rear upright of the cleat for machining on the lathe. The left one has an 8mm hole with a 10 degree angle on it, as the forward upright of the cleat is inclined forward, so this is my attempt to create similar.  Initial machining is to add a 3mm spigot / locating pin on the end of the uprights to locate them in the base plate ready for silver soldering.  The uprights will also be milled to flatten the sides a shade, then an 8mm mill at the top to allow a blend to the top bar of the cleat...  Then silver solder it all together and try to profile it...


We shall see..!
Best regards to all.
David.
Logged
1/10th Aquarama Build - https://tinyurl.com/riva-aquarama
1/5th Aquarama Build - https://tinyurl.com/riva-aquarama2

DJW

  • Full Mayhemer
  • *****
  • Offline Offline
  • Posts: 785
  • Location: London
Re: 1/5 Riva Aquarama...
« Reply #159 on: February 10, 2023, 07:32:24 pm »

Evening All
Well that didn't all go to plan...  Royal Mail delivered me an empty box, no sign of the 50mm brass bar. Someone has a nice paperweight.... So the vents are pushed back til a replacement arrives.
The 3D printed jigs for the cleats were a failure. Couldn't get them to grip the brass. So took a simpler approach, this was as cut, machined and milled.


And this is current state. Some profiling, smoothing and polishing to go, but shape is starting to appear.


Best regards to all.
David.
Logged
1/10th Aquarama Build - https://tinyurl.com/riva-aquarama
1/5th Aquarama Build - https://tinyurl.com/riva-aquarama2

Stuw

  • Full Mayhemer
  • *****
  • Offline Offline
  • Posts: 316
  • slow motion modeller...
  • Location: Surrey, England
Re: 1/5 Riva Aquarama...
« Reply #160 on: February 16, 2023, 06:18:05 pm »

You’re work amazes me.  :-))
Logged
2 Lesro Javelins... and that’s it. Not even close to finished!

DJW

  • Full Mayhemer
  • *****
  • Offline Offline
  • Posts: 785
  • Location: London
Re: 1/5 Riva Aquarama...
« Reply #161 on: February 21, 2023, 05:42:16 pm »

Hey Stuw, thanks for that..!


Some progress on a few fronts since last post, including finally the creation of some sawdust...!


The dock lights.  I've applied plastic primer, then some white spray gloss to the housings, and purchased some 20mm diameter LED reflector / collimators...  They need some cutting down to fit in the housings, to 17mm, but could be interesting.  They're £3.99 on Amazon for 10. ( [size=78%]https://www.amazon.co.uk/dp/B011HFSIDM[/size][size=78%] ) [/size]Seems they have an 8 degree 'viewing angle', which I assume means they pull the LED beam together like a full sized reflector. They've made of solid plastic so I guess act like a lens, I've not seen or used them before...


I'm think 5mm high brightness warm white LEDs.  I'll post the results.


Here's the housings at the moment:


I've been modifying the stern half of the hull.  It's quite useful that the keel is in two parts, makes it a bit more manageable at this stage.


These are the frames pretty much just scaled up from the Amati 1/10 plans:


And then after some attention with saws and drills of various sizes and shapes...


Holes are mainly to allow passage of wires and tubes rather than weight saving. So much easier to do at this stage. Everything is dry fit right now.


One of the electronics packages is shown in its correct location, both can now be recessed well into the frames making space in the hull for the LiPos and ESC box.  LiPos will sit low in the hull with the option to stack two to run in parallel.  You can just make out the cut outs that will take longitudinal stringers, these will be cut from 6mm ply, be about 40mm deep and run from the motor mounts to the transom.  They're 10mm apart to accommodate the prop and rudder tubes, and they'll provide a strong mount for the P brackets.  These are not on the 1/10 build, but I'm hoping they'll add serious stiffening to the 1/5 hull.


Finally for today...  The 50mm brass bar for the vents arrived, but I've not got beyond mounting it in the lathe...  So, this is the starting point.


I'm flitting around various parts of the build...  I think it gives me time to consider what comes next with the various different assemblies. (Also, I get in trouble if I create too much dust...  %) [size=78%] )[/size]

That's about it for now.
Best regards to all.
David.

Logged
1/10th Aquarama Build - https://tinyurl.com/riva-aquarama
1/5th Aquarama Build - https://tinyurl.com/riva-aquarama2

Capt Podge

  • Full Mayhemer
  • *****
  • Offline Offline
  • Posts: 4,499
Re: 1/5 Riva Aquarama...
« Reply #162 on: February 21, 2023, 08:23:31 pm »

Hi David, I have to admire the way you manage to plan your way around the build and the accuracy needed.
I guess that flitting about does help to focus the mind.


Cheers,
Ray.
Logged

Circlip

  • Full Mayhemer
  • *****
  • Offline Offline
  • Posts: 4,638
  • Location: North of Watford, South of Hadrians wall
Re: 1/5 Riva Aquarama...
« Reply #163 on: February 22, 2023, 10:53:10 am »

Think i'd be inclined to put a thrust pad and tailstock support on the end of that lump of brass rather than the overhang.


  Regards  Ian.
Logged
You might not like what I say, but that doesn't mean I'm wrong.
 
What I said is not what you  think you heard.

DJW

  • Full Mayhemer
  • *****
  • Offline Offline
  • Posts: 785
  • Location: London
Re: 1/5 Riva Aquarama...
« Reply #164 on: February 22, 2023, 11:17:53 am »

Hmmm, I did think that was a bit marginal.  I have a tailstock centre and can use that to avoid mishap.  It'll be quite light machining with that length of brass, just to cut the outer edge of the vent down to the flange, then I'm thinking start a cut with the parting cutter and use that as a hacksaw guide to finish the cut.  Then I'll have a 10mm ish disc of brass that I can reverse and put in the chuck to take out the interior, then it goes into the mill to take out the vents.


Thanks for the input..!
David.
Logged
1/10th Aquarama Build - https://tinyurl.com/riva-aquarama
1/5th Aquarama Build - https://tinyurl.com/riva-aquarama2

Circlip

  • Full Mayhemer
  • *****
  • Offline Offline
  • Posts: 4,638
  • Location: North of Watford, South of Hadrians wall
Re: 1/5 Riva Aquarama...
« Reply #165 on: February 22, 2023, 11:39:02 am »

Not a criticism of your obvious expertise in machining David but SOME observers might try to emulate with a suicide cut. With a thrust pad, you could probably (with a thin parting tool) leave just enough to use a saw to do final release?


  Regard  Ian.


 Used this method to make 6 brake pistons in St Stl 2" (50mm)  dia for Brembo/Guzzi calipers.
Logged
You might not like what I say, but that doesn't mean I'm wrong.
 
What I said is not what you  think you heard.

DJW

  • Full Mayhemer
  • *****
  • Offline Offline
  • Posts: 785
  • Location: London
Re: 1/5 Riva Aquarama...
« Reply #166 on: February 28, 2023, 05:19:26 pm »

Afternoon All..!


A little progress to report, not as much as I'd hoped, but isn't that always the way...


@Ian, all feedback gratefully received, I like being on the forum for that very reason. When I just have myself to discuss best approach to whatever I'm doing, I tend to agree with myself... And that's not always a good thing..!


So, here's the 50mm bar with tailstock centre to keep it under control, I don't have a thrust pad...  So did take it slowly.


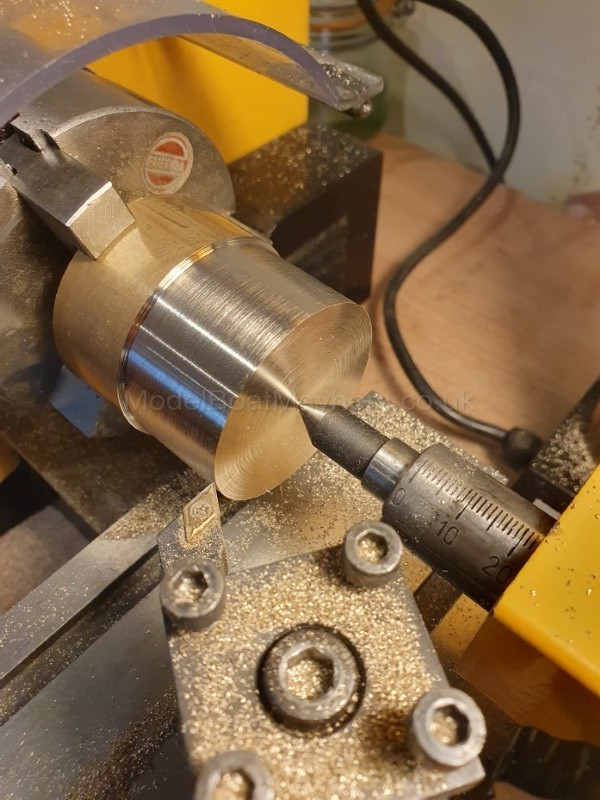
Taken down to 48mm and tested with the guide.


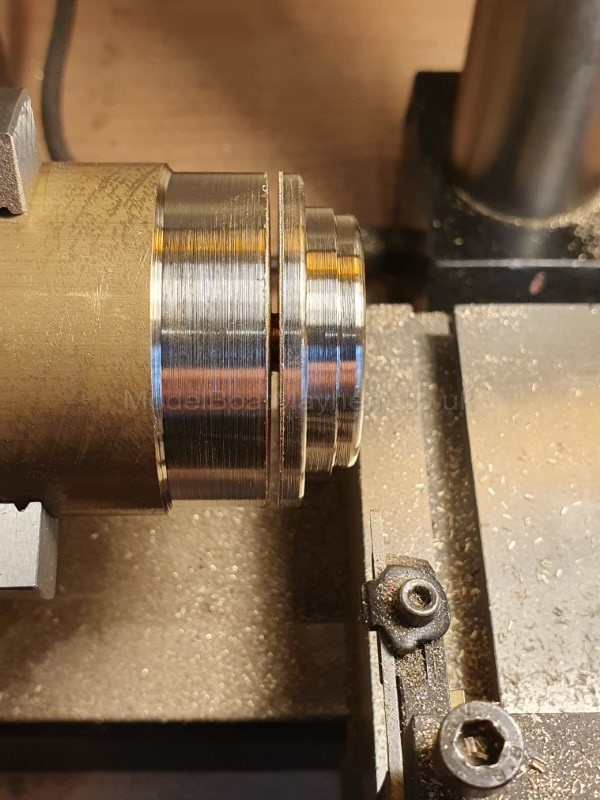
Parted off with a parting tool and hacksaw.


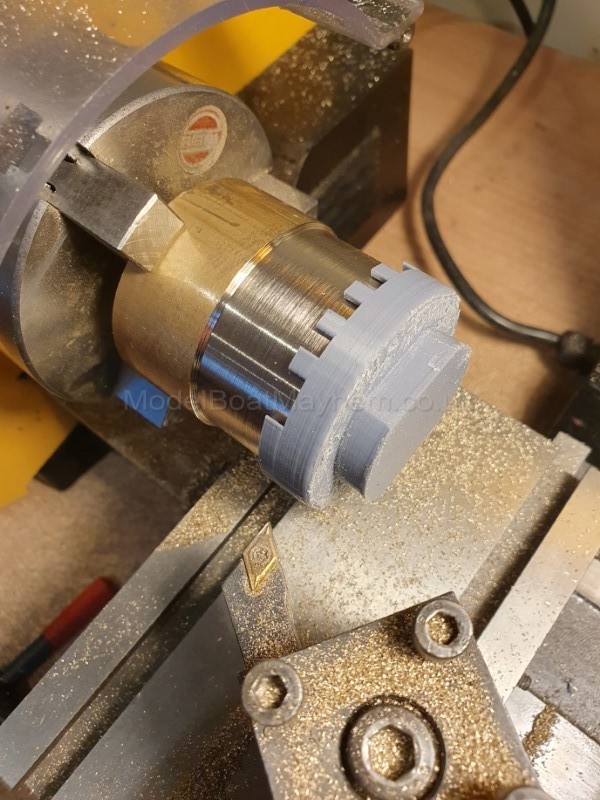
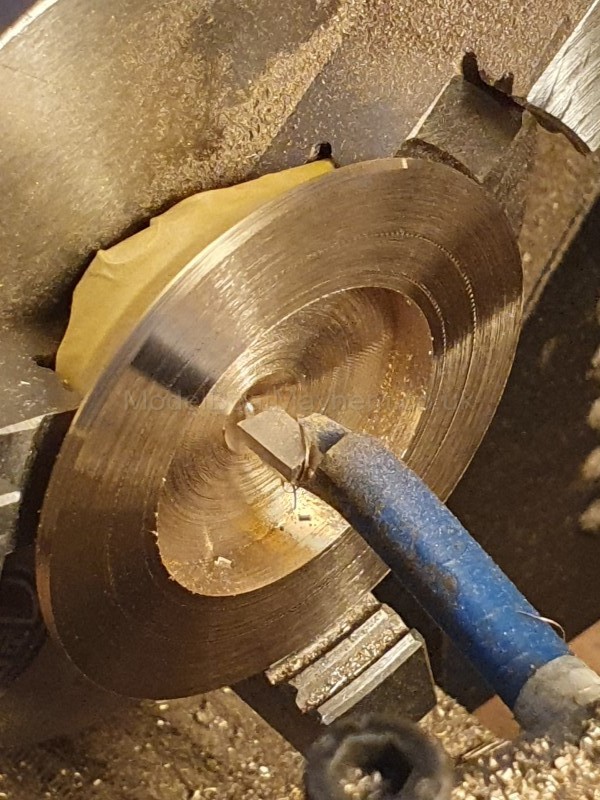
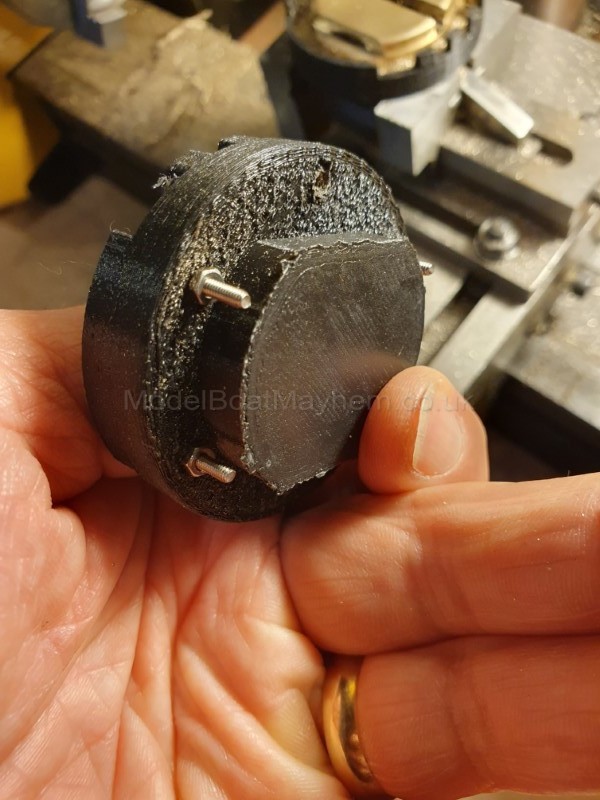
Then the vent reversed (protected with some masking tape), back in the chuck, faced and marked for boring out.


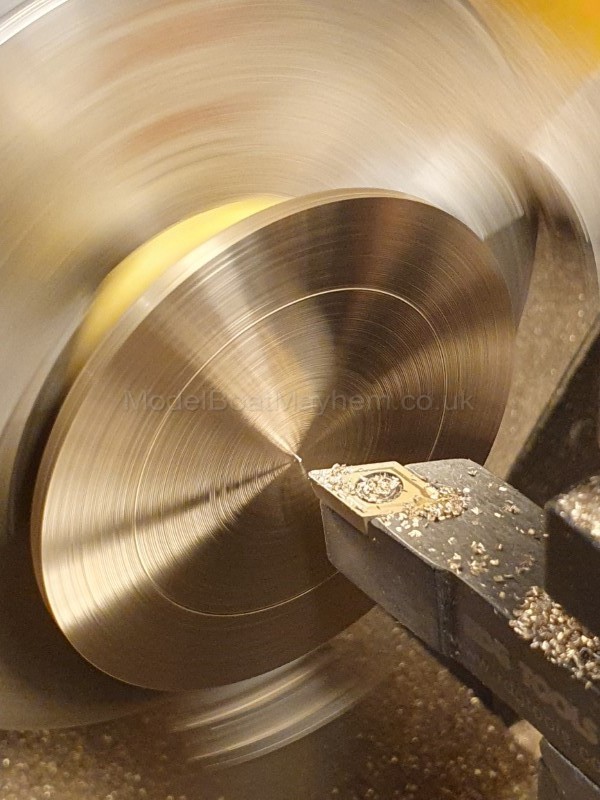
Then drilled to give me a depth to work to, and bored out.


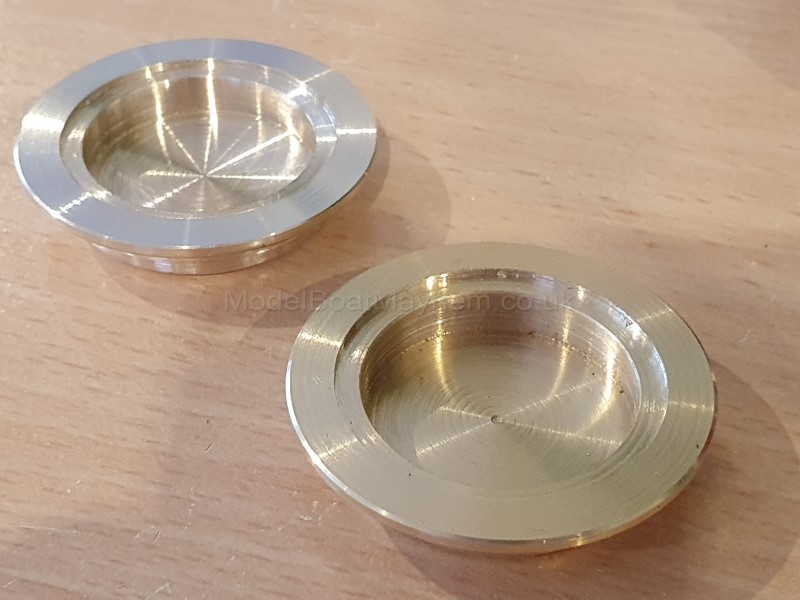
And the result, extra cut on the flange is 1mm deep to take some acetate sheet.


Then into the guides to have the flange mounting holes drilled.


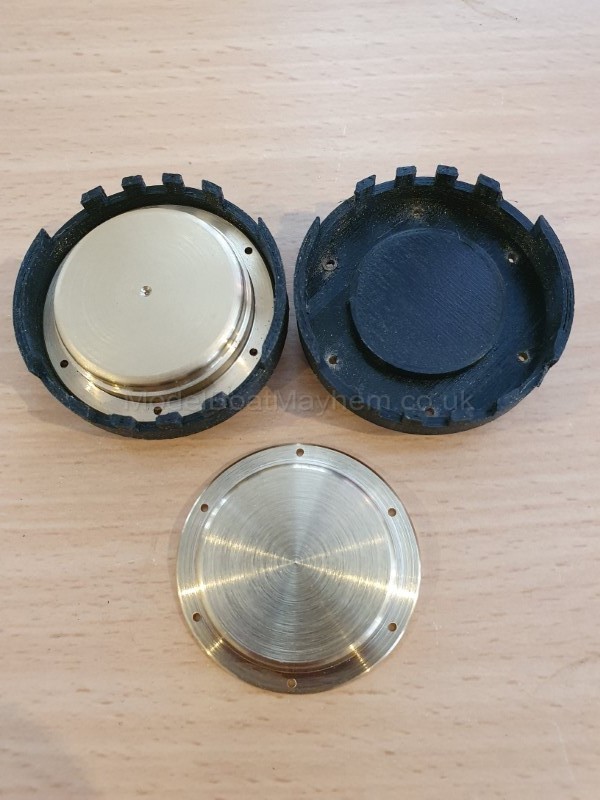
Then countersunk and mounted in the guides with M2 bolts. On the model the bolts will be M1.6.


The flats on the underside of the guides are to help mounting in the mill. Then a 6mm end mill to take out the two edge cuts, and a 4mm to start on the centre cuts.


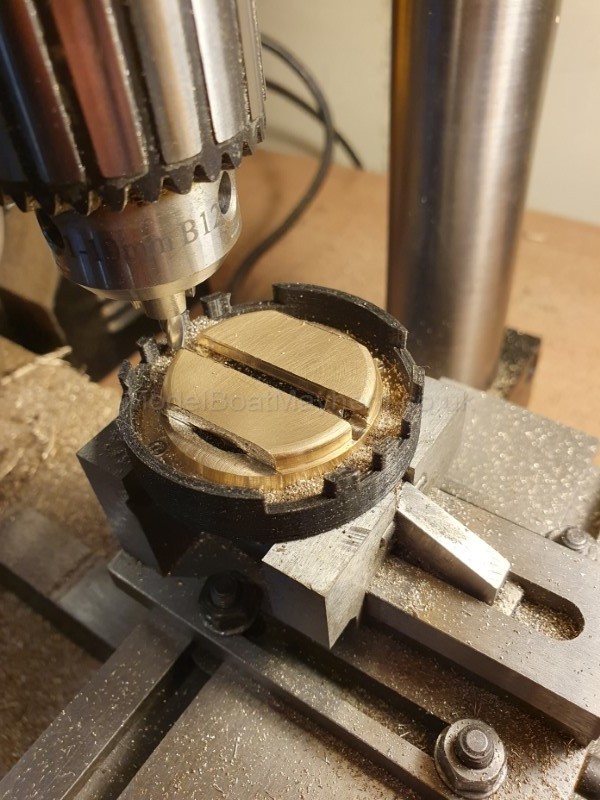
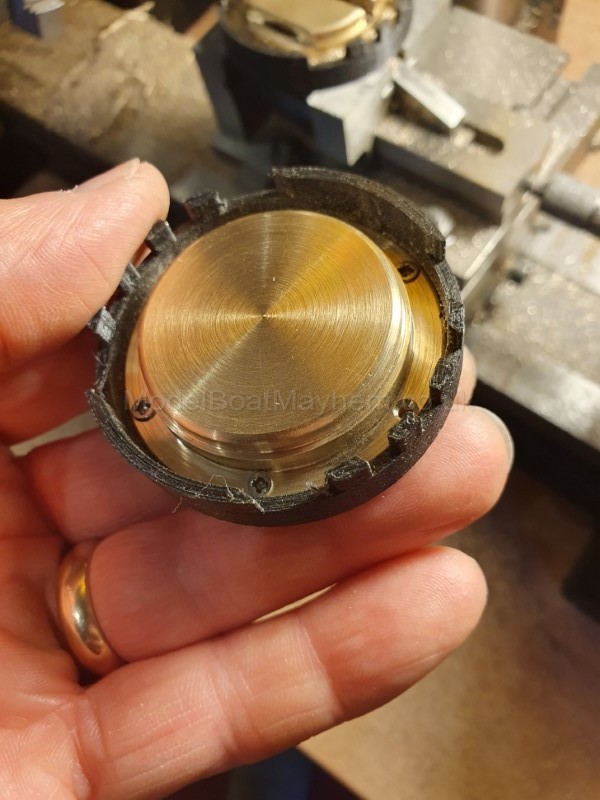
And that's as far as I've got today...  So, two more cuts on that first vent will give me the 'bars' of the vent, probably a bit of filing to round off the edges.  I'll post an update when they're both milled.


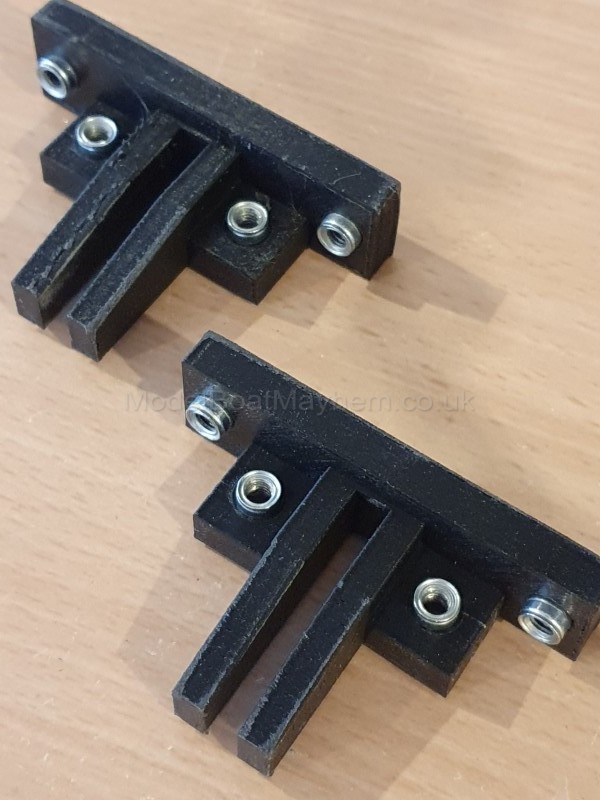
In other news...  I produced a few versions of these 3D printed ESC case mounts before getting it right.  They sit on the keel and bolt through two of the frames so the ESC case has a firm base.  I will be using a thin piece of foam to isolate the case from the mount so no sound vibrations are passed to the hull, or are at least reduced.


And with M4 threaded inserts.


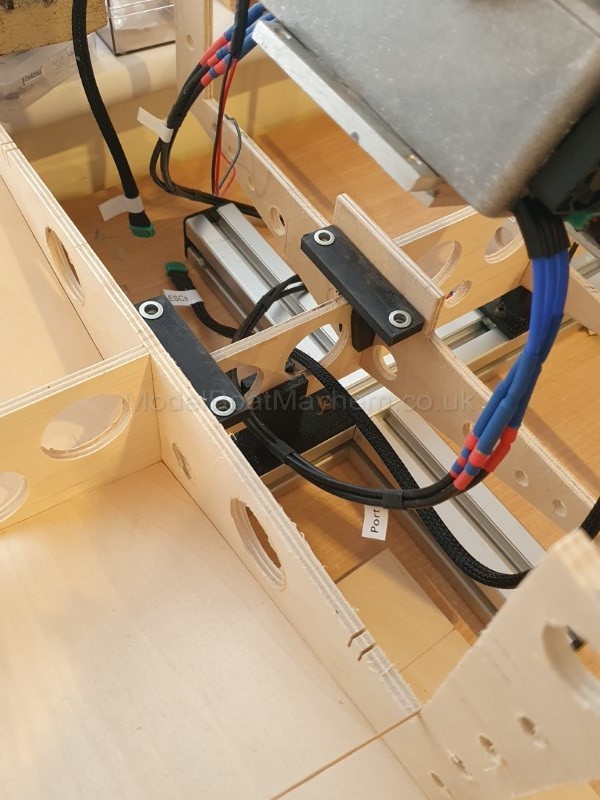
And in place, dry fit at the moment.


That's about it for today...


Very best regards to all.
David.

Logged
1/10th Aquarama Build - https://tinyurl.com/riva-aquarama
1/5th Aquarama Build - https://tinyurl.com/riva-aquarama2

Capt Podge

  • Full Mayhemer
  • *****
  • Offline Offline
  • Posts: 4,499
Re: 1/5 Riva Aquarama...
« Reply #167 on: February 28, 2023, 05:46:57 pm »

Hi David, well impressed with yet more of your superb milling and turning skills and, of course, the 3D printed parts and how these things come together.
Looking forward to seeing more of your progress  :-))


Cheers,
Ray.
Logged

DJW

  • Full Mayhemer
  • *****
  • Offline Offline
  • Posts: 785
  • Location: London
Re: 1/5 Riva Aquarama...
« Reply #168 on: March 01, 2023, 05:29:14 pm »

Afternoon Ray


Thanks for that..!  Finished with one of the vents in the mill today.


And out of the guide:


Need to get second vent milled, then some finishing for both.


Best regards
David.
Logged
1/10th Aquarama Build - https://tinyurl.com/riva-aquarama
1/5th Aquarama Build - https://tinyurl.com/riva-aquarama2

T888

  • Full Mayhemer
  • *****
  • Offline Offline
  • Posts: 1,535
  • Location: NewForest
Re: 1/5 Riva Aquarama...
« Reply #169 on: March 01, 2023, 05:44:00 pm »

Coming along nicely David, which milling machine are you using ?
Logged
Regards David

Circlip

  • Full Mayhemer
  • *****
  • Offline Offline
  • Posts: 4,638
  • Location: North of Watford, South of Hadrians wall
Re: 1/5 Riva Aquarama...
« Reply #170 on: March 02, 2023, 10:27:00 am »

Really impressive work for a "Toy" lathe/mill.  O0


  Regards  Ian.
Logged
You might not like what I say, but that doesn't mean I'm wrong.
 
What I said is not what you  think you heard.

DJW

  • Full Mayhemer
  • *****
  • Offline Offline
  • Posts: 785
  • Location: London
Re: 1/5 Riva Aquarama...
« Reply #171 on: March 02, 2023, 05:38:30 pm »

I have a Clarke CL250M lathe, I've had it for about 10 years, together with the CL251 MH Mill attachment.  Think I paid about £600.00 for both when new from MachineMart. I don't think either are available as Clarke products any more, but also think it's a generic lathe that's badged by a few suppliers.  It's pretty basic, no compound cross slide, and it's pretty small.  But it's served well for modelling work in aluminium and brass, and I use it for machining engineering plastics from time to time too.  It benefits from frequent adjustments to keep the various slides free from play. Then only taking small cuts seems to keep it happy.  On the Mill I use end mills from 10mm down to 3mm.


It's pretty heavy (30Kg with Mill), and currently I don't have it bolted down...  Not best practice...  Drive belt snapped after 8 years, so I picked up a couple of spares.  Otherwise keeps going.


For the price it's done and is doing well.


Best regards to all.
David.
Logged
1/10th Aquarama Build - https://tinyurl.com/riva-aquarama
1/5th Aquarama Build - https://tinyurl.com/riva-aquarama2

T888

  • Full Mayhemer
  • *****
  • Offline Offline
  • Posts: 1,535
  • Location: NewForest
Re: 1/5 Riva Aquarama...
« Reply #172 on: March 02, 2023, 07:11:54 pm »

Hi David,


I got a Axminster SX1 milling Machine and a C2 lathe. Lath I’ve had for 12 years . The mill I got that a couple of years ago, I thought it would not get much use but it’s be invaluable.


Like you I’ve used 12 - 0.5 mm tools and tend to take small light cuts and to date I’ve not had any issues, in fact I’ve been very please with this tool.


Both my machines are bolted to the work bench.

Logged
Regards David

Circlip

  • Full Mayhemer
  • *****
  • Offline Offline
  • Posts: 4,638
  • Location: North of Watford, South of Hadrians wall
Re: 1/5 Riva Aquarama...
« Reply #173 on: March 03, 2023, 10:30:22 am »

Which goes t show that you don't need "Heavy Metal" to achieve excellent results.


  Regards  Ian.
Logged
You might not like what I say, but that doesn't mean I'm wrong.
 
What I said is not what you  think you heard.

DJW

  • Full Mayhemer
  • *****
  • Offline Offline
  • Posts: 785
  • Location: London
Re: 1/5 Riva Aquarama...
« Reply #174 on: March 07, 2023, 05:00:58 pm »

Afternoon All

@Dave. I recognise quite a few of the components (but a few design changes) on that Axminster Mill, same components on my Clarke.  Must be a big factory in China with different paint and badges at the end of the production line..!  Like you I do use it a lot as a mill, also use it as a precise pillar drill.

@Ian.  Yes, the smaller hardware makes me as a user more refined and precise I think, in that you really can't brute force anything.  What you'd get away with on a full size (heavy metal) lathe, you just can't on the micro versions.

A modest update this week.  I've produced the second vent, and got them both polished.


I think they're going to look good up on the bow once chromed.

Best regards to all.
David.
Logged
1/10th Aquarama Build - https://tinyurl.com/riva-aquarama
1/5th Aquarama Build - https://tinyurl.com/riva-aquarama2
Pages: 1 2 3 4 5 6 [7] 8 9 10 11 12 13 14 15   Go Up
 

Page created in 0.037 seconds with 17 queries.