Model Boat Mayhem

Please login or register.

Login with username, password and session length.

Author Topic: David's Amati Riva Aquarama Build - With some mods...  (Read 95064 times)

Koinonia

  • Shipmate
  • *
  • Offline Offline
  • Posts: 9
  • Model Boat Mayhem is Great!
  • Location: Wroughton
Re: David's Amati Riva Aquarama Build - With some mods...
« Reply #225 on: October 16, 2020, 02:38:06 pm »

Looking very good.  Am still on first planking. :-))
Logged

DJW

  • Full Mayhemer
  • *****
  • Offline Offline
  • Posts: 682
  • Location: London
Re: David's Amati Riva Aquarama Build - With some mods...
« Reply #226 on: October 21, 2020, 12:57:24 pm »

Afternoon All


Slow progress over past few days... But I do have a new toy:


Picked up the clamp for it too, very sturdy:


Its really quiet, variable speed and good to grip.  Very pleased so far.


Have just placed an order for the flexi shaft as I need to reach a few awkward areas on the build.


I've been getting the musetto placed so the multi tool came in very useful.


Took a while but seems OK, just dry fit for now.


Best regards to all.
David.

ChrisF

  • Full Mayhemer
  • *****
  • Offline Offline
  • Posts: 1,316
  • What's my favourite cake!
  • Location: Warwick
Re: David's Amati Riva Aquarama Build - With some mods...
« Reply #227 on: October 21, 2020, 04:29:03 pm »

Must dig mine out, I think it's the same model. Bought it at the Warwick show 3 years as wanted something to hold very small drills - it hasn't seen the light of day since! That clamp looks a useful addition.

Chris
Logged
Building Fairey Marine boats: River Cruiser 23 prototype, Huntress 23 Long Cabin with stern-drive, Huntsman 28, Huntsman 31 and Swordsman 33 and two more to come! All scratch built and to a scale of 1:12

Koinonia

  • Shipmate
  • *
  • Offline Offline
  • Posts: 9
  • Model Boat Mayhem is Great!
  • Location: Wroughton
Re: David's Amati Riva Aquarama Build - With some mods...
« Reply #228 on: October 21, 2020, 05:29:43 pm »

We are always finding new gadgets and gismos.  Still rely on the good ol files and sandpaper. Steadily working on planking :-)) :-))
Logged

DJW

  • Full Mayhemer
  • *****
  • Offline Offline
  • Posts: 682
  • Location: London
Re: David's Amati Riva Aquarama Build - With some mods...
« Reply #229 on: October 22, 2020, 06:09:31 pm »

Afternoon All


Been looking again at the fit of the Musetto, pics to follow.


And been looking at the dashboard...


Couldn't resist connecting it up...


I sense another challenge coming up.


There's a lot of nice mahogany around, but just above the dash you may see the edge of some ply, with a white core.  So I'm thinking of edging that ply with a strip of mahogany, to avoid the white core.


Also, around the port side of the dash, the fit of the top of the dash is dire.  Needs a bit of work to get it improved, thats Friday sorted.


Best regards to all.
David.

ukmike

  • Full Mayhemer
  • *****
  • Offline Offline
  • Posts: 445
  • I used to be indecisive... but now I'm not so sure
  • Location: Gorleston Norfolk
Re: David's Amati Riva Aquarama Build - With some mods...
« Reply #230 on: October 23, 2020, 03:27:51 pm »

Here you go David.
Logged

DJW

  • Full Mayhemer
  • *****
  • Offline Offline
  • Posts: 682
  • Location: London
Re: David's Amati Riva Aquarama Build - With some mods...
« Reply #231 on: October 23, 2020, 10:35:57 pm »

Evening Mike


Thanks for these pics of your larger Aquarama. I'm going to look at what I need to do to get that lip over the top of the dashboard, together with a smoother result than I think the Amati kit pieces allow.


Best regards
David.

ukmike

  • Full Mayhemer
  • *****
  • Offline Offline
  • Posts: 445
  • I used to be indecisive... but now I'm not so sure
  • Location: Gorleston Norfolk
Re: David's Amati Riva Aquarama Build - With some mods...
« Reply #232 on: October 23, 2020, 11:01:54 pm »

Evening David.


Did you understand the dash easy  mounting ?
Although it might not work as you have modified the mounting to accommodate the instrument backlighting.


Let me know if you need clarification, but looking at the poor photos maybe I couldn't grasp it myself.😕😕


Keep well.


Mike.
Logged

Taranis

  • Full Mayhemer
  • *****
  • Offline Offline
  • Posts: 5,300
  • Balne Moor MBC
  • Location: Yorkshire
Re: David's Amati Riva Aquarama Build - With some mods...
« Reply #233 on: October 23, 2020, 11:15:57 pm »

I haven't got any white showing. I used a bit of scrap to fill the right hand end of the binnacle


Logged
ANDY
You’ll only know your best effort if you don’t give up.

DJW

  • Full Mayhemer
  • *****
  • Offline Offline
  • Posts: 682
  • Location: London
Re: David's Amati Riva Aquarama Build - With some mods...
« Reply #234 on: October 24, 2020, 01:01:30 pm »

Afternoon Both


Thanks for the pics and comments. Rookie error on my part I think with the ply, it just needs to sit back a shade then raise the mahogany dash.  :embarrassed:  Not the first error and won't be the last I'm sure.  :-))


David.


DJW

  • Full Mayhemer
  • *****
  • Offline Offline
  • Posts: 682
  • Location: London
Re: David's Amati Riva Aquarama Build - With some mods...
« Reply #235 on: October 27, 2020, 09:58:57 am »

Morning All


Been a bit busy in the 1:1 world, but some progress at 1:10...


Final new toy til Christmas:


Pleased with the flexi shaft so far, gets into places that the main tool (230/E) can't. Main tool has plenty of power to drive the flexi shaft so very happy with the combination.


I've reworked the Musetto slightly, its now a little higher and I've added a bridging piece between the saxboards, so they appear more like the full size boat, and the musetto appears to sit on the saxboards, still dry fit until I'm happy with it:


And back to the dashboard top piece, I want to see if I can improve on the kit parts, the dash is a gorgeous part of the boat, the dash top less so in my opinion as it's supplied in two parts.  So I've set out to make it in one piece (and to give the bandsaw an outing...):


It's not fully trimmed to size til I put a curve on it, this is the kit parts in position:


And my version in place, aims are to avoid the binnacle joint being visible, and to give a more pronounced overhang across the whole dash and specifically the binnacle over the helm position:


I need to get the curve / fit right, and forgot to mention that I used my little router table to machine out the underside of the binnacle:


This, is the real thing that I'm trying to get closer to...


Piece is being soaked and curved at the moment, will post an update with the results.


Best regards to all.
David.

ukmike

  • Full Mayhemer
  • *****
  • Offline Offline
  • Posts: 445
  • I used to be indecisive... but now I'm not so sure
  • Location: Gorleston Norfolk
Re: David's Amati Riva Aquarama Build - With some mods...
« Reply #236 on: October 27, 2020, 03:59:18 pm »

Hi David.

Super work, hope that the Mahogany softens enough for the bending, it doesn't soften very easily.

Don't forget that the Dashboard doesn't sit upright, although you probably have that in hand.

Mike.
Logged

DJW

  • Full Mayhemer
  • *****
  • Offline Offline
  • Posts: 682
  • Location: London
Re: David's Amati Riva Aquarama Build - With some mods...
« Reply #237 on: October 27, 2020, 06:13:09 pm »

Evening Mike


Thanks for that. A couple of more pics before close of play:


A little more work required at the port side, otherwise quite pleased with the outcome.  Haven't snapped it so far...  Soaked it and clamped it to a curve for the afternoon, seems OK.


I think next is to get the mahogany ply parts to left and right of the dash (on the deck above) in place so I can go for a final fit. Plan is to soak then press into place with a former (rubber hosepipe) of same radius as the curve, clamp then let them dry fully.  Then clamp, bond and trim.


Best regards to all.
David.

DJW

  • Full Mayhemer
  • *****
  • Offline Offline
  • Posts: 682
  • Location: London
Re: David's Amati Riva Aquarama Build - With some mods...
« Reply #238 on: November 03, 2020, 12:43:17 pm »

Afternoon All


Couple of areas of progress to report.


I've tweaked the bow behind the musetto, bonded the saxboard 'bridge' and also the anchor hatch.  In two minds whether to try to create a new musetto, I plan a few other parts that will need chroming, we'll see.


Also repositioned the ESCs to get them out of the way, added a surface mount XT60 socket to avoid trailing wires.


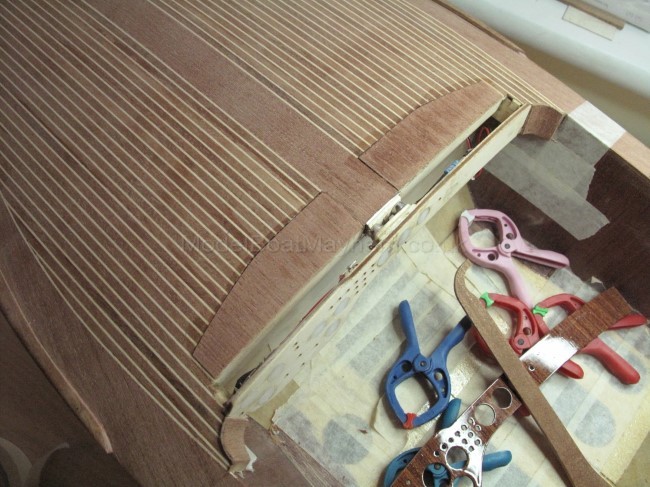
Main work has been with the dashboard and surround.  This is the pair of panels that sit to the left and right of the dash, soaked and being curved around a former.


And clamped into place.


Trimmed and finished with a small piece of mahogany to hide the ply fully.


Filled in the two areas forward of the dash with some spare ply, helps me with maintaining the dash curve as I need it to be self supporting, I need to have the dash removable in case of electrical issues, so not a stressed part of the structure.


The dash is located firmly at three points (left, right and centre), so I've added a couple of small magnets to the back of the dash, and a metal plate on the bulkhead...


Top panel being bonded to the deck:


Some masking ready for the dash top / binnacle:


Glued and clamped:


And the result, all elements fixed in place, here with no dash:


Here with the dash held by the magnets:


And finally the mahogany dash:


[size=78%] [/size]
Best regards to all.
David.

DJW

  • Full Mayhemer
  • *****
  • Offline Offline
  • Posts: 682
  • Location: London
Re: David's Amati Riva Aquarama Build - With some mods...
« Reply #239 on: November 03, 2020, 02:14:50 pm »

I meant to add a couple of pics from the top to show the revised dash top / binnacle in place:


I'm thinking that I may be getting close to applying a thinned Z-Poxy coat to get the mahogany sealed.


Regards to all
David.

ukmike

  • Full Mayhemer
  • *****
  • Offline Offline
  • Posts: 445
  • I used to be indecisive... but now I'm not so sure
  • Location: Gorleston Norfolk
Re: David's Amati Riva Aquarama Build - With some mods...
« Reply #240 on: November 03, 2020, 03:43:50 pm »

Afternoon David.


The Musetto looks good now, the mods have done the trick, well worth the extra effort.


Just a thought, whilst looking at a previous picture showing the hidden away ESC and battery connector, I would certainly make sure that it was impossible for even the tiniest amount of water could to get into that connector, the consequences don't even bare thinking about.


Mike.
Logged

DJW

  • Full Mayhemer
  • *****
  • Offline Offline
  • Posts: 682
  • Location: London
Re: David's Amati Riva Aquarama Build - With some mods...
« Reply #241 on: November 03, 2020, 05:21:52 pm »

Hi Mike


Thanks for that, and fair point about the possible water ingress, I hadn't thought that through... The connector is slightly outboard of the sundeck joint, and the sundeck is a good fit but I'll enhance it with a thin gasket / seal to make sure.


Hope all's well with you.
David.

JimG

  • Full Mayhemer
  • *****
  • Offline Offline
  • Posts: 1,268
  • Model Boat Mayhem is Great!
  • Location: Dundee
Re: David's Amati Riva Aquarama Build - With some mods...
« Reply #242 on: November 03, 2020, 07:16:47 pm »

Just a thought, whilst looking at a previous picture showing the hidden away ESC and battery connector, I would certainly make sure that it was impossible for even the tiniest amount of water could to get into that connector, the consequences don't even bare thinking about.


Mike.
Unless you are sailing in salt water there will be no consequence if water gets into the connector. Normal pond water has a very poor conductivity so will not short out the connector. This is why brushed motors can be run when fully immersed in water with the only problem being the iron in the armature and the steel case rusting. Used to cool down hot NiCd batteries after fast charging by dunking them in the pond, connectors and all.
Jim
Logged
Dundee Model Boat club

ukmike

  • Full Mayhemer
  • *****
  • Offline Offline
  • Posts: 445
  • I used to be indecisive... but now I'm not so sure
  • Location: Gorleston Norfolk
Re: David's Amati Riva Aquarama Build - With some mods...
« Reply #243 on: November 03, 2020, 09:21:35 pm »

Unless you are sailing in salt water there will be no consequence if water gets into the connector. Normal pond water has a very poor conductivity so will not short out the connector. This is why brushed motors can be run when fully immersed in water with the only problem being the iron in the armature and the steel case rusting. Used to cool down hot NiCd batteries after fast charging by dunking them in the pond, connectors and all.
Jim
Jim.

The motor type is irrelevant, the battery type is. I referred to David's setup, i.e. high discharge Lithium batteries, which can discharge massive amounts power,instantly, unlike Nicad and Hydride which are relatively low maximum discharge when compared to Lithium. The fact that the water will most likely be of the fresh type will not stop this happening, slow it down a little, maybe. I know that first hand and the results can be disastrous.
If the possibility of water ingress of any type can be eliminated completely then the situation will not exist.

This build by David is of such a very high standard that it isn't worth taking any chances and I'm sure that he won't risk it.

Remember the saying, "if it can it will".

No doubt other people will disagree but I've seen this happen on more than one occasion.

Mike.

Logged

JimG

  • Full Mayhemer
  • *****
  • Offline Offline
  • Posts: 1,268
  • Model Boat Mayhem is Great!
  • Location: Dundee
Re: David's Amati Riva Aquarama Build - With some mods...
« Reply #244 on: November 04, 2020, 11:51:43 am »

Mike I know all about LiPo batteries and their ability to give high currents. I also do model flying and use up to 6S LiPos that need special anti spark plugs to stop sparking when plugged into an esc. As someone who has been trained in science I don't believe in taking other peoples ideas for granted, I do a practical experiment to check things out. I've just taken a 3S 8000mA pack and connected it to a wattmeter, the output from the this was put straight into a glass of tapwater making sure there were exposed contacts on the plug. The wattmeter showed no current flowing as expected, the meter is calibrated to the nearest 0.1A so there may have been a current less than 0.05A which would not show up. So a practical test shows there to be no problems with a few drops of water in a plug. ( I was unable to try this out with one of the 6S packs as they use an XT90 connection while the wattmeter is XT60)
Jim
Logged
Dundee Model Boat club

ukmike

  • Full Mayhemer
  • *****
  • Offline Offline
  • Posts: 445
  • I used to be indecisive... but now I'm not so sure
  • Location: Gorleston Norfolk
Re: David's Amati Riva Aquarama Build - With some mods...
« Reply #245 on: November 04, 2020, 12:33:08 pm »

Jim.


This is not the place to discuss the pros and cons of batteries. It's Davids Riva build, let's not hijack it.
You could always start a new one in a more appropriate section.


Sorry about this David.


Mike.


Logged

DJW

  • Full Mayhemer
  • *****
  • Offline Offline
  • Posts: 682
  • Location: London
Re: David's Amati Riva Aquarama Build - With some mods...
« Reply #246 on: November 04, 2020, 01:42:04 pm »

Afternoon All


Thanks for the comments, will be working hard to keep the water on the outside to avoid confirming smoke or no smoke..!


Onto the next issue.  Not 100% what its called, I'd have thought it was a 'rubbing strip', Amati seem to call it a 'fender', whatever it's call, the wood supplied in the kit to attach to the sides of the hull is not mahogany, and more to the point its not mahogany coloured...  Its quite lightweight, and its grey when compared to the warm tones of the mahogany planks, and as it's a varnished part this matters:


So I'm thinking another outing for the bandsaw, to create new pieces from real mahogany:


The supplied wood is 5mm x 5mm, this seems a bit odd too as images of the full sized boat show a far less symmetrical shape, so I'm thinking maybe to try 3 or 4mm mahogany to get closer to the correct aspect:


Another point shown on the image above is that I'd have expected the kit to have a stern light, circled above.  I couldn't find it in the (otherwise comprehensive) fittings set, and it's not on the plans... Pretty sure I've seen this on a couple of other build logs, so either it's a difference in kit versions, or I need a new prescription from the opticians...


Best regards to all
David.

Mark T

  • Full Mayhemer
  • *****
  • Offline Offline
  • Posts: 2,087
  • Location: Dudley in the Black Country
Re: David's Amati Riva Aquarama Build - With some mods...
« Reply #247 on: November 04, 2020, 04:27:37 pm »

That’s lovely work David especially on the modified dash  :-))   The wood supplied looks a bit like walnut it’s that kind of colour but I could be wrong. Keep the updates coming  O0

DJW

  • Full Mayhemer
  • *****
  • Offline Offline
  • Posts: 682
  • Location: London
Re: David's Amati Riva Aquarama Build - With some mods...
« Reply #248 on: November 06, 2020, 05:08:28 pm »

Afternoon All

Hi Mark, thanks for that.

I've made some progress creating new side 'fenders'...

Supplied wood is 5x5mm, I want to make them slightly thinner vertically, and slightly wider, aiming for 4x7mm.

Only had 2mm stock to hand, so here's the start point:


Then glued and clamped to get to 4mm, there'll be chrome trim along the joint:


Then I've marked out the fender strips, used some masking tape to stop them bonding, but left room to glue on the part that will be cut off.


The shaped what will be the outer face on the bandsaw:


Then parted off down the straight (hull side) edge, so two identical shaped pieces:


And happy with the shape against the hull, little trimming, and then good to attach:


Also been busy starting to make up a ski pole...

This is the real thing:


I'm making it up from 3mm brass tube, I found some with a 1mm wall so strong enough I think.  I need pipe not tube as I intend to run some control lines for the skier though the pole and along the ski line.


I'm making up the top of the ski pole on my small late / milling machine, I have a Clarke CL250M with milling attachment.  I think it's a poor relation to some of the better makes, but I've had it in pieces and am happy that play has been almost eliminated, it's fine on brass, aluminium and engineering plastics.


So here's the start of the pole top:


Then into the mill to square it off and drill the tow eye:


And into the vice for finishing, I've not fully parted it off yet as it'll make it tricky to hold.


'Pole' just dry fit for now.

That my Friday update.  Great weekend to all. (In a socially distanced way of course...)
David.

DJW

  • Full Mayhemer
  • *****
  • Offline Offline
  • Posts: 682
  • Location: London
Re: David's Amati Riva Aquarama Build - With some mods...
« Reply #249 on: November 09, 2020, 05:57:38 pm »

Afternoon All


More progress with the Ski pole:


And here is the top piece, parted off and on the pole:


Silver soldered and polished:


I'm reasonably happy with the shape compared to the original:


Here it is in place:


The pole is removable, there's a brass tube and pin to retain the pole at the correct height, and to stop it rotating.  I need to reinforce and epoxy the tube in, also to get the guides in place for the control lines. I need to think about how to cap the tube when the pole is not being used.  And of course the pole needs to be chromed, I'll wait til later in the build to see if anything else needs chroming.


Regards to all
David.

Pages: 1 2 3 4 5 6 7 8 9 [10] 11 12 13 14 15 16 17 18 19 20 21 22 23   Go Up
 

Page created in 0.634 seconds with 21 queries.