Model Boat Mayhem

Please login or register.

Login with username, password and session length.
Pages: 1 [2] 3 4   Go Down

Author Topic: Chinese mini tug the Q3 kit!  (Read 10419 times)

Tugtower

  • Full Mayhemer
  • *****
  • Offline Offline
  • Posts: 190
  • Owner of The RCMB Forum
  • Location: Workshop. S.Wales.UK
    • RCMB Forum
Re: Chinese mini tug the Q3 kit!
« Reply #25 on: April 03, 2020, 02:18:37 pm »


Today I’m working on the stern of the side skin, last night before bed I attempted to epoxy the skin around the curve to hold it shape, for the most part it’s held however the very edge was breaking the epoxy joint and trying to flex out, so before the joint fully breaks I’ve busted out the hardcore glue.. in this case my tub of grp compound, for those who don’t know what that is, it’s a epoxy and glass mating mix which you add the harder to make set, apply it and clean up the mess when it sets, I usualy use this for joint reinforcing on areas that are hard to reach or have very little glue surface, and in this case some ply wood that won’t co-operate, now usually I would steam the sheet material for this type of operation however, I have absolutely no clue as to what type of ply this is... I’m going to just simply assume it’s very cheap ply material which will most likely delaminate the moment any water or steam hits it for forming. So in this case the grp compound should do the job very well and holding the skin in, I’ll rack up the other side once this sets and do the same thing...


The top of the deck bulwarks are going to be the same bend.... however as that is a face I won’t be able to hide an unsightly joint like this, I will actually swap over to my 0.5mm ply and make a second skin that can hold the joint over its length with wood glue... more on that much later... just planning forwards..


Once the skin is on correctly I’ll clean up the base of the frames and glue the base down.


More to come slightly later today.


Tugtower

  • Full Mayhemer
  • *****
  • Offline Offline
  • Posts: 190
  • Owner of The RCMB Forum
  • Location: Workshop. S.Wales.UK
    • RCMB Forum
Re: Chinese mini tug the Q3 kit!
« Reply #26 on: April 03, 2020, 11:36:28 pm »


Been a productive day again fortunately, but slow progress in terms of achievement simply due to glue drying times...


Anyway, the Grp compound setup fine so I was able to trim the other half of the stern and tack that in place and grp it in fully, after it cured I sanded the curve back In fully as it wasn’t perfect, there is some thinning of the material top and bottom of the panels doing that, but the base panel has secured that along with some more epoxy on the joint, and the top will become firm once the deck slides into place,


Talking of the bottom panel that has also been secured with a mix of wood glue, a few tacks of super glue to free up fingers and a locating screw in the bow to pull in the shape while the glue sets up, ( I’ll remove it a little later and fill the hole) and once set I’ve taken the time to epoxy all the seams.


I’ll let this cure up over night now and sand the base flush to the sides. There is some overhang and some under cut in places with the base part so I will actully use some of the grp compound on the outside seam to ensure the hull is fully water tight, as well as aiding in the side and base panels positions.


It’s a little bit overkill but I’m not going to take any chances with this kit, better safe than sorry!


Taranis

  • Full Mayhemer
  • *****
  • Offline Offline
  • Posts: 5,300
  • Balne Moor MBC
  • Location: Yorkshire
Re: Chinese mini tug the Q3 kit!
« Reply #27 on: April 03, 2020, 11:40:48 pm »

Looking good. Any idea what the displacement weight will be?
Logged
ANDY
You’ll only know your best effort if you don’t give up.

Tugtower

  • Full Mayhemer
  • *****
  • Offline Offline
  • Posts: 190
  • Owner of The RCMB Forum
  • Location: Workshop. S.Wales.UK
    • RCMB Forum
Re: Chinese mini tug the Q3 kit!
« Reply #28 on: April 03, 2020, 11:56:46 pm »

No idea on displacement weight, it will be what it will be.....  %%  ( honestly I never cared for model displacement calculations or guesses, I’ve always finished a model and bath tested it added weights after it’s finished then just hope my back can lift it after)


I think if i decides to make it go like the advert then as little as possible... with a 2200kv....


But I’m tempted at the moment to add a bow bumper for pushing with rather than this pointy bow. So I’m guessing I can smack a fair bit of weight in there. Much like a half size springer and we all know it takes nearly 5kg to get those to its water line!
I’m also tempted to add a prop and rudder skeg to the model kick it up a notch to some normality of a mini tug rather than a generic kit... anyone who’s seen my kit builds knows I never build to the plans!


Tug Fanatic

  • Full Mayhemer
  • *****
  • Offline Offline
  • Posts: 2,481
  • Location: England
Re: Chinese mini tug the Q3 kit!
« Reply #29 on: April 04, 2020, 10:17:56 am »


................... Much like a half size springer and we all know it takes nearly 5kg to get those to its water line!........................


remember half size is one eighth volume.
Logged

Tugtower

  • Full Mayhemer
  • *****
  • Offline Offline
  • Posts: 190
  • Owner of The RCMB Forum
  • Location: Workshop. S.Wales.UK
    • RCMB Forum
Re: Chinese mini tug the Q3 kit!
« Reply #30 on: April 05, 2020, 03:08:17 pm »


I didn’t achieve much yesterday, just lack of time in the workshop..


I did however I mount the hull from the base board, trim off the base board supports, and trim the deck to fit, all those jobs very easy and very little work needed, the deck only required trimming at the stern, that’s simply due to the shape not everyone’s will be “exactly” as planned but mine only required a little 0.5mm trim and a taper on the emu set side edge to fit firm.


While I was at the stern I also reinforced the joint that was very thin after sanding the correct curvature in, just make up with a couple strips of lime and sanded internally to keep the deck shape.


Today I plan to sand the hulls base panel and glass over all the seams and sand back to smooth. This will ensure strength and watertightness on all joints, although I doubt I need it, none the less nothing better to do!


Tugtower

  • Full Mayhemer
  • *****
  • Offline Offline
  • Posts: 190
  • Owner of The RCMB Forum
  • Location: Workshop. S.Wales.UK
    • RCMB Forum
Re: Chinese mini tug the Q3 kit!
« Reply #31 on: April 05, 2020, 05:24:13 pm »


I’ve glasses the seams of the hull on the base, I’ll take the rest of the evening to sand this smooth, p38 for any odd spots, but this should secure the hull long term, there isn’t a whole lot to do until my shaft arrives in the post, due to recent events I’m not sure how long I’ll be waiting before I can progress a lot faster, the issue with this kit is once parts are installed it’s very hard to uninstall them, as access is very limited so I will look to make things a little easier, possible a detachable tray that can hold the motor and servo so I can slide out through the hatch, I’m also going to add a skeg to the hull, since it’s flat bottomed and I don’t fancy a speed tug, I think this will be a way to help keep the boat stable with a more suitable water line weight.


The rudder will be the next think I work on in conjunction with the skeg, I had thought about a steering kortz but the space underside is limited with the curvature, so I will have a little test and see if that can be achieved if not standard rudder assembly, but I’ll make up the rudder tube on the lathe, the rudders hole in the hull is laser cut at 7mm, a rudder for this boat needs not be more than 3mm by any scale.


So a few things to do...


Tugtower

  • Full Mayhemer
  • *****
  • Offline Offline
  • Posts: 190
  • Owner of The RCMB Forum
  • Location: Workshop. S.Wales.UK
    • RCMB Forum
Re: Chinese mini tug the Q3 kit!
« Reply #32 on: April 05, 2020, 07:20:41 pm »


After a couple hours sanding this is the end result of the seams all nicely smooth and tidy, I’ve even rounded over the sharp edge on the base for a better paint finish, There are a couple of air holes and low spots on the overall hull but those I’ll fill when I true up the hull before priming.


Later tonight I’ll start making up the skeg so I can see how much space there is for the rudder, going off a rough measurement I had 38mm to the base of the hull so I expect the rudder will be around the 30mm size, I will probably elongate this with an off center pivot to give better throw for the little model, aid it’s turning dramatically, I was half tempted to try for a mini Becker “flap” rudder but I think an off center will do a good enough job.


There is no way to fit a kortz nozzle to the hull unless it was a fixed position small one that acted with the skeg Which is actually called a “Mewis Duct”, that of course is taking things a little to far for no reason and the fact the hull isn’t designed in such a way to support its function.


mudway

  • Full Mayhemer
  • *****
  • Offline Offline
  • Posts: 507
  • Model Boat Mayhem is Great
  • Location: Sydney
Re: Chinese mini tug the Q3 kit!
« Reply #33 on: April 06, 2020, 12:11:33 am »

Oh dear first error and it’s a big one... the laser cut sides don’t match... I don’t think this is designed this way given the frame work inside... after a good while I’ve determined the material to add and The material to remove to make this align correctly... as you can see both frames need top and bottom adjustments to take the frame work.. one frame needs more material at the base the other frame requires material from the top.... sigh... i imagine this is a laser cut error....I just hope the rest of the boat isn’t this way...

Would using one side piece as a template for cutting your own "twin" one have worked? Just wondering as they look like a fun little beast..

Logged

Tugtower

  • Full Mayhemer
  • *****
  • Offline Offline
  • Posts: 190
  • Owner of The RCMB Forum
  • Location: Workshop. S.Wales.UK
    • RCMB Forum
Re: Chinese mini tug the Q3 kit!
« Reply #34 on: April 06, 2020, 12:35:46 am »

To some extent yes... the external shape of both frames were right, the internal shapes that had all the cutouts for the frames bother were off, one was to high, one was to low, once I worked out the difference I was able to mod the frames to fit correctly, I could have made new frames from ply I simply couldn’t be bothered to waste my good material or make up frames cut them out when the correction wasn’t that hard with little offcuts from the frames original sheet.


Once glued in place there weren’t going anywhere, there’s a load of epoxy holding the butt joints, as well as the other connecting parts, there is only one frame which had the top cutouts to high that I had to lower, that frame has a reinforcement strip behind overlapping the fix.


So simply Put


 yes I could have, but nope just couldn’t be bothered!

Martin (Admin)

  • Administrator
  • Full Mayhemer
  • *****
  • Offline Offline
  • Posts: 23,420
  • Location: Peterborough, UK
    • Model Boat Mayhem
Re: Chinese mini tug the Q3 kit!
« Reply #35 on: April 06, 2020, 09:26:13 am »


      {-)
Logged
"This is my firm opinion, but what do I know?!" -  Visit the Mayhem FaceBook Groups!  &  Giant Models

Tugtower

  • Full Mayhemer
  • *****
  • Offline Offline
  • Posts: 190
  • Owner of The RCMB Forum
  • Location: Workshop. S.Wales.UK
    • RCMB Forum
Re: Chinese mini tug the Q3 kit!
« Reply #36 on: April 06, 2020, 05:45:14 pm »


I’ve made up the rudder tube with some stainless on the lathe, I’ve turned it to sit into the 7mm hole vertically, I’ll have to add a little internal support on one side to keep it vertical once glued, and I’ve allowed for a larger off center rudder with a little spigot on the bottom, (basically to add clearance for that type of rudder) it’s drilled to 2.5mm for some 2.5mm stainless shaft material I’ve had laying about, it needs shortening at present but you can see the overall fit and no slop in the shaft. Now all I have to do is work out where the boats level and make a skeg to fit, this then allows me to get the rudder vertical as the base of the rudder will slot into it.


I’ve got a template for the skeg but I’m undecided if I want to attempt to get the shaft dead flat or keep the designated angle, flat would mean only a 20mm prop can be used give the hull, but the build instruction angle allows for 25mm prop... this I think will be the best solution as “c” type props can be brought easily for M4 shafts, along with that a 20mm prop really is tiny and I probably won’t do the job!


coch y bonddu

  • Full Mayhemer
  • *****
  • Offline Offline
  • Posts: 376
  • Model Boat Mayhem is Great!
  • Location: Bethesda
Re: Chinese mini tug the Q3 kit!
« Reply #37 on: April 06, 2020, 08:41:26 pm »

Couple pf questions here


1 if Martins is a Q1 ad yours a Q3 what is the difference


2 Why have you turned a rudder tube up on the lathe was there not one in the kit and if so what was wrong with it,just curious thats all


Dave
Logged

Tugtower

  • Full Mayhemer
  • *****
  • Offline Offline
  • Posts: 190
  • Owner of The RCMB Forum
  • Location: Workshop. S.Wales.UK
    • RCMB Forum
Re: Chinese mini tug the Q3 kit!
« Reply #38 on: April 06, 2020, 08:58:30 pm »

To answer your questions Dave...


The Q1 mini tug


The Q3 mini tug


And the reason I’ve turned my own shafts is that I did not buy the running gear pack with the kit, (shaft, rudder and prop) the shaft I did not like it was plastic bushings looking at the photos.. not a chance I was wasting my cash on crap, the prop was also a dog driven x prop, which is fine for a speed boat not for a tug, the rudder looked ok but I’m more than capable of making such things so I just didn’t bother wasting cash on it.


When it comes to kits I generally like to make up parts for them and turn a basic kit into something more, see the sea urchin log on my profile tag as an excellent example, many of the boats I build are semi scale or “general appearance” this gives me great scope to mod them to my liking which is the best thing about moddling with these types of semi kits.


I did work out pretty fast that this kit is based on the full size mini tug plans... just googling those give you mountains of options and customisability.


Hope that answers your questions.

coch y bonddu

  • Full Mayhemer
  • *****
  • Offline Offline
  • Posts: 376
  • Model Boat Mayhem is Great!
  • Location: Bethesda
Re: Chinese mini tug the Q3 kit!
« Reply #39 on: April 06, 2020, 09:03:21 pm »

Ha So i now see the difference fair comment on the shaft etc,just been looking at them on ebay and I am wondering how strong the 3d printed hull and also how smooth it actually is as i've seen quite a few 3d printed parts and the actual ridging on them is awful let alone trying to fettle them for paint is a right PIA so to speak


Dave
Logged

Tugtower

  • Full Mayhemer
  • *****
  • Offline Offline
  • Posts: 190
  • Owner of The RCMB Forum
  • Location: Workshop. S.Wales.UK
    • RCMB Forum
Re: Chinese mini tug the Q3 kit!
« Reply #40 on: April 06, 2020, 09:07:57 pm »

I’ve seen some good 3D prints and some bad ones... I think there is a place for 3D printing in this hobby it’s a good media for those who can...


I think there are many tricks with 3D printing to remove the layer lines from sanding to filling... but the more recent printers are the resin UV cured ones... they do stunning finishes! At a price tag tho....


I’m old school anyway if I can make a part cheaper than buy it I will... and I can’t use the programs to make 3D models and honestly I just can be bothered to learn, rather buy a dedicated mill than a printer and a pc that isn’t 6 years old and slowly dying 😂

Tugtower

  • Full Mayhemer
  • *****
  • Offline Offline
  • Posts: 190
  • Owner of The RCMB Forum
  • Location: Workshop. S.Wales.UK
    • RCMB Forum
Re: Chinese mini tug the Q3 kit!
« Reply #41 on: April 06, 2020, 11:37:56 pm »


Before I do the rudder and the skeg in any finale I need a level position of the hull so I looked for the singular part of the entire boat that is level, which is actully part of the bow hatch. So I quickly made this part up and sat it on the boat, propping it up I was able to get that part level so I could mark up the boats stand... the stand itself will sit the boat level so I can mark up the skeg and rudder correctly, after which I’ll pretty it up.


The stand itself is just two laminates of 4mm marine ply, with a cutout for the skeg location, I will of course box and base the stand sides long term, like most of my other stands It also functions as a place to put small tools, screws etc, anything that comes off the model so not to get dropped on the floor. For those who watch my regular builds this is the typical stand I make for many models, not ornate in any fashion but strong and practical for use and transport.


I’ll finish up the stand tomorrow and get cracking on the rest...


RST

  • Guest
Re: Chinese mini tug the Q3 kit!
« Reply #42 on: April 06, 2020, 11:52:55 pm »

Stavros and Tugtower:  I've learned to embrace 3-D printing the last cpl of years.  You can make it rough and quick or slow and smooth for me anyway, my worst usable prints need not much more clean-up and grain filling than wooden parts do.  It is an art in its self though.  I'm a long way off mastering but I use it complimentary to traditional building, in that respect for me it's no different from moulding, casting and photo etching.  Whatever works for you!

Rich
Logged

RST

  • Guest
Re: Chinese mini tug the Q3 kit!
« Reply #43 on: April 07, 2020, 12:30:10 am »

Tugtower thanks for the build info. Interesting to see how a kit like this comes together.


Rich
Logged

Tugtower

  • Full Mayhemer
  • *****
  • Offline Offline
  • Posts: 190
  • Owner of The RCMB Forum
  • Location: Workshop. S.Wales.UK
    • RCMB Forum
Re: Chinese mini tug the Q3 kit!
« Reply #44 on: April 07, 2020, 05:17:35 pm »


I finished up the stand for the most part today, it still needs a final sand and corners rounded over but it’s a usable stand for continuation of the jobs I need to do, I’ll finish it up properly once construction gets to the paint stage, usualy the stand will take a few knocks during build time so I’m able to repair those before it’s finished rather than after.


I’ll try later to get the rudder tube in place, I’m still waiting for my servo, shaft and prop to arrive... delays in posting just means slower build progression... sigh...


Tugtower

  • Full Mayhemer
  • *****
  • Offline Offline
  • Posts: 190
  • Owner of The RCMB Forum
  • Location: Workshop. S.Wales.UK
    • RCMB Forum
Re: Chinese mini tug the Q3 kit!
« Reply #45 on: April 07, 2020, 09:40:59 pm »


With the stand finished I was able to level the model correctly or to what I think is level... using the plans water line and some deck parts that are in line with it to set the rudder tube, I made a small tab of ply to sit under the high edge of the tube to keep it level, then epoxied it in place, while the epoxy was setting I slid the shaft in and used that with the desk to square up the shaft in all directions.


Once the epoxy dried, I went over and glassed the shaft In solid, I have to fill a gap on the under side of the tube as the epoxy didn’t squeeze out there (tight fitting part) nothing a little filler won’t cure during fairing.


A good result, now I’m able to start on the skeg, I have some scrap brass strip I can use for the detachable part (base of rudder) so I’ll slot that into the ply skeg I’m thinking Just need to make or find something as a bushing for the rudders post.


Tugtower

  • Full Mayhemer
  • *****
  • Offline Offline
  • Posts: 190
  • Owner of The RCMB Forum
  • Location: Workshop. S.Wales.UK
    • RCMB Forum
Re: Chinese mini tug the Q3 kit!
« Reply #46 on: April 08, 2020, 04:29:24 pm »


I’ve started to template out a skeg but I needed to ensure it was level to the hull, since this is a modification there is no set angle for the skeg, so I’m using the boats water line as a reference to level.


I actully had to make up a water line marker from an old magnifying glass stand to hold a bit of lead as my actual water line marker can’t slide that low weirdly, one of those very strange things from a commercial product 🤔 anyway I’ve marked up the waterline and boot topping positions on the hull I can now use those as references to make a level skeg, which will in turn tell me the maximum rudder dimensions.


I’ll do some more after dinner with a bit of luck but the first photo shows my first template slotted in place along with the hull markings.


Tugtower

  • Full Mayhemer
  • *****
  • Offline Offline
  • Posts: 190
  • Owner of The RCMB Forum
  • Location: Workshop. S.Wales.UK
    • RCMB Forum
Re: Chinese mini tug the Q3 kit!
« Reply #47 on: April 09, 2020, 01:40:44 pm »


Shaft, prop and servo finally arrived, the shaft is my normal slimline go to brand this time in 4” length.
The prop is a “C” type prop designed for tug boats in 25mm, and im trying out a new brand of servo from Radient mini metal gear range, it’s become a popular brand I’ve noticed and it was the same price as my mini emax metal gear servos, this one is a bit bigger in size but it’s not a 15g servo like the emax it’s rated at 17g, we’ll see how it performs...


Now back to finally getting some progress done... skeg shaft...


Tugtower

  • Full Mayhemer
  • *****
  • Offline Offline
  • Posts: 190
  • Owner of The RCMB Forum
  • Location: Workshop. S.Wales.UK
    • RCMB Forum
Re: Chinese mini tug the Q3 kit!
« Reply #48 on: April 09, 2020, 04:46:18 pm »


At this point the skeg I’ve been planning may not be the best idea, to make one level with the hull would reduce the rudder size dramatically, obviously there are ways around this, but I don’t think many are suitable.


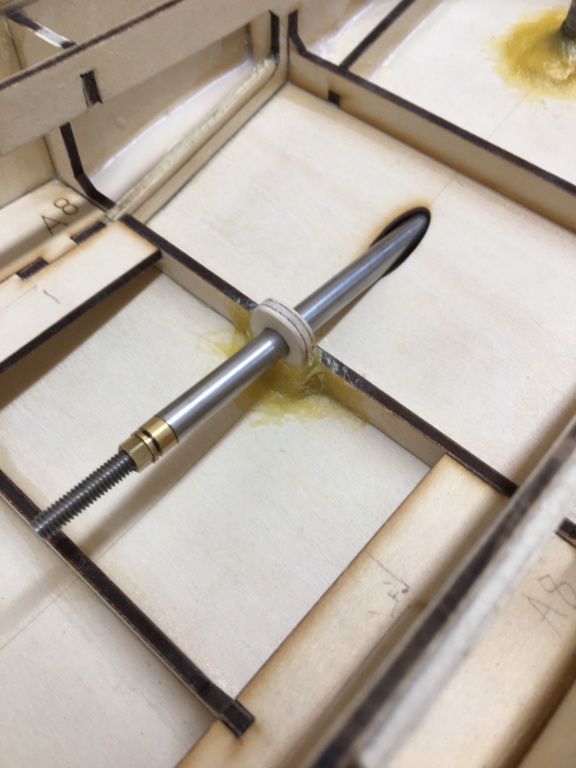
Anyway moving forward while I ponder on skegs, I’ve made up a support bracket for the prop shaft, the original hole is overly large designed for a standard shaft (8mm) I don’t tend to use brass shafts anymore simply due to corrosion over long term use, so sticking with my go to stainless shafts being thinner it required a mounting bracket to hold position and angle, this will let me fit a motor at the correct angle.


Now the kit comes with a laser cut motor bracket, but it requires you to cut the shaft ( and they recommended a 100mm shaft ) to allow the motor to be moved in front of the 2nd bulkhead, on top of that they also want you to take the motor spindle out and reverse it, so the motor is backwards.. this I understand the logic, once the decks on you will not be able to remove a motor is mounted the ‘normal’ way, however I don’t see the point in 1 cutting a perfectly good shaft down, and 2 swapping the motor about when a different bracket can be made up that can support traditional methods of mounting, not forgetting this kit also provides you with a laser cut mount for a servo... that in my case will not fit due to the servo I brought, but the position on the plan gives you no way to remove the servo at a later date... my plan is to make a mount for both motor and servo together as one unit that can come out through the hatch, and screws vertically into the electronics tray, this will mean that the battery will not sit right in the bow as the plan states so I will make a battery tray to sit over the shaft which my hand can get the battery to sit on ( I did a dry fit to see what I can and can’t do) the electronics can then sit either side off the shaft in front of the motor.


It’s an adjustment to build instructions but one I think is better than the half assed method someone came up with for this.


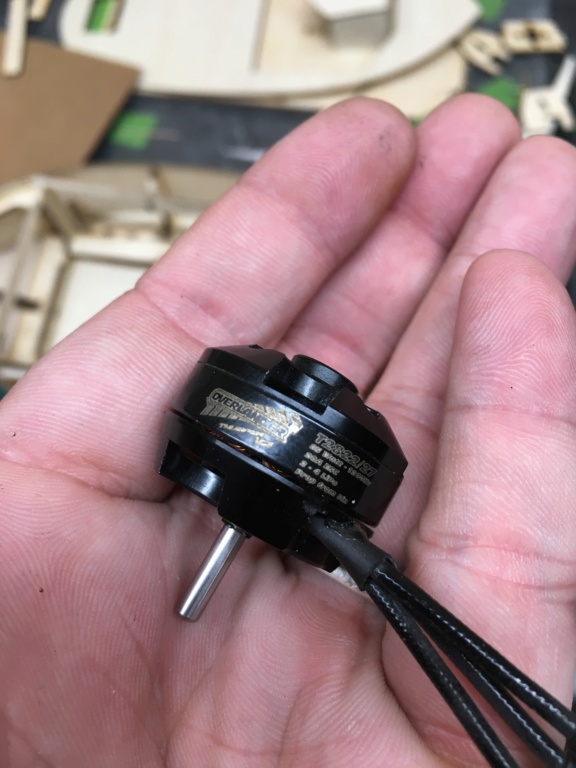
Talking on motors, I had a spare 1500kv outrunner laying about, that was used for a display model, so I’ve removed that motor and swapped it out with an on going project on another boat... that boats motor is one suitable for this model, it’s much smaller in size but still above what the kit recommends, it’s a 1200kv 85w outrunner (20amp esc) 28mm can size. Again my go to brand overlander, tried tested and never failed! ( these even work in reverse flawlessly) but they are quite expensive In comparison to other motors similar spec.


My next task is to make up a coupling, I have a few spare ones laying about but I think I’ll just make one for purpose, a UJ (Huco) coupling is actully to long to fit with the motor and shaft as is, so not suitable for this model unless I want the motor in the bow!


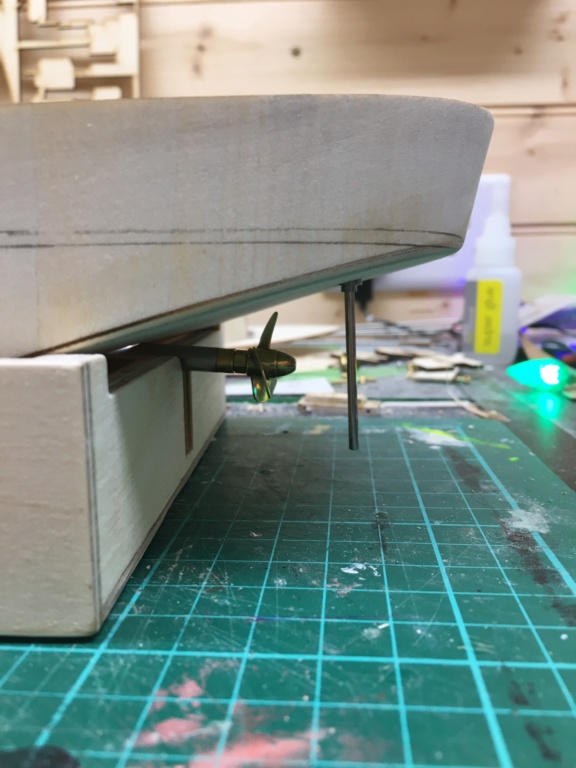
As you can see from the photo the 25mm prop is perfect size, the photo is deceiving in this case it looks like I can add a 30mm sadly I only have 1mm clearance from the shaft correct position.


The grind continues...


Tugtower

  • Full Mayhemer
  • *****
  • Offline Offline
  • Posts: 190
  • Owner of The RCMB Forum
  • Location: Workshop. S.Wales.UK
    • RCMB Forum
Re: Chinese mini tug the Q3 kit!
« Reply #49 on: April 09, 2020, 10:57:34 pm »


Final job the evening, I’ve glasses in the shaft permanently. Nothing major in terms of progress, i did attempt to make a coupling for the motor and shaft, but like a plonker I broke my only M4 Tap when I forgot to change speed on the lathe... yeah we all make bind head blunders sometimes .. so anyway I’ve ordered a new M4 Tap set this evening, so I’ll make up that part once it arrives.
Tomorrow I will mock up the motor and servo mounting plate, which can be done with a spare huco coupling I have I’ll just adjust for distance.
I’ll also take a look at the rudder now that the shafts in its fixed position.
I’m still undecided on skeg at this time, I’m looking at other options just for some scale look rather than function.


Pages: 1 [2] 3 4   Go Up
 

Page created in 0.09 seconds with 21 queries.