Model Boat Mayhem

Please login or register.

Login with username, password and session length.
Pages: [1] 2 3 4 5 6   Go Down

Author Topic: Delftship tutorial  (Read 119566 times)

boatmadman

  • Full Mayhemer
  • *****
  • Offline Offline
  • Posts: 2,703
  • Location: South Cumbria
Delftship tutorial
« on: August 22, 2009, 06:12:31 am »

Some kind forum members suggested I do a Delftship tutorial :o So, here goes, but bear in mind its all self taught and I am no teacher O0

Ok then, after some thought I think a relatively simple hull to demonstrate how the program works is the best way, so, lets begin!
First off, download the free version from:  http://www.delftship.net/
To get started, click file:new and you will get the window below. Enter the dimensions you want to start with, in this case 6 points in longitudinal direction, 5 points in vertical direction,29.26m Length, 7.62m Beam and 2.13m Draft. (some of you may notice these are the dimensions in mts. of Perkasa). Make sure units selected are M, (or ft. if you want to work in old money).
At this point I want to point out that I think its easier to design at full size and when you are happy with the shape, scale down to the size you want to build at.


Sorry, pic didnt load, have asked Martin for advice.
Logged
if at first you dont succeed.....have a beer.....

Martin (Admin)

  • Administrator
  • Full Mayhemer
  • *****
  • Offline Offline
  • Posts: 23,361
  • Location: Peterborough, UK
    • Model Boat Mayhem
Re: Delftship tutorial
« Reply #1 on: August 22, 2009, 09:09:07 am »

(The forum software doesn't like .pdf files....  use 'screen capure' and save as .JPG or .GIF (resize to 640x480 128Kb max) )
Logged
"This is my firm opinion, but what do I know?!" -  Visit the Mayhem FaceBook Groups!  &  Giant Models

longshanks

  • Full Mayhemer
  • *****
  • Offline Offline
  • Posts: 691
Re: Delftship tutorial
« Reply #2 on: August 22, 2009, 09:48:00 am »

Great idea  :-))
Logged

boatmadman

  • Full Mayhemer
  • *****
  • Offline Offline
  • Posts: 2,703
  • Location: South Cumbria
Re: Delftship tutorial
« Reply #3 on: August 22, 2009, 02:04:48 pm »

Ok then, after some thought I think a relatively simple hull to demonstrate how the program works is the best way, so, lets begin!
 
First off, download the free version from:  http://www.delftship.net/

To get started, click file:new and you will get the window below. Enter the dimensions you want to start with, in this case 6 points in longitudinal direction, 5 points in vertical direction,29.26m Length, 7.62m Beam and 2.13m Draft. (some of you may notice these are the dimensions in mts. of Perkasa). Make sure units selected are M, (or ft. if you want to work in old money).

At this point I want to point out that I think its easier to design at full size and when you are happy with the shape, scale down to the size you want to build at.
Logged
if at first you dont succeed.....have a beer.....

boatmadman

  • Full Mayhemer
  • *****
  • Offline Offline
  • Posts: 2,703
  • Location: South Cumbria
Re: Delftship tutorial
« Reply #4 on: August 22, 2009, 02:05:59 pm »

Now click OK and you will get this window.
Logged
if at first you dont succeed.....have a beer.....

boatmadman

  • Full Mayhemer
  • *****
  • Offline Offline
  • Posts: 2,703
  • Location: South Cumbria
Re: Delftship tutorial
« Reply #5 on: August 22, 2009, 02:07:36 pm »

Now we need to temporarily remove some of this information to make the screens easier to work with. Go to project: hydrostatics and you will get this:
Logged
if at first you dont succeed.....have a beer.....

boatmadman

  • Full Mayhemer
  • *****
  • Offline Offline
  • Posts: 2,703
  • Location: South Cumbria
Re: Delftship tutorial
« Reply #6 on: August 22, 2009, 02:09:26 pm »

In the ‘display hydrostatic features’ box, untick the tick boxes and then click ok, you should get this now:
Logged
if at first you dont succeed.....have a beer.....

boatmadman

  • Full Mayhemer
  • *****
  • Offline Offline
  • Posts: 2,703
  • Location: South Cumbria
Re: Delftship tutorial
« Reply #7 on: August 22, 2009, 02:11:46 pm »

For now, leave other selectable features in the boxes we have looked at in default values, they can be changed later if you want to.

Now is a good time to SAVE AS (filename).

In the perspective window (top left), click and hold left mouse button and move, you should see the image zoom in and out. Click and hold centre button and move will rotate the image, click and hold right button moves the image across the screen. Note, the left and right buttons work the same way in all windows, but the centre only works in perspective view.

Next, deselect the options shown with white arrows, and select the one shown with the red arrow. This will allow us to see an uncluttered view of what we have so far.


Logged
if at first you dont succeed.....have a beer.....

over_powered84

  • Guest
Re: Delftship tutorial
« Reply #8 on: August 22, 2009, 04:38:37 pm »

Ooooo This Looks FUN... Seriously I'm Gonna Have A Go With Some Plans I Have Kicking Around See If I Can Do Them With Sufficient Satisfaction >>:-(
Logged

gondolier88

  • Full Mayhemer
  • *****
  • Offline Offline
  • Posts: 1,347
  • www.coniston-regatta.co.uk
  • Location: Crake Valley, Cumbria
    • Coniston Regatta
Re: Delftship tutorial
« Reply #9 on: August 22, 2009, 10:39:41 pm »

Hi Overpowered,

Delftship is a lot of fun, but you need practice to get anywhere with it- it can be quite tedious for the first couple of designs, but well worth the effort- and your lucky enough to have a tutor too!!! :o

Keep up the good work Ian :-))

Here's my current Delft' project, a 30' x 6' fast steam launch design.

Greg
Logged
Don't get heated...get steamed up!

boatmadman

  • Full Mayhemer
  • *****
  • Offline Offline
  • Posts: 2,703
  • Location: South Cumbria
Re: Delftship tutorial
« Reply #10 on: August 22, 2009, 11:59:40 pm »

And you should have this:


Right click in the perspective window and select mode:shade to give you this:

We now have a basic hull, but without a transom !! That will come later.

There is a lot to do yet to get it to resemble an MTB hull, but bear with me.

Remember: SAVE, SAVE and SAVE  and do it frequently as you go along.


Now it’s time to start straightening a few lines out, let’s start with the keel. Click the button ‘show control net’ to get this:


Logged
if at first you dont succeed.....have a beer.....

boatmadman

  • Full Mayhemer
  • *****
  • Offline Offline
  • Posts: 2,703
  • Location: South Cumbria
Re: Delftship tutorial
« Reply #11 on: August 23, 2009, 12:10:38 am »

We want a flat keel from the transom to the curve of the bow, so, working in the plan view, (bottom right), left click on the furthest left control point (black dot) on the centreline. You will see this:


Now, press and hold the ctrl key and left click on the next four control points working to the right, you will get this:


No doubt you will have seen the little pop up box shown above. In the z coordinate enter the value 0.0 (zero) and you will get this:


Now, I think we should refine the shape of the deck a little, then we can refine the hull shape between deck and keel: Click the define control net off, then on again, this removes any previously selected point.

In the profile view, starting at the left edge (transom), select four points along the top edge and assign the value 3.8983 to the Y coordinates. Sometimes, for reasons I don’t know, with this operation the hull shape goes nuts, if so, go to ‘edit’ and undo last operation and re enter the value. You should now see this: (I have moved my perspective view a little, yours may be different in this window)


Logged
if at first you dont succeed.....have a beer.....

boatmadman

  • Full Mayhemer
  • *****
  • Offline Offline
  • Posts: 2,703
  • Location: South Cumbria
Re: Delftship tutorial
« Reply #12 on: August 23, 2009, 12:52:39 am »

I think now is a good time to look at the transom. Select the three control points shown:


And give them the value 3.8983 in the Y coordinates box. Now select the control point up from the keel, ensure no others are selected and assign it the value 0 (zero) in z coordinates. You should have this:


Next, select the points shown and move them to the same width as the transom:


Again, select the points shown below and move them to the keel line:


Logged
if at first you dont succeed.....have a beer.....

boatmadman

  • Full Mayhemer
  • *****
  • Offline Offline
  • Posts: 2,703
  • Location: South Cumbria
Re: Delftship tutorial
« Reply #13 on: August 23, 2009, 12:57:04 am »

I think we should define the turn of the bilge next. To do this right click on the perspective view and select mode: wireframe. Next click on the lines shown in yellow below, yours will be black but turn yellow when you click on them:


Now, go to edit, edge and click crease, you should get this, with the control net turned off:


Now we can see the bilge line running from the stern towards the bow, with the beginnings of the chine starting to show.

Next, I think we will close the transom using the extrude tool. Reselect the control net on, and click on the three lines shown:


Logged
if at first you dont succeed.....have a beer.....

boatmadman

  • Full Mayhemer
  • *****
  • Offline Offline
  • Posts: 2,703
  • Location: South Cumbria
Re: Delftship tutorial
« Reply #14 on: August 23, 2009, 01:05:52 am »

Go to edit, edge, extrude and in the transverse direction box enter-3.8983. This will close the transom back to the centreline:


With the control net off and the hull shaded, you should have something like this:


Ok, not much like a Perkasa type hull at the moment, that’s due to the program giving too much freeboard (I think!), so lets sort that out next.

Select the five points shown and give them a z value of 2.2194 to get:


Do the same with the next horizontal line up, assign the value 4.9732:


Select all the points shown below, then, go to transform, move and enter -1.7 in the vertical axis to give you this: (the bow will be sorted out later)


Repeat the last operation on the deck line, using the value -3.1. You should have this:


Lets make that bow look a bit better now.

 In the profile view, left click and hold on one of the control points that is out of line and drag it until the red line looks better. Repeat that for the other out of line points, then turn off the control net to see the actual bow line. You should have something similar to this:


 I think that’s enough for now. Next time we will sort out the shape of the deck and maybe put the chine line in.
Logged
if at first you dont succeed.....have a beer.....

nick_75au

  • Guest
Re: Delftship tutorial
« Reply #15 on: August 23, 2009, 04:44:55 am »

Excellent job, I've used this program on and off for a few years and never figured out the transom bit :-))

Thank You
Nick
Logged

boatmadman

  • Full Mayhemer
  • *****
  • Offline Offline
  • Posts: 2,703
  • Location: South Cumbria
Re: Delftship tutorial
« Reply #16 on: August 23, 2009, 04:49:36 am »

Lets have a look at the shape of the bows at deck level now. Getting the shape we want at deck level will make it easier to shape the rest of the bows later.

Select the control net on and have a look at the bow area. You will see only one control point between the bow and the sides that we previously worked on. This wont allow us to produce nice faired lines around the bow, so, we need to add more control points in this area.

Select the control lines shown:


And click edit, edge, split. You will have something like this:


Without changing anything else, now go to edit, edge, insert to create extra control edges:


Repeat the above for the section immediately aft of the bow to get:


Now I have just noticed that there is an edge missing where I have circled above, so, to put that right, select the two points shown:


And click edit, edge insert to create the line:


Logged
if at first you dont succeed.....have a beer.....

boatmadman

  • Full Mayhemer
  • *****
  • Offline Offline
  • Posts: 2,703
  • Location: South Cumbria
Re: Delftship tutorial
« Reply #17 on: August 23, 2009, 04:56:29 am »

To work on the bow shape, simply click and drag a control point until you get the desired shape.

This will require you to keep adjusting all the points until you get the shape you require.

 Work in the plan view window whilst doing this, you can see the shape change clearly as you work.

Below is a grab after moving just one point:


And here with a nice bow shape at the deck.


Now, boys and girls, I would like you to work on the remainder of the bow to make it look about right. Try and aim for something like this:


Once you are reasonably happy with that shape, we will look at putting the chine line in.

You will see below that I have split two control lines, the new points are in yellow:


Select the points shown in yellow:


And insert an edge as we did before.

 Now select the edges as shown in yellow, and click edit, edge, crease to get:


And we have a chine line, but you will see it needs adjusting. Do that simply by drag and drop control points.


To see a lines diagram of you model, select view, linesplan.


The deck line doesn’t look so nice now, so I think we will address that next.
Logged
if at first you dont succeed.....have a beer.....

boatmadman

  • Full Mayhemer
  • *****
  • Offline Offline
  • Posts: 2,703
  • Location: South Cumbria
Logged
if at first you dont succeed.....have a beer.....

boatmadman

  • Full Mayhemer
  • *****
  • Offline Offline
  • Posts: 2,703
  • Location: South Cumbria
Re: Delftship tutorial
« Reply #19 on: August 24, 2009, 02:55:49 am »

I know I said we would look at the deck line next, but I think the chine line needs more attention first.

I think it needs to be lowered at the bow, so here goes.

Select the two lines shown and uncrease them. To do this, after selecting the red lines, go to edit, line crease and they turn yellow and are no longer part of the chine:


Insert new points and connect them as before, then crease the new lines to give you:


Remove the two lines that are no longer part of the chine using edit, edge collapse. Then manipulate the new chine line until you are happy with it:


Now that has been improved, the deck doesn’t look as bad to me so I will leave it for now.

I do think though that the boat would look better if the beam narrowed slightly from midships towards the transom.


So, that’s a basic hull done, easy huh?

What I haven’t talked about yet is working with layers.

 When you start to build up components of the model, it’s a good idea to assign each component its own layer. This allows you to move and/or manipulate each component individually as well as give different colours to the components.

To demonstrate this I will put a deck on the boat using a new layer. Click the button layer properties, you will get:


Give layer 0 a name – hull is a good one for this! Then create a new empty layer using the new layer button, give it a name – deck, and choose a colour for it.

Select deck line and extrude by -4, same method as we used for the transom.


Logged
if at first you dont succeed.....have a beer.....

boatmadman

  • Full Mayhemer
  • *****
  • Offline Offline
  • Posts: 2,703
  • Location: South Cumbria
Re: Delftship tutorial
« Reply #20 on: August 24, 2009, 03:01:05 am »

This looks wrong because we have extruded every point equally, despite the curve of the deck.

To correct this, click the button – show both sides of the model –select the points you just extruded and give them a y value of zero, they will go to centreline, now show both sides of model again and you have this, or something like:


Now we have to think about fairing the hull. Fortunately with this model, the curves are reasonably good, but I will demo how to do it.

Unfortunately, with the free version, fairing has to be done manually, if you have paid for the full version, you get an auto fairing tool – nice!

Turn on the control net, select the deck edge:


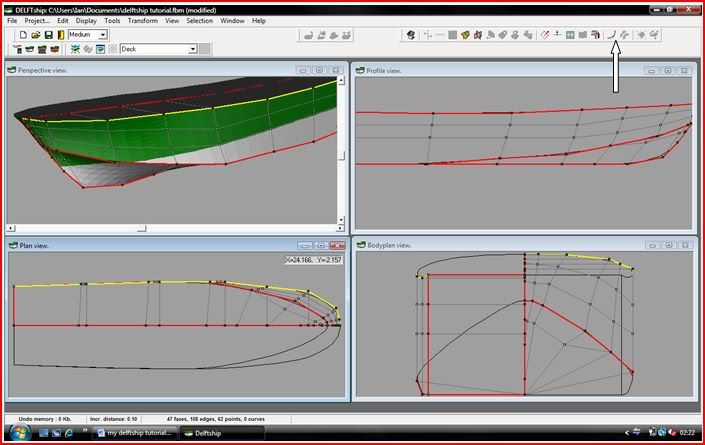
click the button arrowed above to get :


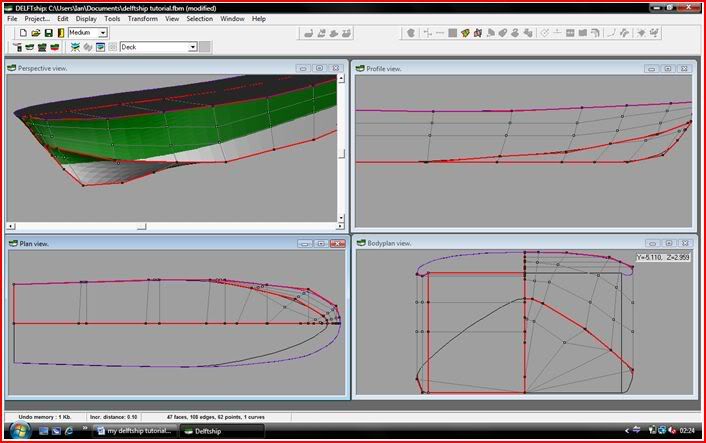
Turn off the control net and select the curvature button and you will get something like:


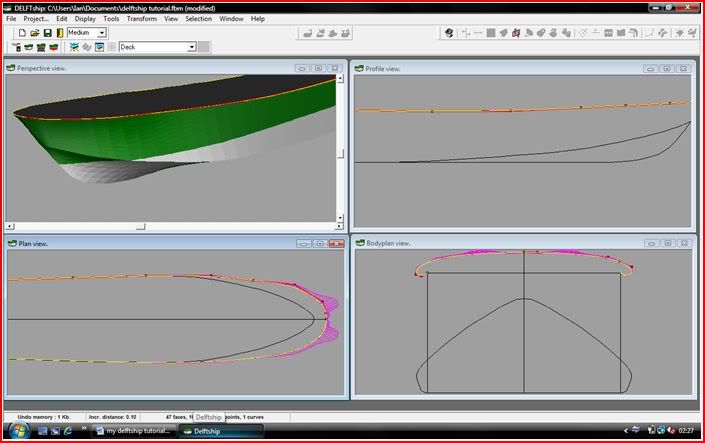
This shows that the curves I have are quite smooth, easiest seen in the plan view. Just to demo what you will see if you have a bad curve I will move a point on my plan view:


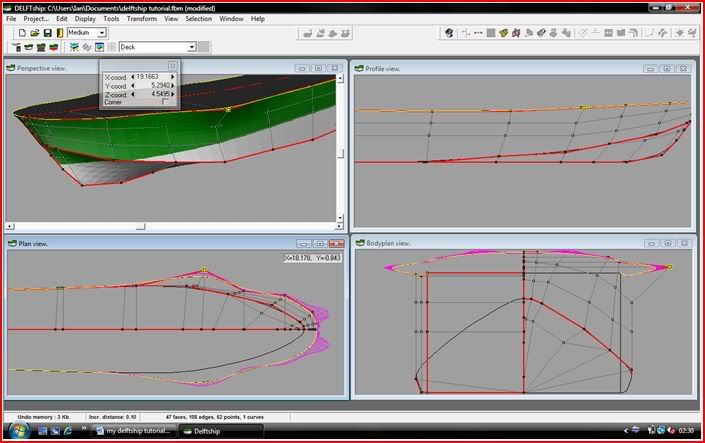
You can see that as the line changes curvature, the pink lines get larger or smaller depending on the curve. Before you try this, save your model, then have a play.

Of course, you need to fair the whole hull using this method, this is where it becomes time consuming and sometimes frustrating!

The best thing now is to experiment, practise really is the best way of learning this software.

I hope this has been helpful.

Ian
Logged
if at first you dont succeed.....have a beer.....

cos918

  • Full Mayhemer
  • *****
  • Offline Offline
  • Posts: 2,278
  • Location: Abingdon
Re: Delftship tutorial
« Reply #21 on: August 25, 2009, 04:27:39 pm »

Hi Ian Thank you very much for this tutorial it's most helpfully . I down loaded Delftship and had a play could not get it to work. I have work thought your step by step tutorial and I have ended up with a hull the same as yours.
A few question come to mind.
How did you come up with the values to put in X and Y
the hull you have done  has a far few lines/ curves in it but how would you go about a more complex hull like your Xbow or a life boat hull which has tunnels in it for the props. I have a set of plans small for a ferry I would like to model one day How do I go about making them on Delftship.

John
Logged

boatmadman

  • Full Mayhemer
  • *****
  • Offline Offline
  • Posts: 2,703
  • Location: South Cumbria
Re: Delftship tutorial
« Reply #22 on: August 25, 2009, 04:58:35 pm »

Glad the tutorial worked for you John.

The y values I used at the transome was the distance the point furthest away from centre was at the aft end, this moves the extruded aedge to the centreline and created the transom.

The z values used for lowering the deckline were arbitrary values just to make it look ok.

To add more control points, select the control net on, then in tools click subdivide control net. This will do as it says on the tin subdivies the net.

Alternatively, you can increase the control points in a particular area by selecting the lines in that area and splitting them. You then need to add an edge to join the new control points.

I showed how this is done at the bows in the tutorial.

You need to be cautious about how many more control points you add, as the more there are, the more difficult it becomes to get nice fair lines, unless you have the pro version of course.

As a rule of thumb, I keep control points to a minimum in areas where the hull is straight or nearly so, and add only at curves.

For your plans of a small ferry, have a look at the other tutorial I posted the link for, it tells you how to develop a model from an imported set of lines. I havent done this myself so cant comment on how easy/hard it is. I will try to have a go soon though.

With my xbow, I started off in exactly the same way and added more lines, control points as I needed them. Its a slow process but satisfying, especially when you start building a model you designed yourself. Time will tell how it behaves on the water though!

Ian
Logged
if at first you dont succeed.....have a beer.....

cos918

  • Full Mayhemer
  • *****
  • Offline Offline
  • Posts: 2,278
  • Location: Abingdon
Re: Delftship tutorial
« Reply #23 on: August 25, 2009, 10:33:05 pm »

Hi Ian just had a look at that other tutorial . I have put a plan as a back round in Delftship. The only thing is suddenly  there to many line so I am going to redraw the plan removing all but essential lines. I can now see were you got the values for X/Y/Z now. It look a very promising program.
When you do a line plan and in the head on view to the bow you can see all the frames . Was it these you printed out in the making of your X Bow.

John
Logged

boatmadman

  • Full Mayhemer
  • *****
  • Offline Offline
  • Posts: 2,703
  • Location: South Cumbria
Re: Delftship tutorial
« Reply #24 on: August 25, 2009, 10:38:51 pm »

John,
The view onto the bow gives you the lines from the bow to midships, the stern on view gives the lines from midships to stern.

I printed these out, then used a pantograph to enlarge to the size I want. Ok, I lost a little accuracy with the pantograph, but I didnt have access to a printer big enough for A3 paper and the local printshop has shut down >>:-(

Ian
Logged
if at first you dont succeed.....have a beer.....
Pages: [1] 2 3 4 5 6   Go Up
 

Page created in 0.096 seconds with 21 queries.